今天我們來聊,怎麼在不實際碰觸到線上資料庫的狀況下,去調整線上的資料
由於我們不想直接從外部連線資料庫,那麼就必須從內部用程式,對資料庫進行修改了。
這有很多實作方式,比方說,我們可以建立一個路由,每次被存取時就針對我們的資料庫進行修改。
不過,在 Laravel 裡面,有一個更簡單的做法,那就是利用 Laravel 的 Command 機制來進行操作。
我們來看看怎麼進行
首先,我們建立一個 Command,每次呼叫時都會建立一個使用者,並給予帳號密碼
php artisan make:command NewUserCommand
然後我們進到 app/Console/Commands/NewUserCommand.php 進行編輯
<?php

namespace App\Console\Commands;

use App\Models\User;
use Illuminate\Console\Command;
use Illuminate\Support\Facades\Hash;
use Illuminate\Support\Str;

class NewUserCommand extends Command
{
    /**
     * The name and signature of the console command.
     *
     * @var string
     */
    protected $signature = 'app:new-user-command';

    /**
     * The console command description.
     *
     * @var string
     */
    protected $description = 'Add New User';

    /**
     * Execute the console command.
     */
    public function handle()
    {
        $password = Str::random(10);
        $user = User::factory()->create([
            'password' => Hash::make($password)
        ]);
        $this->info('email: ' . $user->email);
        $this->info('password: ' . $password);
    }
}
建立並撰寫好之後,我們可以在本地透過指令進行測試
php artisan app:new-user-command
運作完後到本地資料庫,確認成功新增使用者,那麼我們的指令就完成了。
撰寫好 Command 之後,我們將程式碼更新到 GitHub repo 上,確認 Laravel Cloud 內有更新
然後我們點開「command」標籤

輸入 php artisan app:new-user-command 之後,點擊「Run Command」
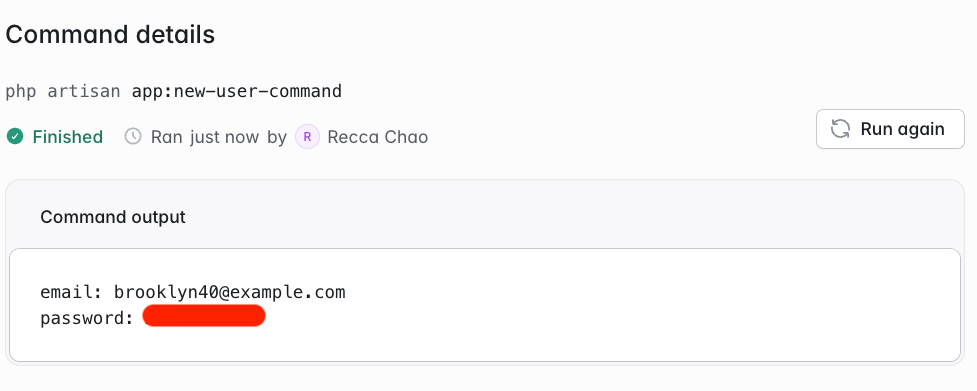
我們就可以透過指令建立使用者
並且可以在網頁畫面上看到用戶帳密,用來登入了!
今天的部分就到這邊,我們明天見!