在上一篇的內容中介紹了如何從 Catalog 找到想要的 CI/CD Components,也提到使用 Components 時可以透過 Partial semantic versions 更靈活的取得,在接下來將介紹,如何把自己的 CI/CD Components 發佈到 GitLab Catalog 以及一些注意事項。
首先回到已經發佈到 Catalog 的「Hello Component 2025」,我們同時對照發布在 Catalog 上的「Hello Component 2025」。可以發現有幾個特徵:
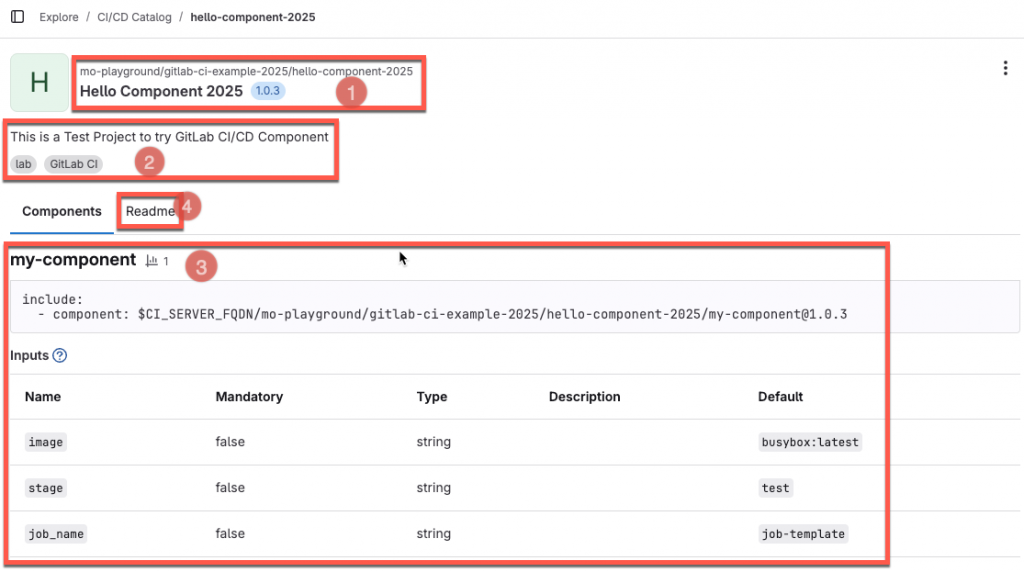
在專案發布之後,其使用的路徑即會標示這個 Component的來源及專案名稱,並且,隨著 Component 的版本演進,Catalog 頁面上,也會跟著更新目前該 Component 的最新版本。
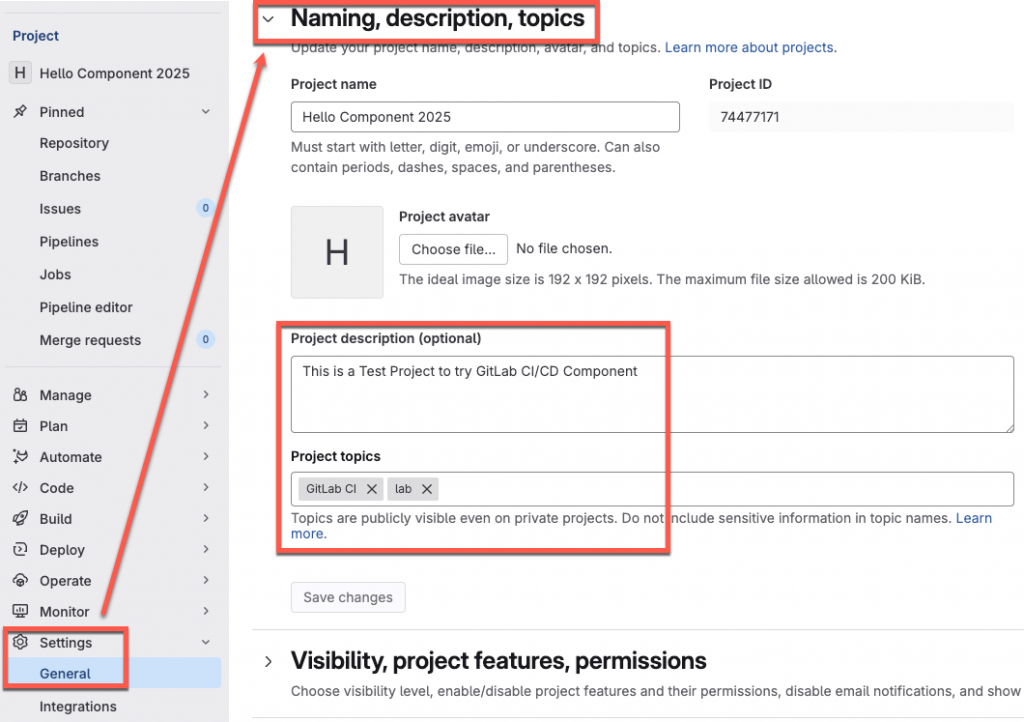
畫面上顯示「This is a Test Project to try GitLab CI/CD Component」這邊的專案描述(Project description),就是每個 GitLab Project 中的 Settings -> Naming, description, topics 這個區塊中的「Project description(optional)」的內容,而底下的 Tags 「lab, GitLab CI」,則是「Project topics」。
這邊需要特別注意 Project description 的填寫,是發布 Catalog 的必要項目,沒有填寫在做 Release 作業的時候,會發生權限不足的錯誤訊息「422 {message: Project must have a description}」。以這次在做實驗的過程中看到的錯誤訊息如下:
• Creating or updating release repo=mo-playground/gitlab-ci-example-2025/hello-component-2025 tag=v1.0.1
x release failed after 0.65 seconds. error=POST https://gitlab.com/api/v4/projects/mo-playground%2Fgitlab-ci-example-2025%2Fhello-component-2025/releases: 422 {message: Project must have a description}
如上面圖片標註 3 的部分,這邊的資訊,對應到「Hello Component 2025」專案中,也就是 README.md 中的 ## Components 底下的區段,其 component 的名稱以 Markdown 語法的 h3 ### 標注,如這次的 ### hello-component。
另外,從畫面上在如何使用 component 的這個小區塊,有一個小功能,可以發現,在 Catalog 的頁面上,引用的連結尾端,目前顯示版本號為 1.0.3,但在 README.md 的內容中,這部分是用 <tag> 標注。這個標注,會直接使用專案中 release 頁面中的版本。另外注意,在建立版本號時,使用的是如 1.0.3 而不是 v1.0.3 不用帶上 v。
到了 Inputs 的說明,這部分取用的是 templates 中對於元件的 spec:inputs 底下的內容,在 Catalog 的介面上以 Table 形式呈現。
Readme 的內容,取用的是專案中的 README.md 檔,會把 README.md 的內容完整的呈現在 Readme 裡。因此對於 README.md 文件的撰寫,在 GitLab 有一些撰寫上的建議:
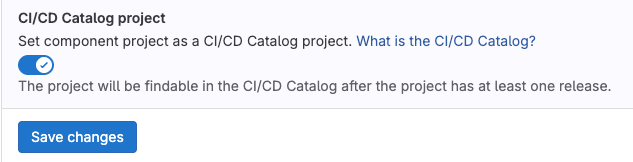
[[_TOC_]] 或 [TOC],這樣可以幫助使用者快速跳到特定的 Component 來查看詳細資訊。## Components 來開始撰寫關於每個 component 的描述,每個 component 以的開頭以 h3 標注,例如 ### Component A。spec:inputs:description 中存在內容,因為在 Catalog 的頁面上會自動呈現。## Contribute 區段。在發布元件的時候還要注意,必須到 General -> Visibility, project features, permissions 中的 「CI/CD Catalog project」 把選項打開,而後儲存設定,接下來進行的 release 動作,才能真正把專案正式發佈到 Catalog 平台中。
接下來,需要搭配 GitLab CI/CD YAML 撰寫 release 程序,來正式發佈 Component 到 GitLab Catalog 平台中,這邊參考 GitLab 手冊中的 Job:
create-release:
  stage: release
  image: registry.gitlab.com/gitlab-org/cli:latest
  rules:
    - if: $CI_COMMIT_TAG
  script: echo "Creating release $CI_COMMIT_TAG"
  release:
    tag_name: $CI_COMMIT_TAG
    description: "Release $CI_COMMIT_TAG of components repository $CI_PROJECT_PATH"
在 Job 描述中,使用 CI/CD YAML 的 release進行,其主要是會利用 glab 這個 CLI 工具進行作業,這邊搭配 registry.gitlab.com/gitlab-org/cli:latest 這個 image來完成,在宣告為 Catalog Project 的專案中,其 Release 程序會自動將其發佈到 Catalog 平台。
今天描述了如何將 Catalog 專案正式發佈到 Catalog 平台的幾個關鍵要點,關於 Catalog 的使用及發布也在這幾天的內容中初步說明完畢,GitLab Components 是一個很好用且重要的功能,透過 Catalog 可以讓更多人更方便的體驗到他的好。我是墨嗓(陳佑竹),期待這次的內容能帶給你實用的啟發與幫助。