🎯 系列目標:用 30 天時間,從零開始打造一個專屬輔大學生的課表生成 Chrome 擴充功能
👨💻 作者:輔大智慧資安 412580084
📅 Day 8:Chrome Extension 理論篇 - 消息傳遞機制與 Popup 介面
昨天我們建立了最基本的 background.js 架構,今天我們要學習 Chrome Extension 的核心概念:消息傳遞機制,並建立使用者介面 popup.html。
今天我們要完成:
Chrome Extension 由多個獨立的腳本組成:
這些腳本運行在不同的環境中,無法直接互相呼叫函數,因此需要透過消息傳遞來溝通。
想像一下,這就像是不同部門之間的溝通:
// 發送消息(像是發送郵件)
chrome.runtime.sendMessage({
  action: 'getSchedule',  // 要做什麼事
  data: { studentId: '123456' }  // 需要的資料
}, (response) => {
  console.log('收到回應:', response);
});

// 接收消息(像是收到郵件並回覆)
chrome.runtime.onMessage.addListener((request, sender, sendResponse) => {
  if (request.action === 'getSchedule') {
    // 處理請求,然後回覆
    sendResponse({ success: true, schedule: '課表資料' });
  }
});
Popup 是當用戶點擊擴充功能圖示時出現的小視窗。對於我們的輔大課表生成器來說,這是用戶的主要操作介面。
讓我們建立一個簡單但實用的 popup.html:
<!DOCTYPE html>
<html>
<head>
  <meta charset="UTF-8">
  <style>
    body {
      width: 300px;
      padding: 15px;
      font-family: Arial, sans-serif;
    }

    .header {
      text-align: center;
      margin-bottom: 20px;
    }

    .header h2 {
      color: #1976d2;
      margin: 0;
    }

    .button {
      width: 100%;
      padding: 12px;
      margin: 8px 0;
      background-color: #1976d2;
      color: white;
      border: none;
      border-radius: 4px;
      cursor: pointer;
      font-size: 14px;
    }

    .button:hover {
      background-color: #1565c0;
    }

    .status {
      margin-top: 15px;
      padding: 10px;
      border-radius: 4px;
      text-align: center;
      font-size: 12px;
    }

    .status.success {
      background-color: #e8f5e8;
      color: #2e7d32;
    }

    .status.error {
      background-color: #ffebee;
      color: #c62828;
    }
  </style>
</head>
<body>
  <div class="header">
    <h2>🎓 輔大課表生成器</h2>
    <p>一鍵產生當學期課表</p>
  </div>

  <button id="generateButton" class="button">
    📊 開始生成課表
  </button>

  <button id="settingsButton" class="button">
    ⚙️ 設定
  </button>

  <div id="status" class="status" style="display: none;">
    準備中...
  </div>

  <script src="popup.js"></script>
</body>
</html>
確保 manifest.json 包含 popup 設定:
{
  "manifest_version": 3,
  "name": "輔大課表生成器",
  "version": "1.0.0",
  "description": "輔大課表生成器,一鍵產生當學期課表",
  "permissions": [
    "activeTab",
    "scripting",
    "storage",
    "downloads"
  ],
  "host_permissions": [
    "https://portal.fju.edu.tw/*",
    "http://estu.fju.edu.tw/*"
  ],
  "background": {
    "service_worker": "background.js"
  },
  "action": {
    "default_popup": "popup.html"
  }
}
使用 day5 所學的更新插件方法後,再點擊插件圖標可以看到以下彈窗效果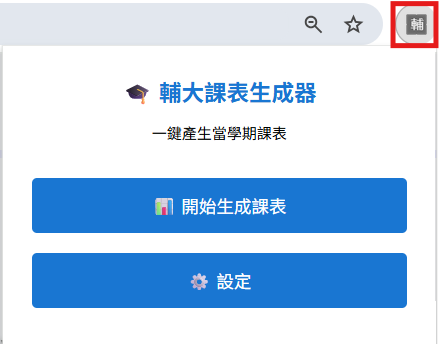
flowchart TD
    A[用戶點擊 popup 中的按鈕] --> B[popup.js 發送消息給 background.js]
    B --> C[background.js 處理請求並回應]
    C --> D[popup.js 更新介面顯示結果]
完成後,目前專案結構應該是:
📁 fju-schedule-extension/
├── 📄 manifest.json     ← 包含 popup 設定
├── 📄 background.js     ← 背景腳本(昨天建立)
├── 📄 popup.html        ← 使用者介面(今天建立)
└── 📄 popup.js          ← 彈出視窗邏輯(明天實作)
🔗 知識銜接:今天我們學習了理論基礎並建立了使用者介面,明天將實作 popup.js,讓按鈕真正能夠工作!
🎯 下集預告:Day 9 - Chrome Extension 實作篇 - Popup Script 基礎架構
 alan_1024
