前面寫了這麼多篇文章,都沒提到關於樣式的設定。
今天我們終於要進入樣式了,Web Component 的樣式其實是我在學習過程中時常卡關的部分。
因為樣式隔離的關係,外部 CSS 沒辦法直接改變 Shadow DOM 裡面元素的 style,這也可以說是 Web Component 一直的一個缺點吧。
在 套用樣式 的過程中,可能會體會到 Shadow DOM 的雙面刃。
Shadow DOM 在某些情境下是好事,因為保證元件樣式不會被外部影響,但在另一面卻可能造成麻煩。
當你的網站有主題顏色(theme colors)或是想統一字型、按鈕樣式時,是無法直接在外部修改的,所以我們會需要用到其他方法,讓外部套用者可以修改在 Shadow DOM 內元件的樣式。
我們先建立一個簡單的 Shadow DOM 元件,試試看在外部覆蓋元件的樣式:
card.js
class UNCard extends HTMLElement {
  constructor() {
    super();
    this.attachShadow({ mode: 'open' });
    this.shadowRoot.innerHTML = `
      <style>
        .card {
          width: 100px;
          height: 20px;
          padding: 12px;
          border: 2px solid #888888;
          border-radius: 8px;
          font-size: 14px;
          font-weight: 600;
        }
      </style>

      <div class='card'>請幫我加入樣式</div>
    `;
  }
}

customElements.define('un-card', UNCard);
index.html
<style>
  un-card .card {
    background-color: #222222;
  }
</style>
<body>
  <un-card></un-card>
</body>
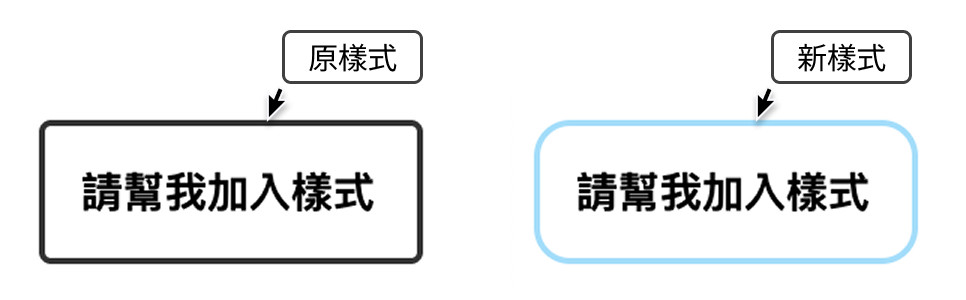
當外部針對卡片元件改變背景樣式時,會發現元件的背景色並未改變。
在前面的文章,其實已經可以透過學到的 attribute 或是 property 來改變元件的樣式。
像是在前面的示範中,我們透過監聽 color 的 attribute 來改變 cat-spinner 中貓咪的顏色。
而今天我們會使用 css 來控制元件樣式,以下有三種方式,可以讓外部改變 Shadow DOM 中的元件樣式。
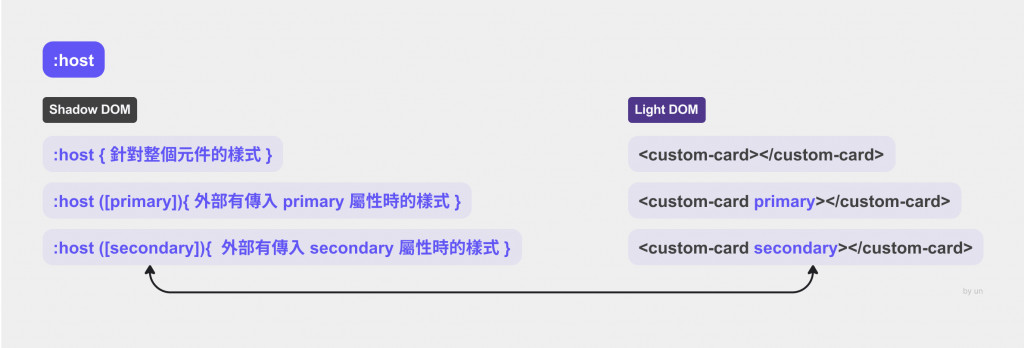
透過在 Web Component 的樣式中定義 :host 來給予基本元件的樣式。
並且可以再針對特定樣式給予特定 host,像是 :host([primary]),這樣子,外部就可以在標籤上面加入我們已經定義好的一些樣式。
這種做法比較像是元件已經寫好了幾種樣式讓使用者切換,可能是主題色像是 primary、secondary...。
card.js
class UNCard extends HTMLElement {
  constructor() {
    super();
    this.attachShadow({ mode: 'open' });
    this.shadowRoot.innerHTML = `
      <style>
        :host {
          display: block;
          width: 100px;
          height: 20px;
          padding: 12px;
          border: 2px solid #888888;
          border-radius: 8px;
          font-size: 14px;
          font-weight: 600;
        }

        :host([primary]) {
          border-color: #ad43d3;
        }

        :host([rounded-xl]) {
          border-radius: 20px;
        }
      </style>

      <div class='card'>請幫我加入樣式</div>
    `;
  }
}

customElements.define('un-card', UNCard);
index.html
<body style="display: flex; gap: 8px">
  <un-card></un-card>
  <un-card primary></un-card>
  <un-card primary rounded-xl></un-card>
</body>

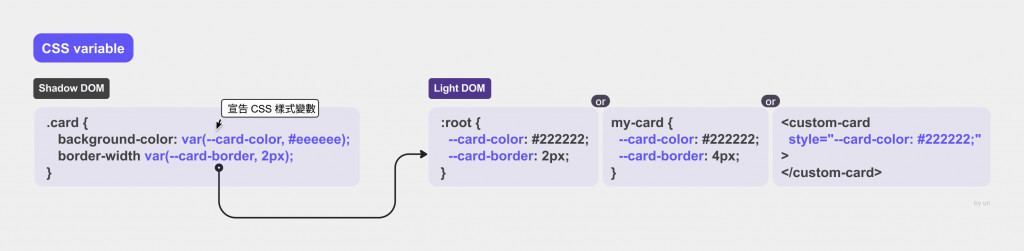
CSS 變數可以突破 Shadow DOM 的隔離限制,外部 CSS 不能直接進 Shadow DOM 修改樣式,但是 CSS 變數卻可以穿透 Shadow DOM ,讓外部來控制內部樣式。
外部可以更靈活的替換 Shadow DOM 元件內的樣式,若有主題色的話也可以更快速的更換。
card.js
class UNCard extends HTMLElement {
  constructor() {
    super();
    this.attachShadow({ mode: 'open' });
    this.shadowRoot.innerHTML = `
      <style>
        :host {
          display: block;
          width: 100px;
          height: 20px;
          padding: 12px;
          border: 2px solid var(--card-border-color, #333333);
          border-radius: var(--card-radius, 8px);
          color: var(--card-text-color, #888888);
          font-size: 14px;
          font-weight: 600;
        }
      </style>

      <div class='card'>請幫我加入樣式</div>
    `;
  }
}

customElements.define('un-card', UNCard);
index.html
<style>
  un-card {
    --card-border-color: #a3ddfa;
    --card-radius: 8px;
    --card-text-color: #dffabc;
  }
</style>

<body style="display: flex; gap: 8px">
  <un-card></un-card>
</body>
part 跟前面所說到的 host 其實蠻相似的,但是 part 讓使用者可以彈性調整樣式的幅度比 host 還要更大。
有標記 part 的元素,定義外部可以修改哪些元素的樣式,哪些不行,以達到有限度的開放。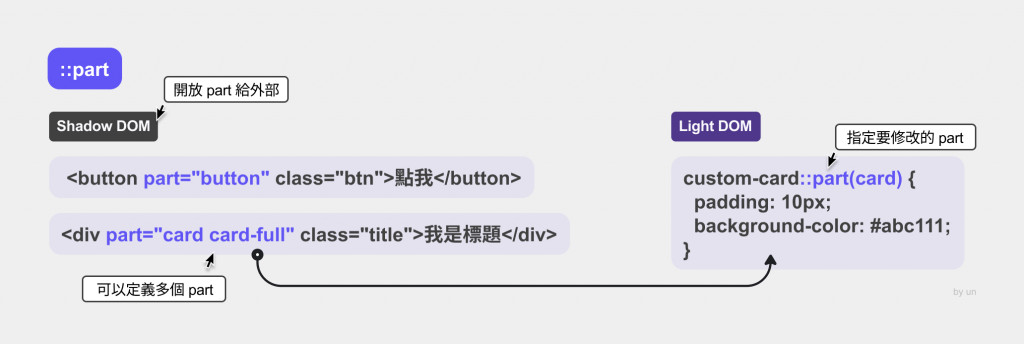
card.js
class UNCard extends HTMLElement {
constructor() {
super();
this.attachShadow({ mode: 'open' });
this.shadowRoot.innerHTML = `
<style>
.card {
padding: 8px;
border: 1px solid #33e4fd;
}
</style>
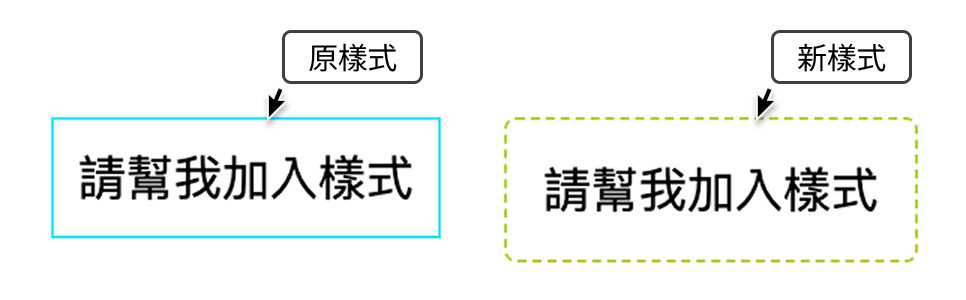
<div part="card" class="card">請幫我加入樣式</div>
`;
}
}
customElements.define('un-card', UNCard);
index.html
<style>
  un-card::part(card) {
    border: 1px dashed #aad332;
    padding: 12px;
    border-radius: 4px;
  }
</style>

<body style="display: flex; gap: 8px">
  <un-card></un-card>
</body>
以上三種方法,就是可以改變 Web Component 樣式的方法。
而要如何使用,就看設計元件的你,想要讓外部使用者有多大的彈性囉!

