在前七天的文章裡,我們已經完成了專案的環境管理、專案設定、依賴策略與目錄結構。
這些都是「讓專案能動」的基礎,但要真正發揮團隊開發的價值,還需要一個關鍵拼圖:統一的工作流。
想像一下,如果你今天加入一個新團隊,負責維護一個 Python 專案,README 上寫著:
pytest
black .
mypy src/
ruff check .
這些指令看似不難,但每個人執行的方式可能不同,有人漏跑 lint,有人格式化忘記加 --check,CI 跑的流程又跟本地端不一致。久而久之,專案就會陷入「人多口雜」的困境。
今天我們要介紹兩個利器:Hatch scripts 與 Nox,讓專案工作流一鍵化,從此只需要記住一個指令,就能完成所有檢查與測試。
傳統問題
pytest -q
black .
mypy src/
ruff check .
每個人都要記住這些指令,而且常常忘記參數,或是 CI/CD pipeline 跑的流程和本地不同。
一鍵化的好處
Hatch 提供了一個 scripts 機制,可以在 pyproject.toml 定義常用指令,類似於 Node.js 的 npm run。
範例設定:
[tool.hatch.envs.default.scripts]
test = "pytest -q"
lint = "ruff check ."
format = "black ."
typecheck = "mypy src/"
使用方式:
hatch run test
hatch run lint
hatch run format
hatch run typecheck
這樣所有開發者都能用相同入口來執行測試與檢查,不需要再背一堆指令。
Hatch scripts 還能定義「多步驟工作流」,把多個命令組合起來:
[tool.hatch.envs.default.scripts]
check-all = [
  "ruff check .",
  "black --check .",
  "mypy src/",
  "pytest -q"
]
一鍵執行:
hatch run check-all
👉 這樣就像 npm run lint 或 make all,讓專案維護更加簡單。
光有 Hatch scripts 還不夠,因為它只能跑單一環境下的流程。
如果你要驗證 不同 Python 版本、不同依賴組合,這時候就需要 Nox。
Nox 是 Python 世界的 task runner(有點像 tox 的現代替代方案),能幫你定義跨環境工作流。
在專案根目錄新增 noxfile.py:
import nox

@nox.session(python=["3.10", "3.11", "3.12"])
def tests(session):
    session.install(".[dev]")
    session.run("pytest", "-q")

@nox.session
def lint(session):
    session.install("ruff", "black")
    session.run("ruff", "check", ".")
    session.run("black", "--check", ".")
執行:
nox
nox -s lint
nox -s tests-3.11
👉 這對於 跨版本測試(例如:確保專案同時支援 Python 3.10/3.11/3.12)特別重要。
我們可以把 Nox 也整合進 Hatch scripts,形成單一入口。
pyproject.toml:
[tool.hatch.envs.default.scripts]
ci = "nox"
使用:
hatch run ci
hatch run ci,就會同時完成 lint、格式化檢查、型別檢查、測試。前面談論了很多,我們把實際的Demo來看一下,這個範例toml檔和會是如下:
[build-system]
requires = ["hatchling"]
build-backend = "hatchling.build"

[project]
name = "demo_app"
dynamic = ["version"]
description = ""
readme = "README.md"
requires-python = ">=3.11,<3.13"
license = "MIT"
keywords = []
authors = [{ name = "clarke", email = "@gmail.com" }]
classifiers = [
  "Development Status :: 4 - Beta",
  "Programming Language :: Python",
  "Programming Language :: Python :: 3.11",
  "Programming Language :: Python :: 3.12",
  "Programming Language :: Python :: Implementation :: CPython",
  "Programming Language :: Python :: Implementation :: PyPy",
]
dependencies = [
  "requests>=2.32,<3",
  "numpy~=1.26",
]

[project.scripts]
demo-app = "demo_app.main:main"

[project.optional-dependencies]
dev = [
  "pytest>=8.3,<9",
  "ruff==0.6.*",
  "mypy~=1.11",
  "nox>=2024.4.15",  # Day 8:任務自動化/多版本測試
]
docs = [
  "mkdocs",
  "mkdocs-material",
]

[project.urls]
Documentation = "https://github.com/clarke/demo-app#readme"
Issues = "https://github.com/clarke/demo-app/issues"
Source = "https://github.com/clarke/demo-app"

# 動態版本來源
[tool.hatch.version]
path = "src/demo_app/__about__.py"

# 打包路徑
[tool.hatch.build.targets.wheel]
packages = ["src/demo_app"]

# 預設環境:使用 uv + 開啟 dev extras
[tool.hatch.envs.default]
features = ["dev"]

[tool.hatch.envs.default.env-vars]
PYTHONPATH = "src"

# Day 8:集中入口的一鍵工作流(不引入 Day 9 的 Black)
[tool.hatch.envs.default.scripts]
start = "python -m demo_app.main"
test = "pytest -q"
lint = "ruff check ."
format = "ruff format ."
typecheck = "mypy src/"

# 一鍵總檢(lint → 格式檢查 → 型別 → 測試)
check-all = [
  "ruff check .",
  "ruff format --check .",
  "mypy src/",
  "pytest -q",
]

# CI 入口:交給 nox(內含多 Python 版本/任務自動化)
ci = "nox"

# 文件環境(如需)
[tool.hatch.envs.docs]
features = ["docs"]

# 額外實驗環境(僅 Hatch 內使用)
[tool.hatch.envs.experiment]
extra-dependencies = ["rich", "httpx"]
向下,我們只有一個主程式main.py和一個測試程式test_main.py,內容就不多贅述,只是一個印出”Hello World”的程式。
- ./
      - pyproject.toml
      - noxfile.py
      - README.md
      - LICENSE.txt
      - uv.lock
      - src/
          - demo_app/
              - init.py
              - about.py
              - main.py
      - tests/
          - init.py
          - test_main.py
先使用Hatch來執行所有檢測流程,執行範例如下:
hatch run check-all

透過Hatch & NOX整合執行:
hatch run ci
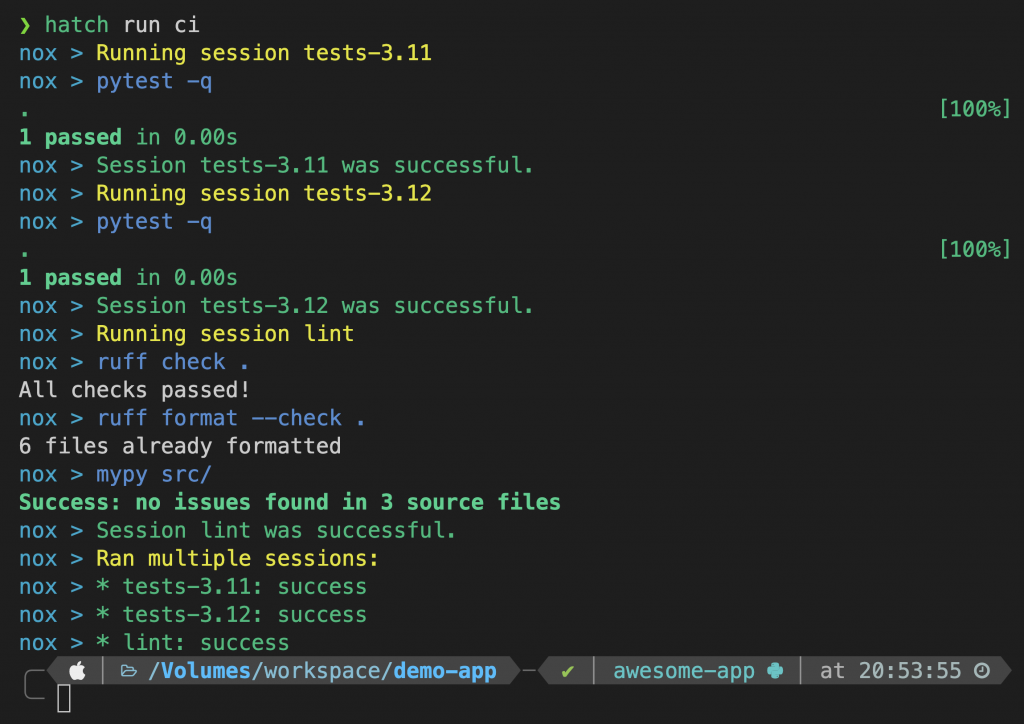
在前七天的鋪陳之後,今天我們把所有的工具鏈串了起來:
從此以後,不管是團隊新成員還是 CI/CD pipeline,只需要一個指令:
hatch run ci
就能保證整個專案的工作流完整執行,避免「人在寫程式、心在 debug pipeline」的困境 🚀。
了解這些有工具的應用之後,明天 Day 9 我們將討論團隊開發相關的規範,風格統一:Black + Ruff + isort + pre-commit
github - https://github.com/shothead6062/py-30days-workshop


 iThome鐵人賽