在 Part 1 中,我們介紹了 Kubernetes (K8s) 的兩種帳號類型,並深入探討了主要用於 Pod 內部流程自動化的 ServiceAccount。
這篇文章將聚焦於另一種帳號類型:Normal User Account,也就是專門為「人類」使用者(如開發者、維運人員)設計的帳號。
雖然 ServiceAccount 也可以透過 kubeconfig 給人類使用者使用,但它並非為此設計。在企業環境中,我們通常希望能夠:
K8s 本身不直接管理 Normal User,而是透過整合外部身份提供者 (Identity Provider, IdP) 來實現認證。本篇將介紹兩種最常見的 Normal User 認證方式。
這是 K8s 最基礎的認證方式,也是您透過 kubeadm 或 k3s 建立叢集時,預設產生的 kubeconfig 所使用的方式。
它的原理是為每一位使用者產生一對獨一無二的 TLS 私鑰和憑證,並由 K8s 叢集的 CA (憑證授權中心) 簽署。API Server 會驗證客戶端提交的憑證是否由受信任的 CA 簽發,並從憑證的 Subject 欄位中提取使用者名稱 (CN) 和所屬群組 (O)。
雖然這種方式安全可靠,但管理起來非常繁瑣,因為您需要為每一位使用者手動產生、簽署、分發和撤銷憑證。
jane 建立 kubeconfig以下是為一位名叫 jane、隸屬於 developers 群組的使用者,手動建立一個僅能讀取 default namespace 下 Pod 權限的 kubeconfig 的完整流程。
# 為 jane 產生一個 2048 位元的 RSA 私鑰
openssl genrsa -out jane.key 2048

# 建立一個 CSR (Certificate Signing Request)
# CN=jane 代表使用者名稱是 "jane"
# O=developers 代表她屬於 "developers" 群組
openssl req -new -key jane.key -out jane.csr -subj "/CN=jane/O=developers"
# 將 CSR 檔案內容進行 Base64 編碼
CSR_BASE64=$(cat jane.csr | base64 -w 0)

# 建立一個 CertificateSigningRequest 物件的 YAML 檔
cat <<EOF > csr.yaml
apiVersion: certificates.k8s.io/v1
kind: CertificateSigningRequest
metadata:
  name: jane-csr
spec:
  request: ${CSR_BASE64}
  signerName: kubernetes.io/kube-apiserver-client
  usages:
  - client auth
EOF

# 將 CSR 提交給 K8s
kubectl apply -f csr.yaml

# 由叢集管理員批准這個 CSR
kubectl certificate approve jane-csr

# 下載簽署好的憑證
kubectl get csr jane-csr -o jsonpath='{.status.certificate}' | base64 --decode > jane.crt
# 建立一個 RoleBinding,將使用者 'jane' 和預先定義好的 'pod-reader' Role 綁定
cat <<EOF > jane-rolebinding.yaml
apiVersion: rbac.authorization.k8s.io/v1
kind: RoleBinding
metadata:
  name: read-pods-jane
  namespace: default
subjects:
- kind: User
  name: jane  # 這就是 CSR 中 CN 的值
  apiGroup: rbac.authorization.k8s.io
roleRef:
  kind: Role
  name: pod-reader # 假設這個 Role 已經存在
  apiGroup: rbac.authorization.k8s.io
EOF

kubectl apply -f jane-rolebinding.yaml
# 這個腳本會讀取當前的叢集資訊,並結合 jane 的憑證,產生一個新的 kubeconfig 檔案
KUBECONFIG_FILE="kubeconfig-jane.yaml"
CLUSTER_NAME=$(kubectl config view --minify -o jsonpath='{.clusters[0].name}')
SERVER=$(kubectl config view --minify -o jsonpath='{.clusters[0].cluster.server}')
CA_DATA=$(kubectl config view --raw --minify -o jsonpath='{.clusters[0].cluster.certificate-authority-data}')

# 設定叢集資訊
kubectl config set-cluster ${CLUSTER_NAME} \
  --server=${SERVER} \
  --certificate-authority-data=${CA_DATA} \
  --embed-certs=true \
  --kubeconfig=${KUBECONFIG_FILE}

# 設定使用者憑證
kubectl config set-credentials jane \
  --client-key=jane.key \
  --client-certificate=jane.crt \
  --embed-certs=true \
  --kubeconfig=${KUBECONFIG_FILE}

# 設定 Context
kubectl config set-context jane-context \
  --cluster=${CLUSTER_NAME} \
  --user=jane \
  --namespace=default \
  --kubeconfig=${KUBECONFIG_FILE}

# 設定預設 Context
kubectl config use-context jane-context --kubeconfig=${KUBECONFIG_FILE}

echo "✅ Kubeconfig file '${KUBECONFIG_FILE}' created successfully."

# --- 測試新的 kubeconfig ---
echo "Testing the new kubeconfig..."
kubectl --kubeconfig=${KUBECONFIG_FILE} get pods # 應該成功
kubectl --kubeconfig=${KUBECONFIG_FILE} get nodes # 應該失敗 (權限不足)
手動管理憑證顯然不適合大型團隊。在企業環境中,OpenID Connect (OIDC) 是整合外部身份驗證的推薦方式。
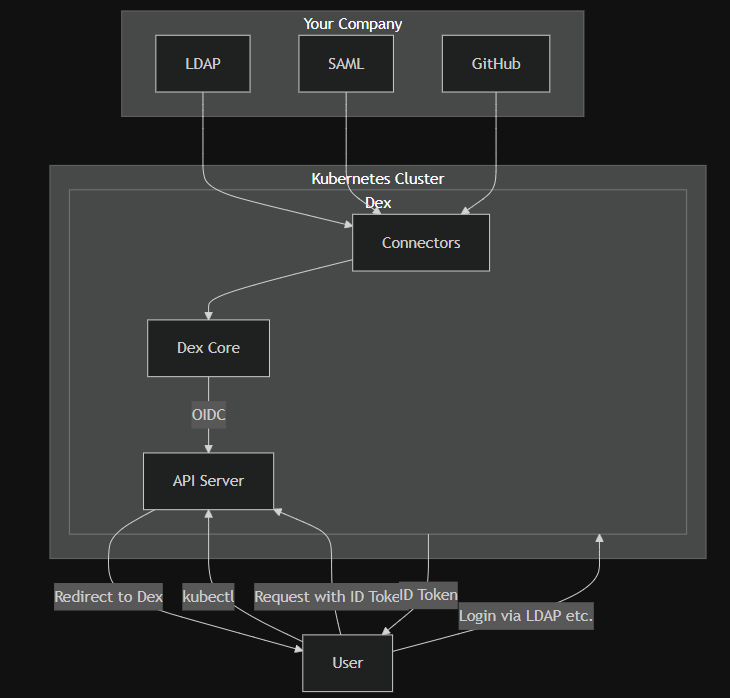
OIDC 是一個基於 OAuth 2.0 的身份驗證協定。K8s API Server 可以配置為信任一個外部的 OIDC IdP (Identity Provider),例如 Google, Okta, Keycloak, 或 GitLab。
kubectl 存取叢集。kubectl 將使用者導向到 OIDC IdP (例如 Google 登入頁面) 進行登入。ID Token 給使用者。kubectl 將這個 ID Token 包含在請求中,發送給 K8s API Server。ID Token 的有效性。ID Token 中提取使用者資訊(如 Email 和群組),並根據 RBAC 規則進行授權。K8s API Server 只支援 OIDC 協定。如果您的公司使用的是 LDAP、SAML 或其他非 OIDC 的認證系統,該怎麼辦?
這時就需要一個中間人,而 Dex 就是最受歡迎的選擇。Dex 是一個開源的身份服務,它可以作為一個橋樑,連接各種後端使用者系統 (稱為 Connectors),並將它們統一以 OIDC 的形式暴露給 K8s。
參考文章 https://geek-cookbook.funkypenguin.co.nz/kubernetes/oidc-authentication/k3s-keycloak/
我這邊設定 github oauth + dex
參考 https://docs.k3s.io/installation/configuration#configuration-file
設定 api server 存取 OIDC
vi /etc/rancher/k3s/config.yaml
kube-apiserver-arg:
- "oidc-issuer-url=<oidc-issuer-url>"
- "oidc-client-id=<oidc-client-id>"
- "oidc-username-claim=email"
- "oidc-groups-claim=groups"
then restart k3s server
restart k3s server
sudo systemctl restart k3s
安裝驗證工具
mise use -g krew kubelogin
export PATH="${KREW_ROOT:-$HOME/.krew}/bin:$PATH"
執行 OIDC 驗證
kubectl oidc-login setup \
  --oidc-issuer-url=<oidc-issuer-url> \
  --oidc-client-id=<oidc-client-id> \
  --oidc-extra-scope=email,openid,groups,profile,offline_access \
  --oidc-client-secret=<oidc-client-secret>
Authentication in progress...
error: could not open the browser: exec: "xdg-open,x-www-browser,www-browser": executable file not found in $PATH

Please visit the following URL in your browser manually: http://localhost:8000/
當驗證成功後
會看到 OIDC 提供的資訊, 以及 command for setup kubeconfig
## Authenticated with the OpenID Connect Provider

You got the token with the following claims:


{
  "iss": "https://xxx",
  "sub": "xxx",
  "aud": "k3s-oidc-owanio1992-cloudns-nz",
  "exp": 1759057994,
  "iat": 1758971594,
  "nonce": "dpm-wofsd-BPGNwqv7ZE-UKgbaeab2mEEMCBK5GwLKg",
  "at_hash": "cNF083gbIONxp2Lkuca0cQ",
  "c_hash": "AJcIrCuV6hKMDY4rlIQ7-A",
  "email": "owan.io1992@gmail.com",
  "email_verified": true,
  "groups": [
    "owan-io1992:test"
  ],
  "name": "owan",
  "preferred_username": "owanio1992"
}


## Set up the kubeconfig

You can run the following command to set up the kubeconfig:


kubectl config set-credentials oidc \
  --exec-api-version=client.authentication.k8s.io/v1 \
  --exec-interactive-mode=Never \
  --exec-command=kubectl \
  --exec-arg=oidc-login \
  --exec-arg=get-token \
  --exec-arg="--oidc-issuer-url=https://xxx" \
  --exec-arg="--oidc-client-id=xxx" \
  --exec-arg="--oidc-client-secret=xxx" \
  --exec-arg="--oidc-extra-scope=email" \
  --exec-arg="--oidc-extra-scope=openid" \
  --exec-arg="--oidc-extra-scope=groups" \
  --exec-arg="--oidc-extra-scope=profile" \
  --exec-arg="--oidc-extra-scope=offline_access"
測試存取,因為還沒有給 RBAC, 失敗會是正常的, 但是能看到 user 為 "owan.io1992@gmail.com"
$ kubectl --user=oidc cluster-info

To further debug and diagnose cluster problems, use 'kubectl cluster-info dump'.
Error from server (Forbidden): services is forbidden: User "owan.io1992@gmail.com" cannot list resource "services" in API group "" in the namespace "kube-system"

$ kubectl whoami --user=oidc
owan.io1992@gmail.com
設定 RBAC
kind: ClusterRoleBinding
apiVersion: rbac.authorization.k8s.io/v1
metadata:
  name: oidc-group-admin-kube-apiserver
roleRef:
  apiGroup: rbac.authorization.k8s.io
  kind: ClusterRole
  name: cluster-admin
subjects:
- kind: Group
  name: oidc:admin-kube-apiserver
apply 後
就可能存取 cluster 了
最後設定 config default user 為 oidc
kubectl config set-context --current --user=oidc
| 特性 | X.509 憑證 | OpenID Connect (OIDC) |
|---|---|---|
| 管理方式 | 手動,分散式 | 集中式,自動化 |
| 適用場景 | 小型團隊、測試環境、自動化腳本 | 中大型企業、需要 SSO 的場景 |
| 優點 | 概念簡單、無需額外服務 | SSO、集中管理、易於擴展、支援多種 IdP |
| 缺點 | 管理複雜、難以擴展、憑證撤銷困難 | 需要額外部署和維護 IdP (如 Dex) |
對於任何正式的生產環境或多人協作的場景,強烈建議投入時間設定 OIDC 整合。