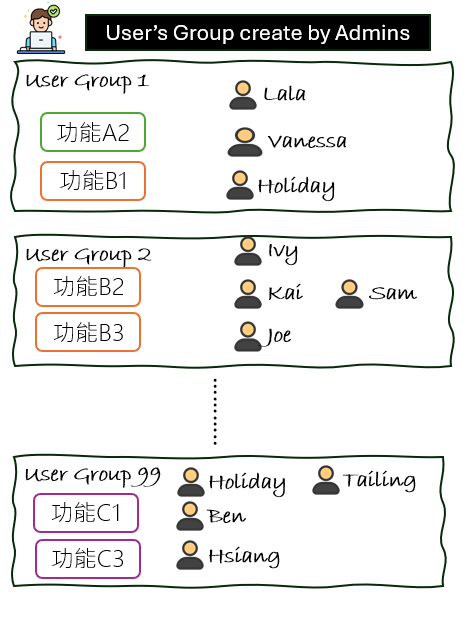
接下來兩天的重點依然是進行套版改造,需求與 Day17 的功能權限控管 有關。目標是讓管理人員能透過 使用者群組 (User Group) 授權機制,決定哪些功能介面可供使用。先回顧 Day17 的 User Group 授權模式(見圖 23-1),本次需要完成的功能如下:
圖23-1:管理人員設定 User Group 開放功能示意圖
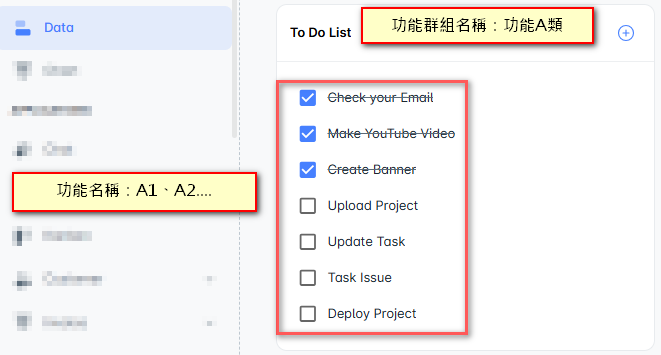
圖23-2:將此套版改造為功能清單介面
todos array 來列出勾選項目,可以沿用相同概念,將 todos array 替換為 TDO 物件,用來讀取各分類的功能清單並存放於 TDO 中,應能相對容易地實現。<script setup lang="ts">
import { shallowRef } from 'vue';
const todos = shallowRef([
{
item: 'Check your Email',
done: true
},
{
item: 'Make YouTube Video',
done: true
},
{
item: 'Create Banner',
done: true
},
{
item: 'Upload Project',
done: false
},
{
item: 'Update Task',
done: false
},
{
item: 'Task Issue',
done: false
},
{
item: 'Deploy Project',
done: false
}
]);
</script>
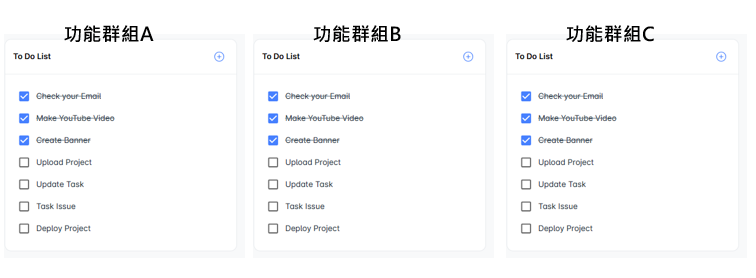
todos array 來渲染多個 Cards,類似 圖23-3 的樣子。todos array 需要再往上新增一個「功能類別」層級,並透過多一層迴圈來繪製多個 Cards。<template>
<div class="pa-5">
<div class="pb-0 todo-list" v-for="(todo, i) in todos" :key="i" :value="todo.item">
<v-checkbox :model-value="todo.done" color="primary" density="compact" hide-details>
<template v-slot:label>
<div class="ms-2 text-darkText">
{{ todo.item }}
</div>
</template>
</v-checkbox>
</div>
</div>
</template>
圖23-3:將範本中的單一卡片 (Card) 改造成多張卡片 (Cards)
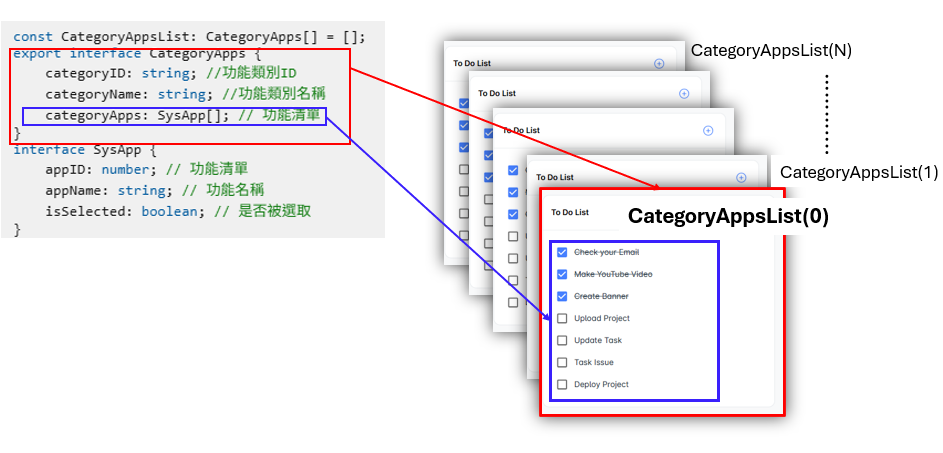
todos array 外,再增加一層 CategoryApps,形成以下結構。整合後的介面示意如圖23-4。const CategoryAppsList: CategoryApps[] = [];
export interface CategoryApps {
categoryID: string; //功能類別ID
categoryName: string; //功能類別名稱
categoryApps: SysApp[]; // 功能清單
}
interface SysApp {
appID: number; // 功能清單
appName: string; // 功能名稱
isSelected: boolean; // 是否被選取
}
圖23-4:CategoryAppsList 與 SysApp 結構對應示意圖
DialogEditGroupApp.vue,作為設定使用功能的介面:UiParentCard.vue,用來包覆功能清單中的 <v-checkbox-btn> 元素。<script setup lang="ts">
import UiParentCard from '@/views/pages/Admin/GroupAppCard.vue';
</script>
<template>
<v-row>
<v-col v-for="category in categoryAppsList" :key="category.categoryID" class="mb-4" cols="3">
<UiParentCard :title="category.categoryName" :categoryID="category.categoryID">
<div class="pb-0" v-for="(app, i) in category.categoryApps" :key="i" :value="app.appID" >
<v-checkbox-btn color="success" hide-details v-model="app.isSelected" aria-label="checkbox">
<template v-slot:label>
<div class="ms-2 text-darkText">
{{ app.appName }}
</div>
</template>
</v-checkbox-btn>
</div>
</UiParentCard>
</v-col>
</v-row>
</template>
UiParentCard.vue 中的 template 區域:UiParentCard.vue 本身屬於套版元件,原則上不需大幅調整,只需顯示功能類別名稱。<v-checkbox-btn>。<script setup lang="ts">
import { ref } from 'vue';
const props = defineProps({
title: String,
categoryID: String
});
const isSelected = ref(false);
</script>
<template>
<v-card variant="outlined" elevation="0" class="bg-surface" rounded="lg">
<v-card-item class="pa-5">
<div class="d-sm-flex align-center justify-space-between">
<v-card-title class="text-subtitle-1" style="line-height: 1.57">
<v-checkbox-btn color="success" hide-details aria-label="checkbox" v-model="isSelected" >
<template v-slot:label>
<div class="ms-2 text-darkText">
{{ props.title }}
</div>
</template>
</v-checkbox-btn>
</v-card-title>
<slot name="action"></slot>
</div>
</v-card-item>
<v-divider></v-divider>
<v-card-text>
<slot />
</v-card-text>
</v-card>
</template>
完成前端物件結構設計後,接下來進入後端部分。目標是從資料庫撈取功能分類資料,並依照前端設計的 DTO 結構進行彙整,最後將結果回傳至前端。
//回應給前端的Dto CategoryAppsDto.cs
namespace Core.Models.Dto
{
    public class CategoryAppsDto
    {
        public required string CategoryID { get; set; }
        public required string CategoryName { get; set; }
        public required List<SysApp> CategoryApps { get; set; }
    }
    public class SysApp {
        public required int AppID { get; set; }
        public required string AppName { get; set; }
        public required bool IsSelected { get; set; }   = false;
    }
}
//Group_AppController.cs
  [HttpGet("CategoryApps")]
  [ProducesResponseType(typeof(List<CategoryAppsDto>), 200)]
  public  async Task<IActionResult> GetCategoryApp(int userGroupId)
  {
     //userGroupId 是因為有建立不同的User 群組,需要取得該群組下哪些功能已經被勾選
     List<CategoryAppsDto> queryResults = await _rightGroupAppService.GetGroupAppbyGroupId(userGroupId);
     if (queryResults == null)
       {
          return NotFound();
       }
       return Ok(queryResults);
   }
本篇完成了前端的改造以及後端資料庫的資料擷取,接下來將在下一篇中進行前後端的整合,讓功能得以完整實現。
