在上一篇中,我們已經將後端的基礎功能完整打造完成,接下來就是行程管家的「門面」時刻啦!
今天開始,我將帶領大家進入 前端 Android 的世界,正式為我們的行程管家建立第一個使用者能實際互動的畫面——登入系統的 UI 介面。
對任何一個 App 來說,登入頁面就像是一扇精緻的大門,它不僅承擔著帳號驗證的功能,也往往是使用者對整個應用的第一印象。
因此,我們要讓它既 簡潔大方,又直觀易用。
activity_login ui介面
以下是我們設計好的 activity_login.xml 程式碼:
<?xml version="1.0" encoding="utf-8"?>
<androidx.constraintlayout.widget.ConstraintLayout xmlns:android="http://schemas.android.com/apk/res/android"
    xmlns:app="http://schemas.android.com/apk/res-auto"
    xmlns:tools="http://schemas.android.com/tools"
    android:id="@+id/main"
    android:layout_width="match_parent"
    android:layout_height="match_parent"
    tools:context=".ui.login.LoginActivity">


    <LinearLayout
        android:layout_width="match_parent"
        android:layout_height="600dp"
        android:layout_gravity="center"
        android:orientation="vertical"
        app:layout_constraintBottom_toBottomOf="parent"
        app:layout_constraintEnd_toEndOf="parent"
        app:layout_constraintHorizontal_bias="0.0"
        app:layout_constraintStart_toStartOf="parent"
        app:layout_constraintTop_toTopOf="parent">


        <ImageView
            android:id="@+id/imageView2"
            android:layout_width="150dp"
            android:layout_height="150dp"
            android:layout_gravity="center"
            android:layout_marginBottom="50dp"
            android:layout_weight="1"
            app:srcCompat="@drawable/u2"/>

        <LinearLayout
            android:layout_width="match_parent"
            android:layout_height="200dp"
            android:layout_weight="1"
            android:orientation="vertical">

            <LinearLayout
                android:layout_width="match_parent"
                android:layout_height="30dp"
                android:layout_weight="1"
                android:layout_marginLeft="10dp"
                android:layout_marginRight="10dp"
                android:orientation="horizontal">


                <TextView
                    android:id="@+id/login_textView_email"
                    android:layout_width="match_parent"
                    android:layout_height="match_parent"
                    android:layout_weight="3"
                    android:text="帳號"
                    android:textSize="15sp"
                    android:textStyle="bold"
                    android:gravity="center" />

                <EditText
                    android:id="@+id/login_editTextTextEmailAddress"
                    android:layout_width="match_parent"
                    android:layout_height="match_parent"
                    android:layout_weight="1"
                    android:ems="10"
                    android:inputType="textEmailAddress"
                    android:hint="email"
                    android:textSize="15sp"
                    android:gravity="center_vertical"
                    />
            </LinearLayout>

            <LinearLayout
                android:layout_width="match_parent"
                android:layout_height="30dp"
                android:layout_weight="1"
                android:layout_marginLeft="10dp"
                android:layout_marginRight="10dp"
                android:orientation="horizontal">

                <TextView
                    android:id="@+id/login_textView_pwd"
                    android:layout_width="match_parent"
                    android:layout_height="match_parent"
                    android:layout_weight="3"
                    android:text="密碼"
                    android:textStyle="bold"
                    android:textSize="15sp"
                    android:gravity="center"/>

                <EditText
                    android:id="@+id/login_editTextTextPassword"
                    android:layout_width="match_parent"
                    android:layout_height="match_parent"
                    android:layout_weight="1"
                    android:ems="10"
                    android:inputType="textPassword"
                    android:hint="pwd"
                    android:textSize="15sp"
                    android:gravity="center_vertical"/>
            </LinearLayout>

            <LinearLayout
                android:layout_width="match_parent"
                android:layout_height="40dp"
                android:layout_weight="1"
                android:layout_marginLeft="10dp"
                android:layout_marginRight="10dp"
                android:orientation="horizontal">
                <Button
                    android:id="@+id/login_button_in"
                    android:layout_width="250dp"
                    android:layout_height="40dp"
                    android:layout_gravity="center_vertical"
                    android:layout_weight="1"

android:text="登入"
                    android:textStyle="bold"
                    android:textSize="15sp"/>

                <Button
                    android:id="@+id/login_button_rest"
                    android:layout_width="250dp"
                    android:layout_height="40dp"
                    android:layout_weight="1"
                    android:layout_gravity="center_vertical"
android:text="註冊"
                    android:textStyle="bold"
                    android:textSize="15sp"/>


            </LinearLayout>


        </LinearLayout>


    </LinearLayout>


</androidx.constraintlayout.widget.ConstraintLayout>
成果展示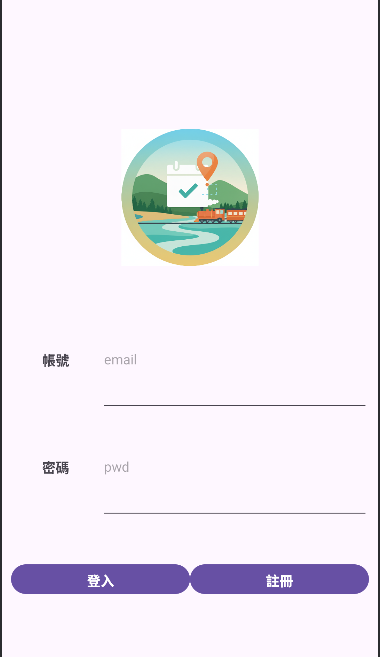


 iThome鐵人賽