我想在box1加入能顯示天氣的區塊,這時就要結合api來實現,選用有提供免費方案且較簡單的OpenWeatherMap API,能支援全球的天氣查詢,還有多樣化的API介面
我們先註冊好OpenWeatherMap API後,點擊上方選單的下拉選單,點擊My API keys
獲得API 金鑰
可以藉由輸入網址來確認你的API是否能執行,記得要改成你的API key
https://api.openweathermap.org/data/2.5/weather?q=Taipei&appid=”你的API_KEY”&units=metric&lang=zh_tw
如果看到一大串 JSON 資料就代表你的 API 已經能正確使用,例如
{"coord":{"lon":121.53,"lat":25.05},"weather":[{"description":"晴朗","icon":"01d"}], ... }
好的接著來處理程式碼
我們先在components資料夾中建立一個WeatherBox.vue元件
然後在WeatherBox.vue中填入下方程式碼
先處理<script setup>區域
<script setup>
import { ref, onMounted } from "vue";

//OpenWeather API 金鑰
const apiKey = "你的 OpenWeather API 金鑰";

const weather = ref(null);
const loading = ref(true);
const error = ref(null);
const updateTime = ref("");

// 格式化時間
function formatTime(date) {
  const hours = date.getHours();
  const minutes = String(date.getMinutes()).padStart(2, "0");
  const isPM = hours >= 12;
  const formattedHour = hours % 12 === 0 ? 12 : hours % 12;
  const period = isPM ? "下午" : "上午";
  return `${period} ${formattedHour}:${minutes}`;
}

//當元件載入後,自動定位並呼叫 API
onMounted(() => {
  if ("geolocation" in navigator) {
    navigator.geolocation.getCurrentPosition(
      async (pos) => {
        const lat = pos.coords.latitude;
        const lon = pos.coords.longitude;

        //這裡放這段程式 ↓↓↓
        const url = `https://api.openweathermap.org/data/2.5/weather?lat=${lat}&lon=${lon}&appid=${apiKey}&units=metric&lang=zh_tw`;

        try {
          const res = await fetch(url); // 呼叫 API
          if (!res.ok) throw new Error("無法取得天氣資料");
          weather.value = await res.json();

          // 記錄更新時間
          const now = new Date();
          updateTime.value = formatTime(now);
        } catch (err) {
          error.value = err.message;
        } finally {
          loading.value = false;
        }
      },
      () => {
        error.value = "定位失敗,請允許存取位置";
        loading.value = false;
      }
    );
  } else {
    error.value = "此裝置不支援地理定位";
    loading.value = false;
  }
});
</script>
這裡要注意const apiKey = "你的 OpenWeather API 金鑰";這段
要記得改成填你的OpenWeather API金鑰
抓取天氣資訊的核心程式碼就是onMounted(() => { ... })那段程式
當這個元件一載入,就執行裡面的程式,表示畫面顯示時,就會自動抓天氣資料if ("geolocation" in navigator) 先檢查使用者的瀏覽器是否支援地理定位功能
如果支援則執行下個步驟,否則會執行else中包含的指令
確認有支援地理定位功能後,利用經緯度定位const lat = pos.coords.latitude;const lon = pos.coords.longitude;
從 pos 物件中取出緯度 (latitude)和經度 (longitude)
try{...}放入可能出錯的主要程式,例如網路請求(fetch)catch (err) { error.value = err.message; } 如果上面的任何一步失敗(例如網路中斷、API 壞掉),就會執行這段finally { loading.value = false; } 無論成功與否,finally都會在最後執行(通常用來清理狀態,例如關閉 loading)
const res = await fetch(url); fetch() 是原生的網路請求方法,用來向 API 伺服器取得資料await 代表「等資料回來後再繼續執行下一行」
if (!res.ok) throw new Error("無法取得天氣資料"); 沒有成功,則丟出錯誤訊息
() => {
        error.value = "定位失敗,請允許存取位置";
        loading.value = false;
      }
表示當使用者拒絕地理定位時會執行的函式。例如使用者按「不允許」,或瀏覽器沒回傳座標。
const url = `https://api.openweathermap.org/data/2.5/weather?lat=${lat}&lon=${lon}&appid=${apiKey}&units=metric&lang=zh_tw`;
用方才取得的經緯度組成請求網址
然後來處理<template>區域
<template>
  <div class="flex flex-col items-center justify-center min-h-screen bg-blue-50 text-gray-800">
    <div class="bg-white shadow-lg rounded-2xl p-6 w-80 text-center">
      <h1 class="text-2xl font-bold mb-4">即時天氣</h1>


      <div v-if="loading" class="text-gray-500">正在取得天氣資料...</div>
      <div v-else-if="error" class="text-red-500">
        {{ error }}
      </div>
      <div v-else>
        <h2 class="text-xl font-semibold mb-2">{{ weather.name }}</h2>
        <img
          :src="`https://openweathermap.org/img/wn/${weather.weather[0].icon}@2x.png`"
          :alt="weather.weather[0].description"
          class="mx-auto"
        />
        <p class="text-lg">{{ weather.weather[0].description }}</p>
        <p class="text-3xl font-bold mt-2">{{ weather.main.temp }}°C</p>
      </div>
    </div>
  </div>
</template>
這裡用到條件渲染v-if的指令v-if 如果接收到loading,會顯示”正在取得天氣資訊...”v-else-if 如果收到error,則會顯示紅字v-else 如果都沒收到以上兩種訊息,則直接顯示天氣資訊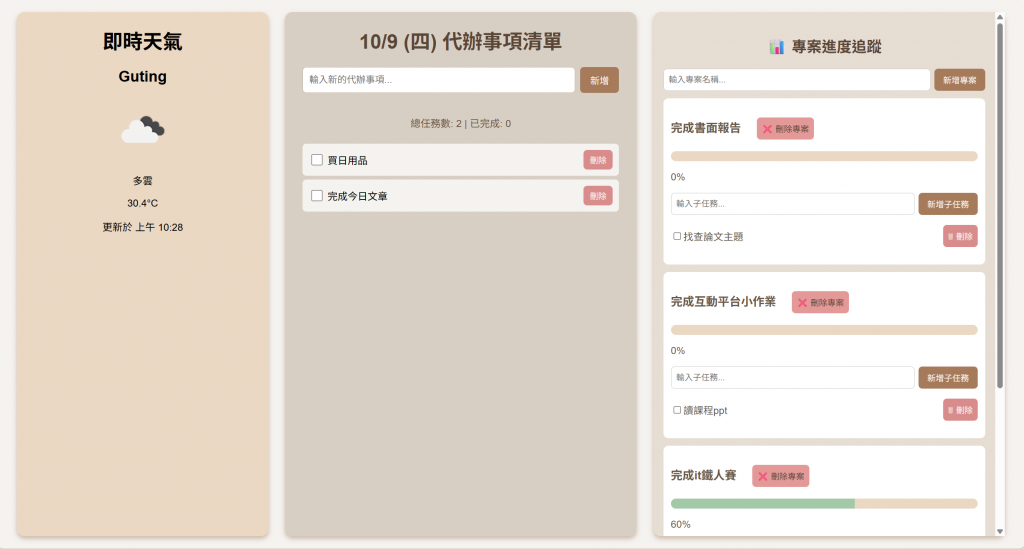
這是目前的畫面,明天來修改樣式
各位明天見~


 iThome鐵人賽