


昨天講完「為什麼」,今天開始講「怎麼做」。第一個問題是:要在哪裡蓋這個開發者主控台?
一開始我認真考慮過自己開一個 Electron 專案:自己管視窗、自己嵌 xterm.js、自己接 node-pty。但很快就打消念頭——光是「把 PTY 做到跟系統 shell 完全一致」這件事,就是一個無底洞:ConPTY 的相容性、視窗 resize 時的 reflow、複製貼上行為、IME 輸入……這些 Hyper 全都解完了。
Hyper 是 Vercel 出的 Electron 終端機,整個 UI 是 React + Redux,而且它有一個殺手級特性:插件可以攔截、包裝、改寫它的每一層。與其重造終端機,不如把 Hyper 當成「已經幫你把 PTY 搞定的 Electron 底座」,我們只負責在上面長出 IDE。
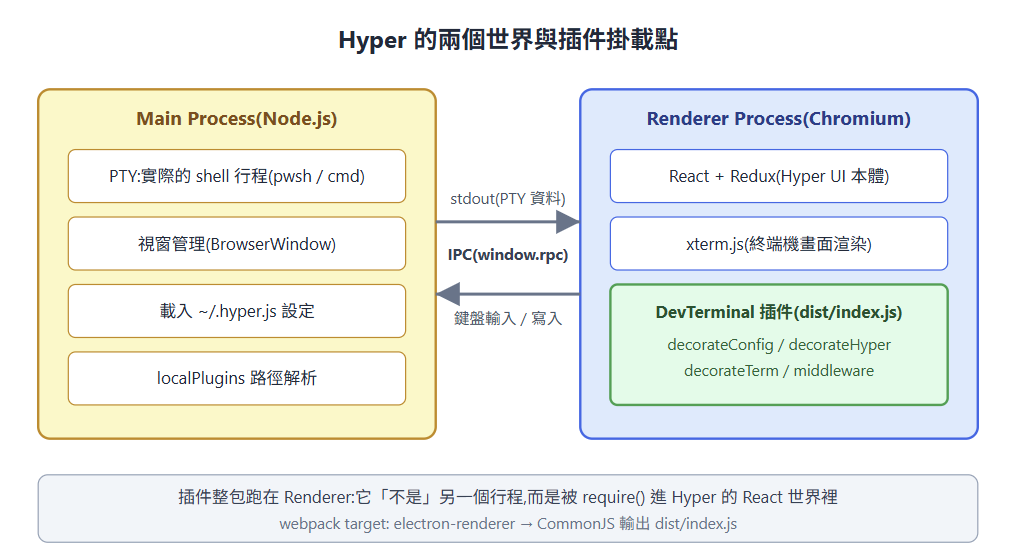
跟所有 Electron app 一樣,Hyper 分成兩個行程。插件的程式碼整包跑在 Renderer——它不是獨立行程,而是被 require() 進 Hyper 的 React 世界裡:
( )
)
要載入插件,只需要在 ~/.hyper.js 加一行:
module.exports = {
  config: { /* ... */ },
  localPlugins: ['C:/path/to/C-Console/devterm-plugin'],
};
Hyper 會去該目錄找 package.json 的 main 欄位——我們指向 webpack 打包出來的 dist/index.js。build 設定的重點只有兩個:
// webpack.config.js(節錄)
module.exports = {
  target: 'electron-renderer',   // 讓 require('electron') / fs 都能用
  output: { libraryTarget: 'commonjs2' }, // Hyper 用 CommonJS require 插件
};
target: 'electron-renderer' 是關鍵:插件因此同時擁有瀏覽器 DOM 和 Node.js API(fs、path、ipcRenderer)。後面所有功能——檔案樹、git 操作、監看 state.json——都建立在這個「雙棲」能力上。
Hyper 插件本質上是一個「匯出特定名字函式」的 CommonJS 模組。DevTerminal 實際用到這幾個:
exports.decorateConfig = (config) => { /* 改設定、注入 CSS */ };
exports.decorateHyper  = (Hyper, { React }) => { /* 包 UI 最外層 */ };
exports.decorateTerm   = (Term, { React })  => { /* 包每個終端機 */ };
exports.middleware     = (store) => (next) => (action) => { /* 攔 Redux action */ };
其中最重要的是 decorateHyper:Hyper 把它的根元件交給你,你回傳一個新的元件類別把它包起來。這就是「動手術」的手術口——三欄式佈局就是在這裡縫進去的:
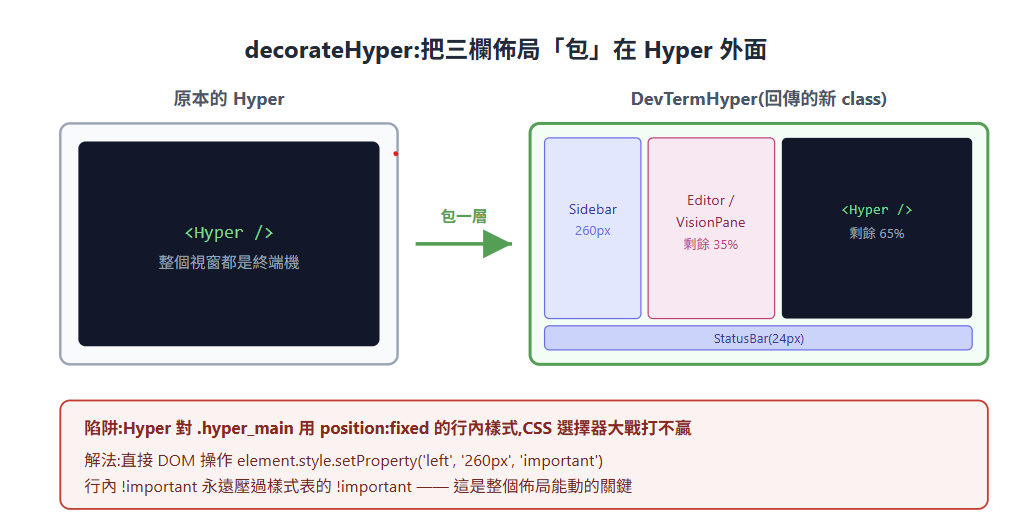
實際的程式碼(節錄自 src/index.js):
exports.decorateHyper = (Hyper, { React: R }) => {
  return class DevTermHyper extends R.Component {
    render() {
      const { editFile, visionOpen } = this.state;
      return R.createElement(
        'div',
        { style: { position: 'absolute', top: 0, left: 0, right: 0, bottom: 0 } },
        R.createElement(Hyper, { ...this.props }),        // 原本的終端機
        R.createElement(Sidebar, { cwd: this.state.cwd }), // 我們的側邊欄
        editFile && R.createElement(EditorPane, { file: editFile }),
        R.createElement(StatusBar, { /* ... */ }),
      );
    }
  };
};
包好元件之後,下一步是把 Hyper 本體「擠」到右邊 65%。直覺做法是注入 CSS:
.hyper_main { left: 260px !important; }
沒用。 Hyper 對 .hyper_main 用的是行內樣式的 position: fixed,而且它自己也在動態改 style。CSS specificity 這場仗,樣式表永遠打不贏行內樣式。
最後有效的解法是放棄 CSS,直接動 DOM:
// updateLayout():行內 !important 永遠壓過樣式表的 !important
const main = document.querySelector('.hyper_main');
main.style.setProperty('left', `${SIDEBAR_WIDTH}px`, 'important');
main.style.setProperty('bottom', `${STATUSBAR_HEIGHT}px`, 'important');
element.style.setProperty(prop, value, 'important') 是整個佈局系統能動的基石。之後每次開關編輯器 / Vision 面板,都是重新跑一次這個函式,用 requestAnimationFrame 等 React 畫完再調 DOM。
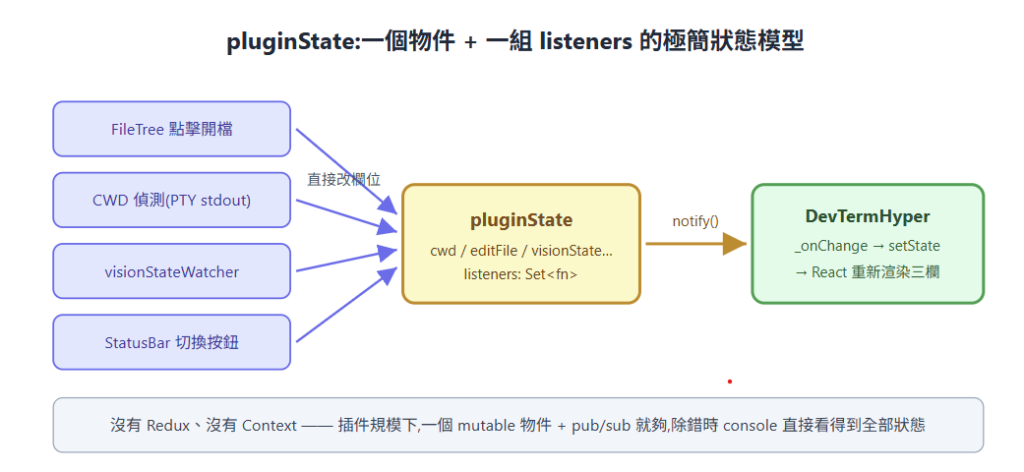
最後一塊拼圖:側邊欄、編輯器、狀態列之間怎麼共享狀態?答案簡單到有點反高潮——一個 mutable 物件加一組 listeners:
const pluginState = {
  cwd: null, editFile: null, visionState: null, /* ... */
  listeners: new Set(),
  notify() { this.listeners.forEach(fn => fn(this)); },
};
任何模組(CWD 偵測、檔案樹點擊、vision watcher)改完欄位就呼叫 notify();DevTermHyper 在 componentDidMount 註冊 listener,把欄位抄進 this.state 觸發重繪。沒有 Redux、沒有 Context——插件這個規模,pub/sub 就夠了,而且除錯時打開 console 直接看得到全部狀態。
今天我們搞清楚了三件事:
target: 'electron-renderer')decorateHyper 是手術口:回傳新元件把 <Hyper> 包進三欄佈局setProperty(..., 'important') 直接動 DOM,CSS 大戰打不贏明天(Day 3)深入佈局細節:三欄的尺寸計算、開關編輯器時的 relayout 時序,以及為什麼要 requestAnimationFrame。


 iThome鐵人賽
 看影片追技術