

昨天講到 decorateHyper 把三欄佈局「包」在 Hyper 外面,以及 CSS 大戰打不贏、必須直接動 DOM 的結論。今天把整套佈局系統拆開來看:尺寸怎麼算、什麼時機動 DOM,以及一個讓我 debug 到懷疑人生的隱形殺手。
三欄的規格是:Sidebar 固定 260px,Editor 佔剩餘寬度的 35%,Terminal 佔剩餘的 65%,底部再讓出 24px 給 StatusBar:
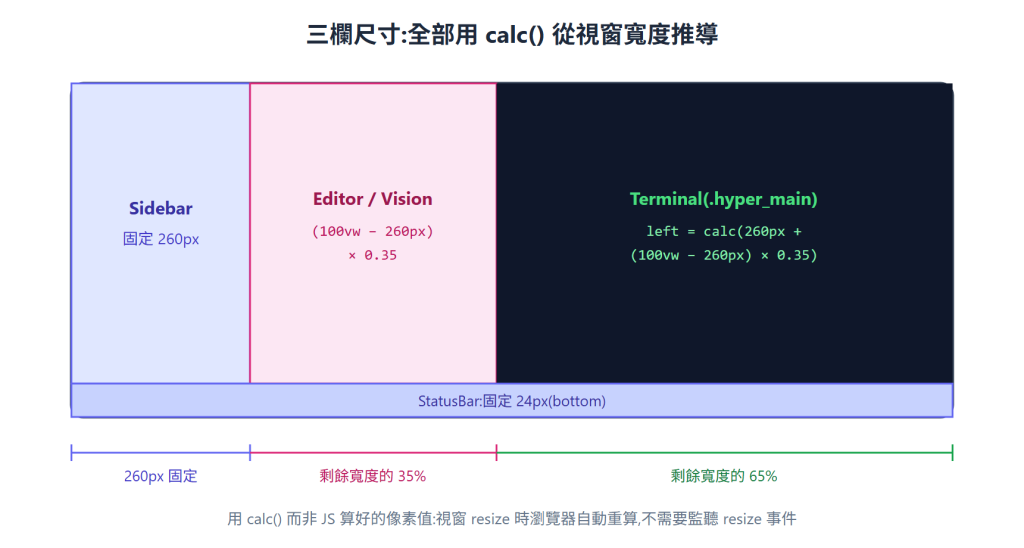
關鍵決策:寬度用 CSS calc() 表達,而不是用 JS 算好的像素值:
// src/index.js — updateLayout()
const termLeft = editorOpen
  ? `calc(${SIDEBAR_WIDTH}px + (100vw - ${SIDEBAR_WIDTH}px) * 0.35)`
  : `${SIDEBAR_WIDTH}px`;
如果寫死像素,使用者一拉視窗大小佈局就爛了,你得監聽 resize 事件重算。交給 calc(100vw ...),瀏覽器在每次 reflow 自動重算——整個插件完全沒有 resize listener,這是「讓平台幫你工作」的典型例子。
Hyper 的 UI 用 CSS Modules,類名在 build 後長這樣:hyper_main_x7f3a。所以 document.querySelector('.hyper_main') 抓不到東西,要用屬性子字串選擇器:
const hyperMain = document.querySelector('[class*="hyper_main"]');
[class*="..."] 比對的是「class 屬性字串包含這段文字」,對雜湊後綴免疫。整個 updateLayout() 都用這招。
把 Terminal 推到右邊,不是只改一個元素。實際的 updateLayout() 要動五個:
function updateLayout(editorOpen) {
  const termLeft = /* 上面的 calc() */;

  // 1. 終端機本體
  const hyperMain = document.querySelector('[class*="hyper_main"]');
  hyperMain.style.setProperty('left', termLeft, 'important');
  hyperMain.style.setProperty('bottom', `${STATUSBAR_HEIGHT}px`, 'important');

  // 2. 分頁列
  const headerEl = document.querySelector('[class*="header_header"]');
  headerEl.style.setProperty('left', `calc(${termLeft} + 1px)`, 'important');

  // 3. 視窗拖曳區(後面詳述,這行救了所有按鈕)
  const windowHeader = document.querySelector('[class*="header_windowHeader"]');
  windowHeader.style.setProperty('left', termLeft, 'important');

  // 4 & 5. 漢堡選單與視窗控制鈕
  document.querySelector('[class*="header_hamburgerMenuLeft"]')
    ?.style.setProperty('left', termLeft, 'important');
  document.querySelector('[class*="header_windowControlsLeft"]')
    ?.style.setProperty('left', termLeft, 'important');
}
漏掉任何一個,畫面就會出現「分頁列飄在 Sidebar 上」「漢堡選單被編輯器蓋住」之類的靈異現象。這也是 DOM 手術式佈局的代價:你接管了佈局,就要接管到底。
updateLayout() 在哪裡被呼叫?開關編輯器 / Vision 面板的瞬間:
componentDidUpdate(prevProps, prevState) {
  const wasOpen = !!prevState.editFile || !!prevState.visionOpen /* ... */;
  const isOpen  = !!this.state.editFile || !!this.state.visionOpen /* ... */;
  if (wasOpen !== isOpen) {
    requestAnimationFrame(() => updateLayout(isOpen));
  }
}
注意那層 requestAnimationFrame。直接在 componentDidUpdate 裡動 DOM 的話,React 這一輪的 commit 可能還沒完全落地,你 querySelector 到的是舊佈局、寫進去的值也可能被同幀稍後的渲染蓋掉:
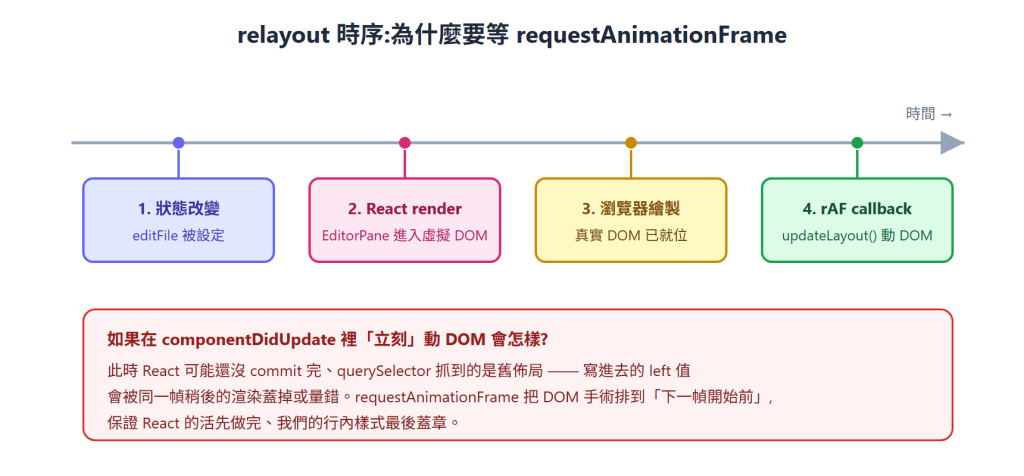
requestAnimationFrame 把我們的 DOM 手術排到「下一幀開始前」——React 的活先做完,我們的行內樣式最後蓋章。配合 Day 2 講的 setProperty(..., 'important'),這就是「永遠贏」的兩個條件:優先級最高 + 出手最晚。
佈局做完後,出現一個詭異 bug:Sidebar 頂部的按鈕全部點不到。DevTools 檢查,事件監聽器都在、z-index 沒問題、hover 樣式正常——就是收不到 click。
兇手是 Electron 的視窗拖曳區。Hyper 的 header_windowHeader 是一條 34px 高、橫跨全寬的 -webkit-app-region: drag 區域(讓無邊框視窗可以拖曳)。落在這條帶子裡的點擊,OS 層直接當成「拖曳視窗」處理,根本不會進到網頁的事件系統——DevTools 當然看不到,它是純粹的事件黑洞:
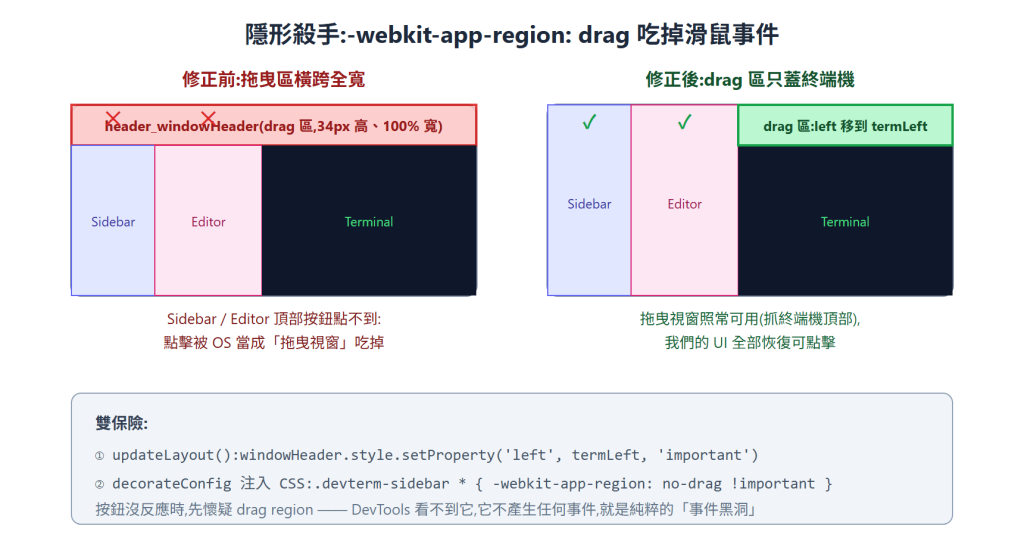
解法是雙保險:
// ① updateLayout() 裡:把拖曳區的 left 推到終端機區域
windowHeader.style.setProperty('left', termLeft, 'important');
// ② decorateConfig 注入 CSS:我們的 UI 一律宣告 no-drag
exports.decorateConfig = (config) => Object.assign({}, config, {
  css: `
    ${config.css || ''}
    .hyper_main { bottom: ${STATUSBAR_HEIGHT}px !important; }
    .devterm-sidebar, .devterm-sidebar *,
    .devterm-editor-wrapper, .devterm-editor-wrapper * {
      -webkit-app-region: no-drag !important;
    }
  `,
});
拖曳視窗的功能保留(抓終端機頂部照樣能拖),我們的按鈕全數復活。之後在 Electron 裡遇到「按鈕沒反應但事件系統一切正常」,先懷疑 drag region。
順帶一提:decorateConfig 這裡還做了一件事——Windows 上偵測 pwsh.exe(PowerShell 7)存在就設成預設 shell,因為 PS7 的 PSReadLine 才支援預測式自動完成,這是 Day 5 shell 整合的伏筆。
calc(100vw ...) 表達,resize 交給瀏覽器,插件零 resize listener[class*="hyper_main"] 屬性選擇器對付requestAnimationFrame + 行內 !important = 優先級最高、出手最晚,永遠贏-webkit-app-region: drag 事件黑洞明天(Day 4)進入 Sidebar 的靈魂:檔案樹的遞迴建構(.gitignore 過濾、深度上限),以及用 textarea + highlight.js 疊出一個「夠用就好」的輕量編輯器。


 iThome鐵人賽
 看影片追技術