

這篇文章會用 TDD 手刻 myAssociate、myAssociateBy、myAssociateWith。前面的轉換都是 List → List,這篇開始把 List 轉成 Map
| Kotlin | C# LINQ | 備註 |
|---|---|---|
associate { it.id to it.name } |
ToDictionary(x => x.Id, x => x.Name) |
|
associateBy { it.id } |
ToDictionary(x => x.Id) |
value 是元素本身 |
associateWith { it.length } |
無直接對應 | key 是元素本身 |
先釐清三個函式各自做什麼
associate:你自己決定 key 和 value 分別是什麼,Lambda 回傳一個 Pair<K, V>
associateBy:你只提供 key selector,value 就是元素本身associateWith:反過來,key 是元素本身,你只提供 value selector用 employees 來舉例
// associate:自己指定 key 和 value
employees.associate { it.id to it.name }
// {1="Alice", 2="Bob", ...}

// associateBy:key 是 id,value 是整個 Employee
employees.associateBy { it.id }
// {1=Employee(1, "Alice", ...), 2=Employee(2, "Bob", ...), ...}

// associateWith:key 是整個 Employee,value 是 salary
employees.associateWith { it.salary }
// {Employee(...)=85000, ...}
@Test
fun `associate creates map from pairs`() {
    val numbers = listOf(1, 2, 3)
    val result = numbers.myAssociate { it to it * it }
    assertEquals(mapOf(1 to 1, 2 to 4, 3 to 9), result)
}

@Test
fun `associate employees id to name`() {
    val result = employees.myAssociate { it.id to it.name }
    assertEquals(7, result.size)
    assertEquals("Alice", result[1])
    assertEquals("Grace", result[7])
}

@Test
fun `associate duplicate keys last wins`() {
    val words = listOf("apple", "ant", "banana")
    val result = words.myAssociate { it.first() to it }
    assertEquals("ant", result['a'])
    assertEquals("banana", result['b'])
}
第三個測試很重要。"apple" 和 "ant" 的首字母都是 'a',key 衝突了。Kotlin 的行為是後者覆蓋前者(last write wins),所以 result['a'] 是 "ant" 而不是 "apple"
C# 的 ToDictionary 在 key 重複時直接拋 ArgumentException。這是一個行為差異,要注意
也因為 key 衝突不拋例外,associate 系列沒有例外路徑要測,邊界測試的重點就放在 key 衝突,加上空集合(後面 myAssociateWith 會補一個空 List 的測試)
to 中綴函式測試裡用了 it to it * it 這種語法。to 是 Kotlin stdlib 定義的中綴函式(infix function),用來建立 Pair
// 這兩行等價
val pair = "key" to "value"
val pair = "key".to("value")
to 的原始碼很單純
public infix fun <A, B> A.to(that: B): Pair<A, B> = Pair(this, that)
infix 關鍵字讓函式可以省略 . 和 (),用中綴寫法呼叫。day 33 會完整講解 infix 的機制和限制
inline fun <T, K, V> Iterable<T>.myAssociate(transform: (T) -> Pair<K, V>): Map<K, V> {
    val result = LinkedHashMap<K, V>()
    for (element in this) {
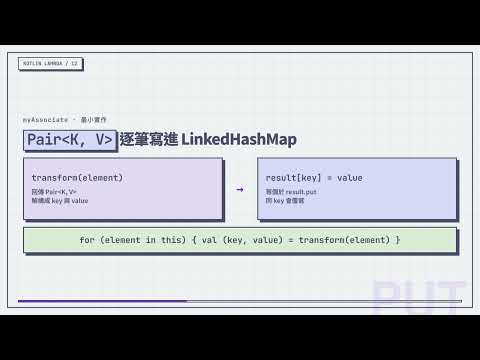
        val (key, value) = transform(element)
        result[key] = value
    }
    return result
}
三個泛型參數:T 是輸入型別,K 是 Map 的 key 型別,V 是 Map 的 value 型別
用 LinkedHashMap 而不是 HashMap,因為 Kotlin stdlib 的慣例是保持插入順序。LinkedHashMap 內部用雙向鏈結串列維護順序,遍歷時元素會按照放入的先後排列
這個選擇是「可預測勝過效能」的設計取捨。HashMap 的遍歷順序由 hash 函式跟 bucket 排列決定,跟你的程式碼邏輯無關。字串 hash 改一下、JVM 版本換一下,順序就可能變。對純尋找沒差,但對「先存什麼、遍歷時就想看到一樣順序」的場景有差,像測試斷言、序列化輸出、UI 顯示都是。C# 的 Dictionary<K, V> 跟 Java 的 HashMap 一樣,順序不保證;要保留插入順序得自己用 OrderedDictionary 或雙寫。Kotlin 把 LinkedHashMap 當預設,代價是每個 entry 多兩個 pointer(雙向鏈結),等於用記憶體換確定性
val (key, value) = transform(element) 用了解構宣告(destructuring declaration),一行把 Pair 拆成兩個變數。這裡先會用就好,背後的 componentN 機制 day 13 會深入講
result[key] = value 就是 result.put(key, value)。如果 key 已存在,新值覆蓋舊值。這就是 last write wins 的來源
核心邏輯已經跟 stdlib 一致,剩下的差別只有容量預先分配,這個最佳化留到文末「與 stdlib 原始碼比較」一起看
@Test
fun `associateBy with key selector`() {
    val result = employees.myAssociateBy { it.id }
    assertEquals(7, result.size)
    assertEquals("Alice", result[1]?.name)
}

@Test
fun `associateBy with key and value selector`() {
    val result = employees.myAssociateBy(
        keySelector = { it.id },
        valueTransform = { it.name }
    )
    assertEquals("Alice", result[1])
    assertEquals("Grace", result[7])
}

@Test
fun `associateBy duplicate keys last wins`() {
    val result = employees.myAssociateBy { it.department }
    assertEquals(3, result.size)
    assertEquals("Grace", result["Engineering"]?.name)
}
associateBy 有兩個版本:只帶 key selector 的,以及同時帶 key selector 和 value transform 的
第三個測試用 department 當 key。Engineering 有三個人(Alice、Bob、Grace),最後留下的是 Grace(最後一個被放進去的),所以第二個斷言直接驗證 result["Engineering"] 拿到的是 Grace
inline fun <T, K> Iterable<T>.myAssociateBy(keySelector: (T) -> K): Map<K, T> {
    val result = LinkedHashMap<K, T>()
    for (element in this) {
        result[keySelector(element)] = element
    }
    return result
}

inline fun <T, K, V> Iterable<T>.myAssociateBy(
    keySelector: (T) -> K,
    valueTransform: (T) -> V
): Map<K, V> {
    val result = LinkedHashMap<K, V>()
    for (element in this) {
        result[keySelector(element)] = valueTransform(element)
    }
    return result
}
第一個版本回傳 Map<K, T>,value 就是元素本身。第二個版本回傳 Map<K, V>,value 經過 transform
兩個版本的差別在回傳型別和 value 的來源。結構完全一樣
你可能會想讓單參數版本委派給雙參數版本(valueTransform = { it })來消除重複,但 stdlib 沒這麼做,兩個多載各寫各的,各自對應一個 associateByTo 多載。這裡跟著 stdlib 不動
@Test
fun `associateWith creates map with element as key`() {
    val words = listOf("hello", "hi", "hey")
    val result = words.myAssociateWith { it.length }
    assertEquals(mapOf("hello" to 5, "hi" to 2, "hey" to 3), result)
}

@Test
fun `associateWith empty list returns empty map`() {
    val empty = emptyList<String>()
    val result = empty.myAssociateWith { it.length }
    assertEquals(emptyMap<String, Int>(), result)
}
associateWith 跟 associateBy 剛好相反。associateBy 是你選 key,associateWith 是你選 value
inline fun <K, V> Iterable<K>.myAssociateWith(valueSelector: (K) -> V): Map<K, V> {
    val result = LinkedHashMap<K, V>()
    for (element in this) {
        result[element] = valueSelector(element)
    }
    return result
}
注意泛型參數名稱。這裡用 K 而不是 T,因為元素本身就是 Map 的 key,語意上更清楚。這個命名跟 stdlib 一致,實作本身也已經和 stdlib 的核心邏輯相同,不用再動
整理一下三種 associate 在 key 衝突時的行為
Kotlin 的 associate 系列:後者覆蓋前者(last write wins),不拋例外。這是 Map.put 的天然行為
C# 的 ToDictionary:key 重複直接拋 ArgumentException。嚴格但安全,逼你在上游處理好資料
如果你需要的不是「一個 key 對一個 value」而是「一個 key 對多個 value」,那應該用 groupBy。day 14 會實作 groupBy,回傳的是 Map<K, List<T>>(元素原封不動收進 List;另一個多載可以再指定 valueTransform,那個版本才是 Map<K, List<V>>)
原始碼位置:kotlin.collections 的 _Collections.kt
stdlib 的 associate 有個小最佳化
public inline fun <T, K, V> Iterable<T>.associate(
    transform: (T) -> Pair<K, V>
): Map<K, V> {
    val capacity = mapCapacity(collectionSizeOrDefault(10)).coerceAtLeast(16)
    return associateTo(LinkedHashMap<K, V>(capacity), transform)
}
mapCapacity 根據預期大小算出 HashMap 的初始容量,避免 rehash。跟 day 10 看到的 collectionSizeOrDefault 是同一個策略:如果知道大小就預分配容量
核心邏輯在 associateTo 裡,還是那套 xxxTo 模式
associate 系列把 List 轉成 Map。associate 讓你完全控制 key 和 value,associateBy 只選 key,associateWith 只選 value。key 衝突時 last write wins,這點跟 C# 的 ToDictionary 不同
底層都是 for 迴圈 + map[key] = value,結構跟 filter/map 一樣單純。差別在回傳的容器從 ArrayList 變成了 LinkedHashMap
下一篇來看另一種配對操作:zip 把兩個 List 拉鍊式合併,unzip 把 Pair 的 List 拆開
同步刊登於 Blog
圖片來源:AI 產生


 iThome鐵人賽
 看影片追技術