


⬆️ 點上方縮圖或影片連結即可播放。
Astro 用 loader 把不同來源接進同一個 Content Layer:glob() 掃一批本地檔案、file() 拆開單一 JSON/YAML/TOML、custom loader 自己 fetch 或呼叫 SDK。資料進來後,頁面都用 getCollection() 查,不必跟著來源改寫。
Day 10:Content Collections示範了將本地 Markdown 轉為可查詢的 blog collection。當內容來源擴展到其他格式或外部 API,選型取決於來源資料的組織形式。判斷 loader 是否配置正確,得逐層驗證「來源資料 → Content Layer 查詢 → 靜態頁輸出」三道關卡;設定檔能編譯並不代表資料流已正確打通。
本文以 Astro 7.1.1 為基準,於 2026-07-24 查證 Content Loader API 與 Content Collections 官方指南。Content Layer 是易變 API,看到舊課程範例時,先核對版本再搬。
頁面的查詢方式不受來源影響;三種 loader 的差別在「一筆 entry 從哪裡來」:
| loader | 來源形狀 | 一筆 entry 從哪來 | 本篇案例 |
|---|---|---|---|
glob() |
資料夾裡的多個檔案 | 每個符合 pattern 的檔案 | src/content/blog/*.md |
file() |
一個 JSON、YAML 或 TOML | 陣列中每個帶 id 的 object,或 object 的每個 key |
src/data/loader-notes.json |
| custom loader | API、CMS、SDK 或任意轉換流程 | loader 自己決定 ID 與 data | Astro GitHub 固定 tag 的 package JSON |
glob() 是「多個檔案各自成為 entry」;file() 是「一個檔案裡裝整個 collection」。兩者很容易看反。custom loader 也不只用於遠端資料;只要取得或整理資料的方式超出內建 loader,就能自己實作。
glob():現有 blog 就是真實案例專案的 blog collection 已經用 glob() 載入文章:
import { defineCollection } from 'astro:content';
import { glob } from 'astro/loaders';
import { z } from 'astro/zod';

const blog = defineCollection({
  loader: glob({
    pattern: '**/[^_]*.{md,mdx}',
    base: './src/content/blog',
  }),
  schema: ({ image }) =>
    z.object({
      title: z.string(),
      description: z.string(),
      day: z.number().int().positive(),
      pubDate: z.coerce.date(),
      cover: z
        .object({
          src: image(),
          alt: z.string().min(1),
        })
        .optional(),
      tags: z.array(z.string()).default([]),
      draft: z.boolean().default(false),
    }),
});
pattern 相對於 base。這裡每個符合條件的 Markdown/MDX 檔會成為一筆 blog entry;預設 ID 由相對路徑產生,再給文章頁、RSS 與 JSON feed 使用。
「官方支援」和「本篇已實測」要分開看:
glob() 支援 Markdown、MDX、Markdoc、JSON、YAML、TOML。.mdx,目前 blog collection 實際只有 .md。支援某格式,不等於本篇已實測那個格式。dev server 會監看符合 pattern 的檔案新增、修改與刪除;build 也會重新同步,並移除來源中已不存在的舊 entry。這些生命週期已由內建 loader 處理。
file():一個 JSON 裝三筆 entry資料集中在一個結構化檔案時,可以直接用 file(),不必拆成三個檔案再交給 glob()。src/data/loader-notes.json 就是一個陣列:
[
  {
    "id": "glob",
    "label": "glob()",
    "source": "多個本地檔案",
    "entryShape": "每個符合 pattern 的檔案是一筆 entry",
    "updateTiming": "build 同步;dev 監看 add、change、unlink"
  },
  {
    "id": "file",
    "label": "file()",
    "source": "一個 JSON、YAML 或 TOML",
    "entryShape": "陣列中每個帶 id 的 object 是一筆 entry",
    "updateTiming": "build 同步;dev 監看既有單檔的 change"
  },
  {
    "id": "custom",
    "label": "custom loader",
    "source": "API、CMS、SDK 或自訂轉換流程",
    "entryShape": "loader 自己決定 ID 與 data",
    "updateTiming": "build 時執行;遠端更新不會自動輪詢"
  }
]
再把它宣告成獨立 collection:
import { file } from 'astro/loaders';

const loaderNotes = defineCollection({
  loader: file('src/data/loader-notes.json'),
  schema: z.object({
    label: z.string(),
    source: z.string(),
    entryShape: z.string(),
    updateTiming: z.string(),
  }),
});
這會產出 3 筆 entry(而非整檔 1 筆)。陣列格式的公開契約要求每筆有唯一 id;如果來源是 object,則每個 key 會當 ID。file() 內建支援 JSON、YAML、TOML;只有來源需要轉換時,才加 parser(text),把「選 loader」和「改資料 shape」分開。
來源成功讀取並解析成陣列或 object 後,file() 會清掉這個 collection 的舊 store,再依單檔內容重建。讀檔或 parse 失敗發生在 clear 之前,因此既有 entry 可能繼續留在 store。dev 模式會監看啟動時已存在檔案的 change;它不像 glob() 一樣處理整個資料夾的 add/unlink 生命週期。
第三個來源是真實網路資料:Astro 官方 GitHub repo 裡,固定在 astro@7.1.1 tag 的 packages/astro/package.json。
固定抓取特定 tag(而非 latest),能確保同一份範例下次 build 仍得到 astro@7.1.1,避免文章數字與截圖隨遠端版本漂移。但來源仍在網路上:連不到或回傳非 2xx 時,build 會明確中斷報錯——這比靜默塞一份 fallback 舊資料更容易判斷部署出了什麼事。
custom object loader 至少要回傳 name 與 load()。完整實作如下:
import type { Loader } from 'astro/loaders';
import { z } from 'astro/zod';

const sourceSchema = z.object({
  name: z.string(),
  version: z.string(),
  description: z.string(),
  homepage: z.string().url(),
});

const entrySchema = z.object({
  packageName: z.string(),
  version: z.string(),
  description: z.string(),
  homepage: z.string().url(),
  sourceUrl: z.string().url(),
});

export function astroPackageLoader({ url }: { url: string }): Loader {
  let sourceUrl = new URL(url);

  return {
    name: 'astro-package-loader',
    schema: entrySchema,
    load: async ({ store, parseData, generateDigest, logger }) => {
      logger.info(`Loading package data from ${sourceUrl.href}`);
      let response = await fetch(sourceUrl);

      if (!response.ok) {
        throw new Error(
          `Astro package source returned ${response.status} ${response.statusText}`,
        );
      }

      let source = sourceSchema.parse(await response.json());
      let id = `${source.name}@${source.version}`;
      let rawData = {
        packageName: source.name,
        version: source.version,
        description: source.description,
        homepage: source.homepage,
        sourceUrl: sourceUrl.href,
      };
      let data = await parseData({ id, data: rawData });
      let staleIds = new Set(store.keys());
      let wasUpdated = store.set({
        id,
        data,
        digest: generateDigest(data),
      });
      staleIds.delete(id);

      for (let staleId of staleIds) {
        store.delete(staleId);
      }

      logger.info(wasUpdated ? `Updated ${id}` : `${id} is unchanged`);
    },
  };
}
這段實作有五個地方不能省略:
sourceSchema.parse() 先確認外部 response 的 shape,避免對 unknown 硬做型別斷言。parseData() 才會依 collection schema 驗證與轉換;store.set() 本身不會執行 schema 驗證。generateDigest() 產生的是變更判斷用的非密碼學 digest。把它放進 entry 後,store.set() 才能在內容沒變時回傳 false。staleIds 先記住舊 ID,寫入目前來源後再刪掉剩下的 ID,避免來源移除資料後,舊 entry 永遠留在 store。logger 會讓訊息帶上 loader 名稱,比 console.log 更容易從 build log 找到來源。設定 collection 時,只要把 URL 傳進 loader:
const astroPackages = defineCollection({
  loader: astroPackageLoader({
    url: 'https://raw.githubusercontent.com/withastro/astro/refs/tags/astro%407.1.1/packages/astro/package.json',
  }),
});

export const collections = { blog, loaderNotes, astroPackages };
loader 已經提供 schema,collection 不必再寫一份;如果兩邊都有,collection 自己的 schema 會覆蓋 loader 提供的版本。
load() 的 LoaderContext 提供哪些工具?公開的 LoaderContext 如下;這個案例實際用到 store、parseData()、generateDigest()、logger:
| context 欄位 | 用途 |
|---|---|
collection |
目前 collection 在 collections object 裡的 key |
store |
讀寫這個 collection 的 entry |
meta |
跨 build 保存字串型 sync token、ETag、last-modified;不會出現在 getCollection() 結果 |
config |
完整 resolved Astro config |
parseData() |
套用 collection schema,回傳解析後資料 |
renderMarkdown() |
custom loader 要把 Markdown 字串轉成可 render 內容時使用 |
generateDigest() |
產生變更判斷用 digest |
watcher |
只在 dev 提供的檔案系統 watcher |
refreshContextData |
integration 觸發 refresh 時傳進來的額外資料 |
精確名稱是 watcher,不是 watch();公開 context 也沒有 invalidate()。loader 更新 store 後,dev 模式的 HMR invalidation 由 Astro 內部處理,不要從舊範例猜一個 API 出來。
來源不同,進入 Content Layer 後都回到 getCollection():
---
import { getCollection } from 'astro:content';

const [posts, loaderNotes, astroPackages] = await Promise.all([
  getCollection('blog'),
  getCollection('loaderNotes'),
  getCollection('astroPackages'),
]);
---
這段最小查詢用來確認資料確實進入 Content Layer;完整的篩選與 client island 分工已放在 Day 14:文章搜尋。如果要把同一份 collection 吐成 JSON 或 RSS,Day 20:Endpoints 與 RSS也同樣從 getCollection() 開始,不需要替每種來源重寫 endpoint。
/demos/content-loaders 把三個查詢結果放在同一頁,build 後的 HTML 會留下可直接核對的數字:
<section data-loader="glob" data-count="23">
<section data-loader="file" data-count="3">
<section data-loader="custom" data-count="1">
glob:23 篇 blog Markdown,包含這篇 Day 11。file:JSON 陣列裡的 3 筆 loader note。astro@7.1.1,來源是固定 GitHub tag。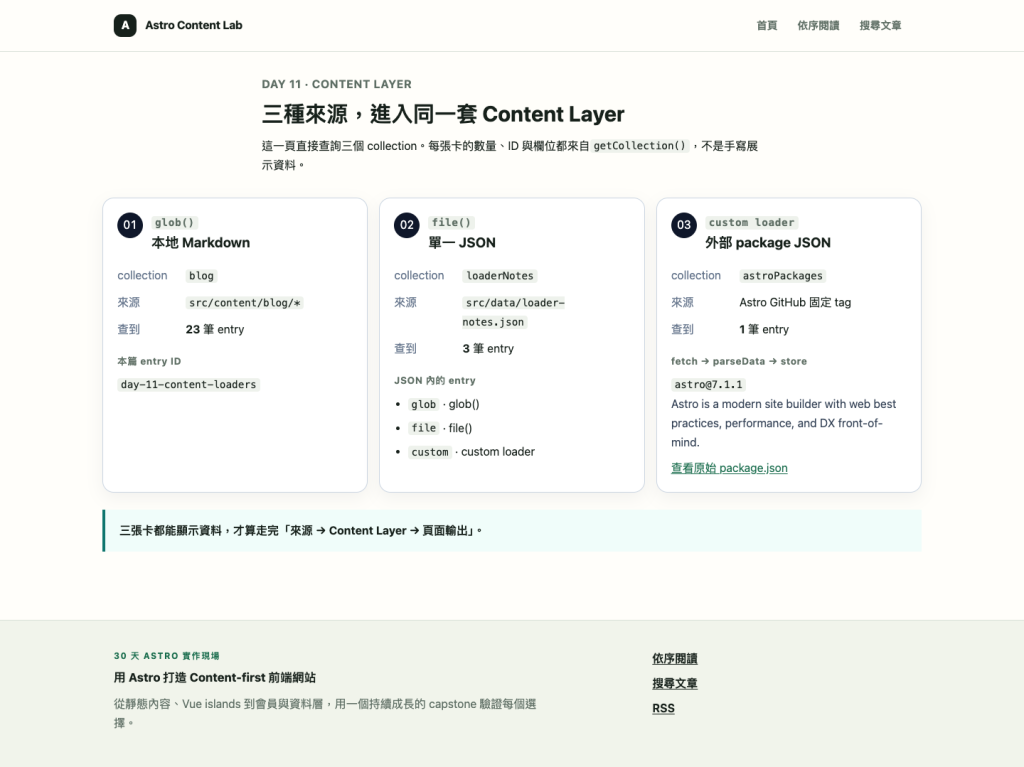
完整的驗證要涵蓋三層:看得到來源檔或 URL、getCollection() 查得到 entry、靜態 HTML 也輸出相同數量。只寫好 content.config.ts 還不算完成。
本篇三種都是 build-time loader。它們和 Day 15:SSG/SSR談的頁面產生時機是兩層問題:loader 先把資料同步進 Content Layer,頁面才決定 build 時預渲染或 request 時產生。
| 情境 | 資料會不會更新 |
|---|---|
執行 astro build |
三種 loader 都會同步 |
astro dev 修改 blog 檔 |
glob() watcher 會更新 |
astro dev 修改 file() 指向的既有單檔 |
file() watcher 會更新 |
| 遠端 API 自己改了 | custom loader 不會自動輪詢;要重新同步,或由 integration 呼叫 refreshContent() |
| 靜態站已部署,來源後來改了 | 不會自己變;要重新 build/deploy |
Content Layer 和資料庫的差別之一,是資料在什麼時候更新。build-time collection 適合發布前就能確定的內容;使用者在網站上隨時新增的收藏、購物車或 feedback,仍要走 Day 22:Drizzle ORM 與 Turso那條 request-time 資料路徑。
Astro 6 之後另有 Live Loader API,可以在 request time 讀 live data,但那是不同介面,不要和本篇的 glob()、file()、custom build-time loader 混在一起。
fetch() 只代表 load() 執行時會抓遠端;它不會在部署後自己輪詢。glob({ deferRender: true }) 是 Astro 7.1.0 才加入,用來把大量 Markdown 的 render 延後到頁面需要時。如果專案還在 Astro 7.0 或更早版本,直接照抄會失敗。這種選項屬於 volatile 知識,使用前要回官方文件確認。
Node 24.16.0 執行 npm run build 後:
loaderNotes 與 astroPackages 都出現在 Astro 產生的 collection 型別。/demos/content-loaders 產成靜態 HTML,三組數量是 23/3/1。三種來源進入 Content Layer 後,都能共用同一套查詢。下一篇 Day 12:schema 與 Zod 驗證會接著處理資料驗證:資料雖然進來了,少填欄位或型別錯誤時,schema 要怎麼在 build 前擋下來。
本日程式碼:step-11|只看這天的改動:step-10...step-11


 iThome鐵人賽
 看影片追技術