

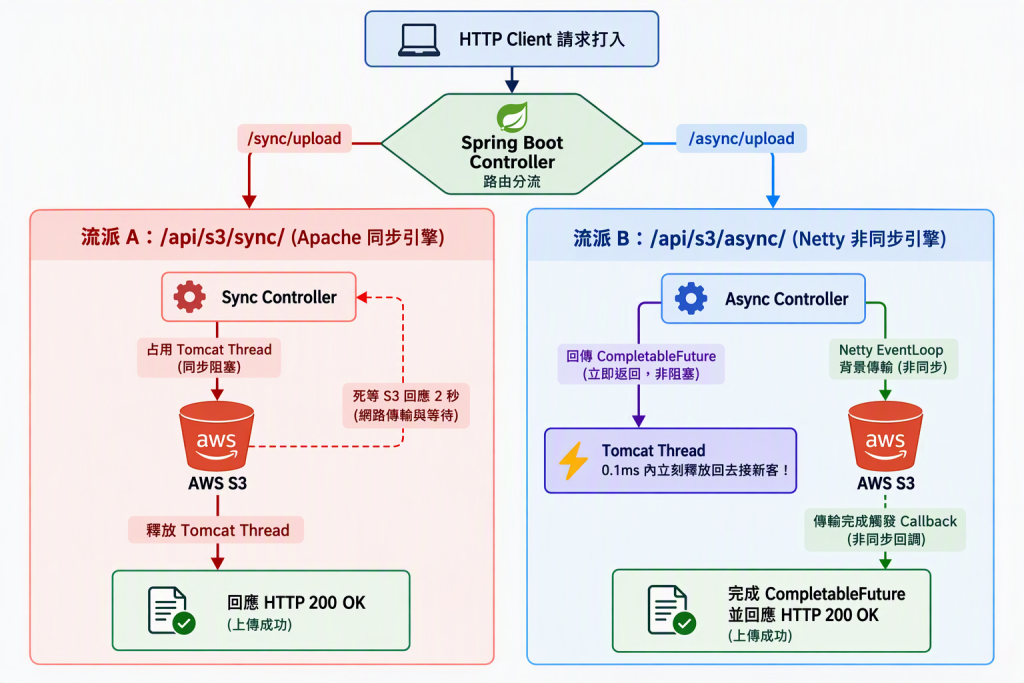
昨天我們成功在本地終端機中驗證了 Apache 同步與 Netty 非同步兩大連線引擎的執行緒行為以及將檔案上傳到AWS S3。今天,我們要將上傳引擎正式升級為一個標準的微服務!使用 Java 生態系中最主流的 Spring Boot 框架,把這兩個引擎包裝成對外的 RESTful API,並一口氣實現 上傳 (Put)、下載 (Get)、列出清單 (List)、刪除 (Delete) 四大核心功能。為了讓大家能同場對照兩種連線流派的實戰差異,我們在 Controller 層設計了雙路由架構
| 方法 | 路徑 | 類型 | 功能 |
|---|---|---|---|
POST |
/api/s3/sync/upload |
同步 | 上傳檔案到 S3 |
GET |
/api/s3/sync/files |
同步 | 列出 S3 bucket 中的檔案 |
GET |
/api/s3/sync/download/{key} |
同步 | 下載指定檔案 |
DELETE |
/api/s3/sync/delete/{key} |
同步 | 刪除指定檔案 |
POST |
/api/s3/async/upload |
非同步 | 非同步上傳檔案到 S3 |
GET |
/api/s3/async/files |
非同步 | 非同步列出 S3 檔案 |
GET |
/api/s3/async/download/{key} |
非同步 | 非同步下載指定檔案 |
DELETE |
/api/s3/async/delete/{key} |
非同步 | 非同步刪除指定檔案 |
隨著專案從單一 Class 演變為 Spring Boot 服務,良好的架構分層能讓程式碼更容易維護。
以下是我們在本地 IDE 中建立的專案目錄結構,這也是後續搬上 Docker 與 K8s 的地基:
com.example.s3service
├── S3ServiceApplication.java (Spring Boot 啟動點)
├── config
│   └── S3Config.java       (定義雙連線引擎 Bean)
├── controller
│   └── S3Controller.java   (提供 RESTful API 路由)
└── service
    └── S3Service.java      (實現 Sync 與 Async 的 S3 核心邏輯)
在 Spring Boot 中,我們要將 S3Client 與 S3AsyncClient 註冊為 IoC 容器中的 Bean,這樣我們在 Service 層就能隨時 @Autowired 直接注入使用。
這裡又會需要Day6 建立AWS S3 bucket取得的access key, secret key,如果你確定沒有要push 到github可以簡單的直接替換下方的System.getenv("AWS_ACCESS_KEY");的部分,但為了資安問題,我們通常會把它變成環境變數的形式來儲存,透過在終端機設定 export AWS_ACCESS_KEY=your_key (windows set AWS_ACCESS_KEY=your_key) 來讓程式碼執行時不會洩漏密鑰,此外區域的部分也要記得調整喔!
package com.example.s3service.config;

import org.springframework.context.annotation.Bean;
import org.springframework.context.annotation.Configuration;
import software.amazon.awssdk.auth.credentials.AwsBasicCredentials;
import software.amazon.awssdk.auth.credentials.StaticCredentialsProvider;
import software.amazon.awssdk.http.apache.ApacheHttpClient;
import software.amazon.awssdk.http.apache.ProxyConfiguration;
import software.amazon.awssdk.http.nio.netty.NettyNioAsyncHttpClient;
import software.amazon.awssdk.regions.Region;
import software.amazon.awssdk.services.s3.S3AsyncClient;
import software.amazon.awssdk.services.s3.S3Client;

import java.net.URI;
import java.time.Duration;

@Configuration
public class S3Config {

    private final String accessKey = System.getenv("AWS_ACCESS_KEY");
    private final String secretKey = System.getenv("AWS_SECRET_KEY");
    private final Region region = Region.AP_SOUTHEAST_2; // 你的Bucket區域

    @Bean
    public S3Client s3Client() {
        return S3Client.builder()
                .region(region)
                .credentialsProvider(StaticCredentialsProvider.create(
                        AwsBasicCredentials.create(accessKey, secretKey)
                ))
                .httpClientBuilder(ApacheHttpClient.builder()
                        .maxConnections(100) // 同步連線池上限
                        .connectionTimeout(Duration.ofSeconds(5))
                        .socketTimeout(Duration.ofSeconds(30))
                        .connectionAcquisitionTimeout(Duration.ofSeconds(10))
                )
                .overrideConfiguration(configuration -> configuration
                        .apiCallAttemptTimeout(Duration.ofSeconds(45))
                        .apiCallTimeout(Duration.ofSeconds(60)))
                .build();
    }

    @Bean
    public S3AsyncClient s3AsyncClient() {
        return S3AsyncClient.builder()
                .region(region)
                .credentialsProvider(StaticCredentialsProvider.create(
                        AwsBasicCredentials.create(accessKey, secretKey)
                ))
                .httpClientBuilder(NettyNioAsyncHttpClient.builder()
                        .maxConcurrency(100) // Netty 併發連線數上限
                        .connectionTimeout(Duration.ofSeconds(5))
                        .readTimeout(Duration.ofSeconds(30))
                        .writeTimeout(Duration.ofSeconds(30))
                )
                .overrideConfiguration(configuration -> configuration
                        .apiCallAttemptTimeout(Duration.ofSeconds(45))
                        .apiCallTimeout(Duration.ofSeconds(60)))
                .build();
    }
}
S3Service 負責跟 AWS S3 進行實質的溝通。在這裡,我們同時注入 S3Client 與 S3AsyncClient。
我們將在這裡實作 Put (上傳)、List (列表)、Delete (刪除)、Get (下載)。注意看非同步方法中,我們是如何利用 Java 21 的 CompletableFuture 優雅地包裹非同步結果的!
package com.example.s3service.service;

import org.springframework.beans.factory.annotation.Autowired;
import org.springframework.stereotype.Service;
import software.amazon.awssdk.core.async.AsyncRequestBody;
import software.amazon.awssdk.core.async.AsyncResponseTransformer;
import software.amazon.awssdk.core.sync.RequestBody;
import software.amazon.awssdk.services.s3.S3AsyncClient;
import software.amazon.awssdk.services.s3.S3Client;
import software.amazon.awssdk.services.s3.model.*;

import java.util.List;
import java.util.concurrent.CompletableFuture;
import java.util.stream.Collectors;

@Service
public class S3Service {

    @Autowired
    private S3Client s3Client;

    @Autowired
    private S3AsyncClient s3AsyncClient;

    // ==========================================
    // 流派 A:Apache 同步阻塞模式 (Sync)
    // ==========================================

    public void uploadSync(String bucket, String key, byte[] content) {
        PutObjectRequest request = PutObjectRequest.builder().bucket(bucket).key(key).build();
        s3Client.putObject(request, RequestBody.fromBytes(content));
    }

    public List<String> listFilesSync(String bucket) {
        ListObjectsV2Request request = ListObjectsV2Request.builder().bucket(bucket).build();
        ListObjectsV2Response response = s3Client.listObjectsV2(request);
        return response.contents().stream().map(S3Object::key).collect(Collectors.toList());
    }

    public void deleteFileSync(String bucket, String key) {
        DeleteObjectRequest request = DeleteObjectRequest.builder().bucket(bucket).key(key).build();
        s3Client.deleteObject(request);
    }

    public byte[] downloadFileSync(String bucket, String key) {
        GetObjectRequest request = GetObjectRequest.builder().bucket(bucket).key(key).build();
        return s3Client.getObjectAsBytes(request).asByteArray();
    }

    // ==========================================
    // 流派 B:Netty 非同步非阻塞模式 (Async)
    // ==========================================

    public CompletableFuture<Void> uploadAsync(String bucket, String key, byte[] content) {
        PutObjectRequest request = PutObjectRequest.builder().bucket(bucket).key(key).build();
        return s3AsyncClient.putObject(request, AsyncRequestBody.fromBytes(content))
                .thenApply(response -> null); // 轉化為 CompletableFuture<Void>
    }

    public CompletableFuture<List<String>> listFilesAsync(String bucket) {
        ListObjectsV2Request request = ListObjectsV2Request.builder().bucket(bucket).build();
        return s3AsyncClient.listObjectsV2(request)
                .thenApply(response -> response.contents().stream()
                        .map(S3Object::key)
                        .collect(Collectors.toList()));
    }

    public CompletableFuture<Void> deleteFileAsync(String bucket, String key) {
        DeleteObjectRequest request = DeleteObjectRequest.builder().bucket(bucket).key(key).build();
        return s3AsyncClient.deleteObject(request).thenApply(response -> null);
    }

    public CompletableFuture<byte[]> downloadFileAsync(String bucket, String key) {
        GetObjectRequest request = GetObjectRequest.builder().bucket(bucket).key(key).build();
        // 關鍵:使用 AsyncResponseTransformer.toBytes() 非同步將 S3 串流轉換為位元組陣列
        return s3AsyncClient.getObject(request, AsyncResponseTransformer.toBytes())
                .thenApply(responseBytes -> responseBytes.asByteArray());
    }
}
我們透過S3 java sdk的方式進行連線,要記得調整下方的 bucketName = "ithome-iron" 替換成自己的bucket不然後緒連線會出錯
💡 非同步的部分,我們返回的不是傳統的物件,而是 CompletableFuture<>,因為Spring Boot 的 Servlet 容器(如 Tomcat)天生支持非同步請求處理。當我們返回 CompletableFuture 時,Tomcat 的工作執行緒會立刻被釋放並回到連線池中去接待別的請求。真正的 HTTP 回應,會等到 Netty 執行緒池在背景完成 S3 傳輸並完成 CompletableFuture 後,才被發送給客戶端。
package com.example.s3service.controller;

import com.example.s3service.service.S3Service;
import org.springframework.beans.factory.annotation.Autowired;
import org.springframework.http.ResponseEntity;
import org.springframework.web.bind.annotation.*;
import org.springframework.web.multipart.MultipartFile;

import java.io.IOException;
import java.util.List;
import java.util.concurrent.CompletableFuture;

@RestController
@RequestMapping("/api/s3")
public class S3Controller {

    @Autowired
    private S3Service s3Service;

    private final String bucketName = "ithome-iron"; // 替換為你的 S3 Bucket 名稱

    // 服務檢查
    @GetMapping("/check")
    public String check() {
        return "ok";
    }

    // ==========================================
    // 1. 同步 API 路由 (Sync Endpoints)
    // ==========================================

    @PostMapping("/sync/upload")
    public ResponseEntity<String> uploadSync(@RequestParam("file") MultipartFile file) throws IOException {
        s3Service.uploadSync(bucketName, file.getOriginalFilename(), file.getBytes());
        return ResponseEntity.ok("[Sync] Upload success: " + file.getOriginalFilename());
    }

    @GetMapping("/sync/files")
    public ResponseEntity<List<String>> listFilesSync() {
        return ResponseEntity.ok(s3Service.listFilesSync(bucketName));
    }

    @GetMapping("/sync/download/{key}")
    public ResponseEntity<byte[]> downloadSync(@PathVariable String key) {
        byte[] data = s3Service.downloadFileSync(bucketName, key);
        return ResponseEntity.ok()
                .header("Content-Disposition", "attachment; filename=\"" + key + "\"")
                .body(data);
    }

    @DeleteMapping("/sync/delete/{key}")
    public ResponseEntity<String> deleteSync(@PathVariable String key) {
        s3Service.deleteFileSync(bucketName, key);
        return ResponseEntity.ok("[Sync] Deleted: " + key);
    }

    // ==========================================
    // 2. 非同步 API 路由 (Async Endpoints - Tomcat 執行緒不卡死!)
    // ==========================================

    @PostMapping("/async/upload")
    public CompletableFuture<ResponseEntity<String>> uploadAsync(@RequestParam("file") MultipartFile file) throws IOException {
        return s3Service.uploadAsync(bucketName, file.getOriginalFilename(), file.getBytes())
                .thenApply(v -> ResponseEntity.ok("[Async] Upload success: " + file.getOriginalFilename()));
    }

    @GetMapping("/async/files")
    public CompletableFuture<ResponseEntity<List<String>>> listFilesAsync() {
        return s3Service.listFilesAsync(bucketName)
                .thenApply(ResponseEntity::ok);
    }

    @GetMapping("/async/download/{key}")
    public CompletableFuture<ResponseEntity<byte[]>> downloadAsync(@PathVariable String key) {
        return s3Service.downloadFileAsync(bucketName, key)
                .thenApply(data -> ResponseEntity.ok()
                        .header("Content-Disposition", "attachment; filename=\"" + key + "\"")
                        .body(data));
    }

    @DeleteMapping("/async/delete/{key}")
    public CompletableFuture<ResponseEntity<String>> deleteAsync(@PathVariable String key) {
        return s3Service.deleteFileAsync(bucketName, key)
                .thenApply(v -> ResponseEntity.ok("[Async] Deleted: " + key));
    }
}
在專案根目錄建立 Spring Boot 啟動類別 S3ServiceApplication.java:
package com.example.s3service;

import org.springframework.boot.SpringApplication;
import org.springframework.boot.autoconfigure.SpringBootApplication;

@SpringBootApplication
public class S3ServiceApplication {

    public static void main(String[] args) {
        SpringApplication.run(S3ServiceApplication.class, args);
    }
}
執行很簡單,只要使用 mvn spring-boot:run 就可以啦,啟動服務後(預設 Port 為 8080),你可以打開終端機用curl的方式確認或是用postman來看看API是否成功
透過Postman的方式,選擇file上傳,且key名稱設定file,上傳成功會回傳[Async] Upload success: 檔名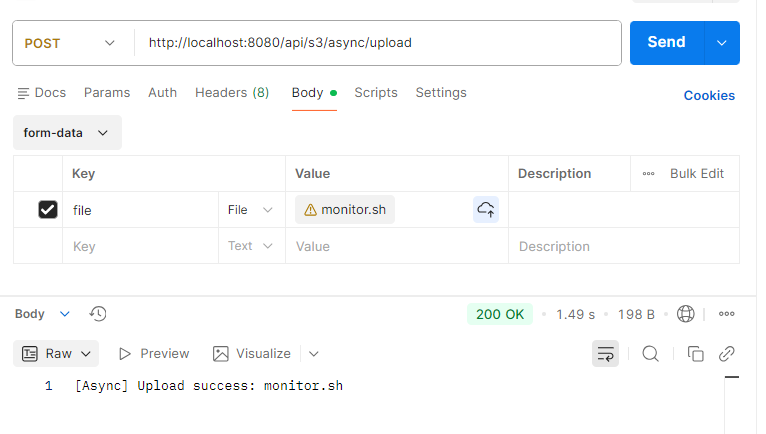
或是用curl -X POST -F "file=@test.txt" http://localhost:8080/api/s3/sync/upload的方式上傳指定的檔案
會發現剛剛上傳的monitor.sh檔案成功上傳且可以看到了,透過aws console頁面也可以看到相同的結果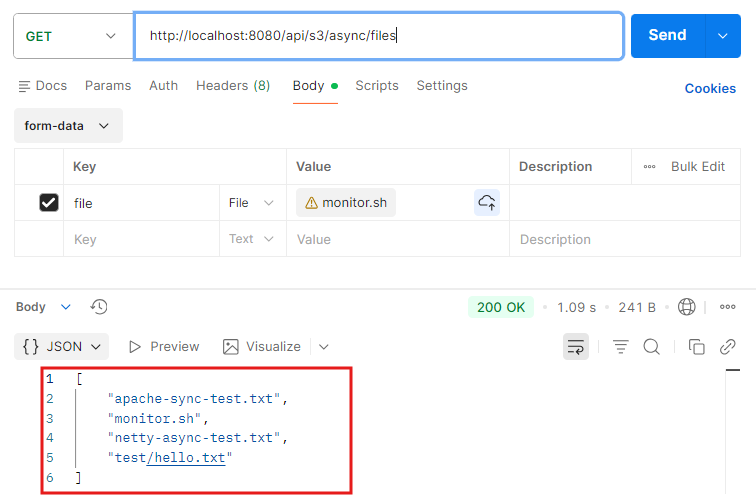
無論使用同步API和非同步API看到的結果都是一樣的!差別只是在於底層邏輯的穩定性不同,對單一使用者來說用起來是沒有太大差異的
今天,我們成功將昨天的底層引擎,大刀闊斧地封裝成了現代化的 Spring Boot 微服務。並且讓Apache與Netty引擎和諧地共存在同一個 JVM 執行環境中。透過在 Spring MVC 控制器中使用 CompletableFuture,我們更解鎖了 Servlet 容器執行緒不卡死、端到端非同步傳輸的成就。
現在地基已經打穩,接下來就要在進入真實世界中討論,因為 API 絕對不可能一直處於網路通暢、運行順利的烏托邦。明天,我們將透過Jmeter的壓力測試來看看兩種不同的底層連線邏輯下,究竟會有多大的差異。以及未來幾天也會和大家說明當真實世界遇上高延遲、封包遺失與 Timeout 災難,我們的微服務會發生什麼悲劇?我們又該如何開始著手設計分散式防禦機制?


 iThome鐵人賽
 看影片追技術