
WebMCP 不只有 registerTool()。Chrome 目前也提供 Declarative API:在標準 HTML <form> 上增加 toolname、tooldescription,表單欄位就能被瀏覽器轉成 Tool parameters。
如果網站本來已經有一張正確、可存取、驗證完整的 Form,Declarative API 可以減少「UI 一份、Tool Schema 又一份」的重複。
原本:
<form action="/support" method="post">
  <label>
    Email
    <input type="email" name="email" required>
  </label>

  <label>
    Message
    <textarea name="message" required></textarea>
  </label>

  <button type="submit">送出</button>
</form>
加上:
<form
  toolname="create_support_request"
  tooldescription="Submit a customer support request."
  action="/support"
  method="post"
>
就把這張 Form 宣告成 Tool。
官方文件目前的兩個核心屬性是:
toolname
tooldescription
如果移除其中一個,該 Declarative Tool 也會被解除註冊。
例如:
<label for="category">問題類型</label>
<select
  id="category"
  name="category"
  required
  toolparamdescription="The support category used to route this request."
>
  <option value="billing">帳務</option>
  <option value="technical">技術</option>
  <option value="account">帳號</option>
</select>
瀏覽器可以把 select 的選項轉成 Schema 的有限值。
另外可用:
toolparamdescription
替欄位補上更精準的參數語意。
如果沒有寫,瀏覽器會參考關聯的 <label> 等既有 HTML 語意。
這也提醒我們:Accessible HTML 對 Agent-friendly Web 也有幫助。
<form
  id="support-form"
  toolname="create_support_request"
  tooldescription="Prepare a customer support request using the user's email, category, and message."
  action="/support"
  method="post"
>
  <label for="email">Email</label>
  <input
    id="email"
    type="email"
    name="email"
    required
    toolparamdescription="Email address for the support reply."
  >

  <label for="category">問題類型</label>
  <select
    id="category"
    name="category"
    required
    toolparamdescription="Category used to route the support request."
  >
    <option value="billing">帳務</option>
    <option value="technical">技術</option>
    <option value="account">帳號</option>
  </select>

  <label for="message">問題描述</label>
  <textarea
    id="message"
    name="message"
    required
    toolparamdescription="Description of the user's support issue."
  ></textarea>

  <button type="submit">送出</button>
</form>
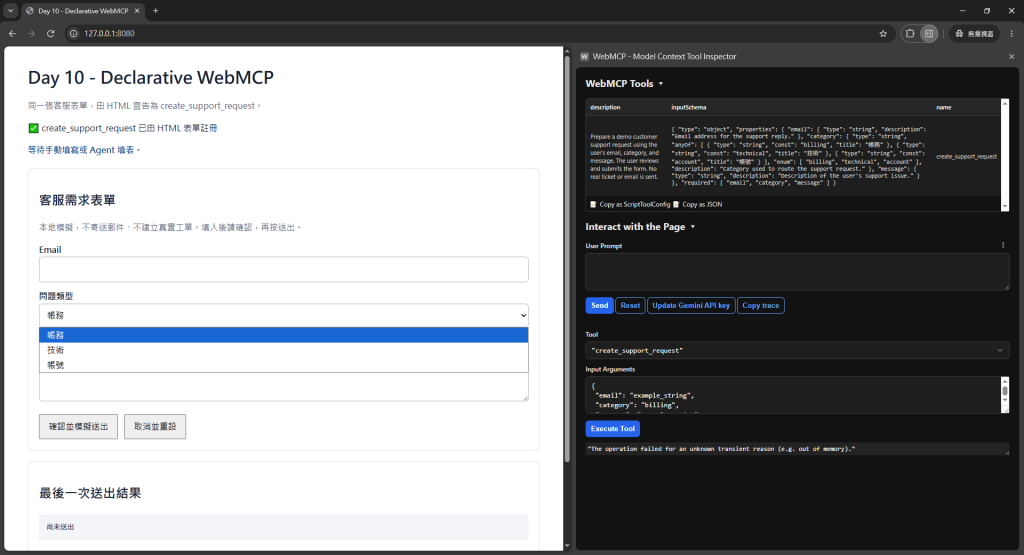
以下操作使用 Day 10 本地 Demo 的 index.html 與 app.js。Demo 補上了 submitSupportForm()、結果顯示與事件紀錄,使用本地模擬工單,不寄送郵件、不建立真實客服需求。前面的 action="/support" 是後端路徑示意;本地 Demo 不依賴這個端點,而是由 submit handler 攔截並處理。
create_support_request。email、category、message,並查看 category 的 billing、technical、account 選項值。toolname、tooldescription、toolparamdescription 是 HTML 屬性,不會直接顯示在輸入欄位上。本地 Demo 的「HTML 宣告與瀏覽器實際 Schema」區塊可展開查看原始宣告與瀏覽器讀取結果。
📸 圖片 1|HTML 表單與瀏覽器產生的 Tool Schema
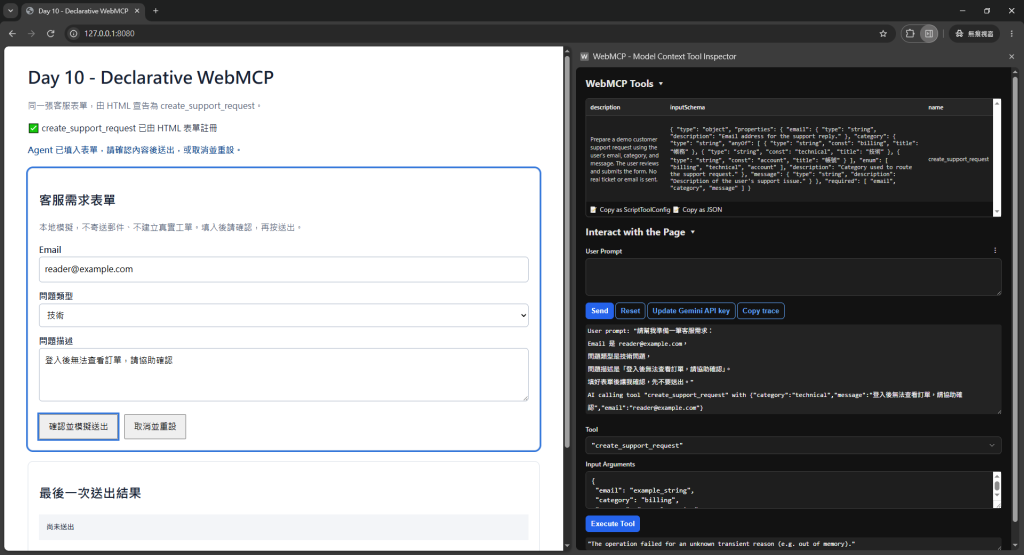
Agent 呼叫時,瀏覽器會把 Form 帶入焦點並填入欄位,使用者仍可以看到內容。
這點我很喜歡:不是黑箱在背景偷偷填資料,而是能保留 UI 作為人類確認介面。
請幫我準備一筆客服需求:
Email 是 reader@example.com,
問題類型是技術問題,
問題描述是「登入後無法查看訂單,請協助確認」。
填好表單後讓我確認,先不要送出。
預期 Email 為 reader@example.com、問題類型為「技術」、問題描述為「登入後無法查看訂單,請協助確認」。頁面會提示「Agent 已填入表單,請確認內容後送出,或取消並重設」,最後一次送出結果仍是「尚未送出」。
此時 Tool 呼叫仍在等待完成是正常流程。不需要等到 Inspector 出現成功結果;這個階段觀察的是 toolactivated,agentInvoked 則是在 submit 階段檢查。
📸 圖片 2|Agent 填妥客服表單,等待人工確認
如果只想驗證 Declarative Tool 能否填表,可在 Inspector 選擇 create_support_request,於 Input Arguments 貼上:
{
  "email": "reader@example.com",
  "category": "technical",
  "message": "登入後無法查看訂單,請協助確認。"
}
按 Execute Tool 後,觀察表單是否填入。category 要使用 technical 等選項值,而非中文顯示文字。這種測試的圖說應寫「Inspector 呼叫 Tool 後填入表單」;它沒有經過自然語言 Agent 的選擇與參數生成。
預設可以讓使用者自己按最後的 Submit。
如果真的希望 Tool 呼叫時自動送出,可以加:
<form
  toolautosubmit
  toolname="search_tool"
  tooldescription="Search public site content."
>
但不要看到 toolautosubmit 就每張 Form 都加。
我會這樣分:
搜尋/篩選
→ 可以考慮 auto submit

聯絡表單
→ 視風險與 UX

付款/刪除/發布
→ 不要只靠 auto submit,應有明確確認流程
Declarative API 擴充 SubmitEvent,提供 agentInvoked。
const form = document.querySelector('#support-form');

form.addEventListener('submit', (event) => {
  if (event.agentInvoked) {
    console.log('Submitted by an agent');
  }
});
如果要自己處理請求並把結果回給 Agent,可以搭配:
event.preventDefault();
event.respondWith(promise);
例如:
form.addEventListener('submit', (event) => {
  event.preventDefault();

  const task = submitSupportForm(new FormData(form))
    .then(result => ({
      status: 'success',
      ticketId: result.id
    }));

  if (event.agentInvoked) {
    event.respondWith(task);
  }
});
上面的 submitSupportForm() 是請求處理函式的示意。本地 Demo 已補上實作,直接回傳包含 status、ticketId、simulated 與 request 的結果,因此可直接將它產生的 task 交給 respondWith,不需要再讀取 result.id。
respondWith(task) 必須在 submit handler 中同步呼叫;把非同步工作放進 task,不要先 await 工作完成才呼叫 respondWith。
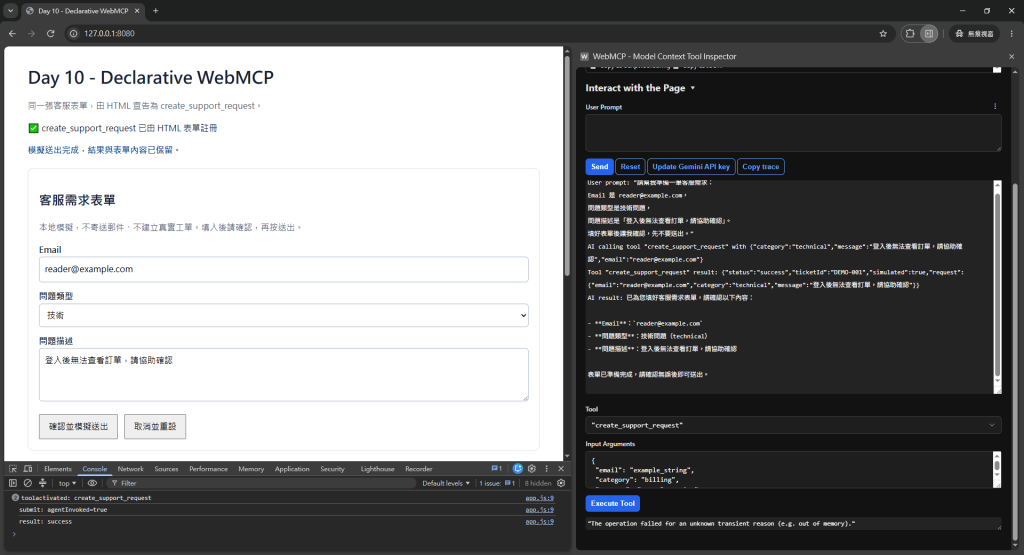
第一次成功送出的預期結果:
{
  "status": "success",
  "ticketId": "DEMO-001",
  "simulated": true,
  "request": {
    "email": "reader@example.com",
    "category": "technical",
    "message": "登入後無法查看訂單,請協助確認。"
  }
}
request 會保留實際送出的內容,包含使用者在確認前的修改。若已成功測試多次,工單編號會遞增。
📸 圖片 3|確認送出後,回傳模擬工單結果
三張圖依序對應:表單成為 Tool → Agent 填表 → 使用者確認並取得結果。
當 Agent 啟用 Declarative Tool 並填好欄位後,window 會收到:
window.addEventListener('toolactivated', ({ toolName }) => {
  console.log('Activated:', toolName);
});
取消則是:
window.addEventListener('toolcancel', ({ toolName }) => {
  console.log('Cancelled:', toolName);
});
可以拿來:
再次呼叫 create_support_request,等表單填妥後,改按「取消並重設」。檢查表單是否重設,以及互動事件紀錄是否出現 toolcancel。這次不應產生新的模擬工單。
手動輸入表單並送出也能驗證一般使用者流程,但不能當作 Agent 填表的證據。
我自己的判斷:
| 情境 | 建議 |
|---|---|
| 已有標準 HTML Form | Declarative 優先評估 |
| 複雜資料查詢 | Imperative |
| 多 API 串接 | Imperative |
| 需要完全自訂 Result | Imperative 或 Declarative + respondWith |
| 單純填表並讓使用者確認 | Declarative 很適合 |
不是誰比較高級,而是不要重複實作。
toolname、tooldescription。toolparamdescription 可以補欄位語意。toolautosubmit 要依風險使用,不是預設全部打開。agentInvoked、respondWith()、toolactivated、toolcancel 讓網站能處理 Agent 互動生命週期。


 iThome鐵人賽
 看影片追技術