
搜尋是我最推薦第一個 WebMCP 化的功能:read-only、風險低、效果又很容易比較。傳統 Agent 需要找搜尋框、輸入、送出、讀結果;WebMCP 可以直接變成:
search_content({ keyword: "WebMCP", limit: 5 })
今天做一個真正可以用的 search_content Tool,並處理搜尋參數、結果裁切與 no results。
這次建立一個站內搜尋頁面。使用者可以在網頁上搜尋,Agent 也可以透過 Tool 搜尋,兩者共用 searchContent()。搜尋與文章詳情的 Tool 都在 app.js 中註冊。
建立兩個檔案:index.html、app.js。以下 app.js 程式區塊依順序組合:文章資料 → searchContent() → UI 事件 → WebMCP 支援檢查 → search_content → get_content。不要重複貼入註冊區塊。
index.html:
<!DOCTYPE html>
<html lang="zh-Hant">
<head>
  <meta charset="UTF-8">
  <meta name="viewport" content="width=device-width, initial-scale=1.0">
  <title>Day 11 - WebMCP 站內搜尋</title>
  <style>
    body { font-family: system-ui; max-width: 900px; margin: 32px auto; padding: 0 24px; line-height: 1.6; }
    label { display: block; margin: 12px 0; }
    input, select, button { font: inherit; padding: 8px; }
    pre { background: #f5f5f5; padding: 16px; white-space: pre-wrap; }
  </style>
</head>
<body>
  <h1>Day 11 - WebMCP 站內搜尋</h1>
  <form id="search-form">
    <label>關鍵字 <input name="keyword" required></label>
    <label>分類
      <select name="category">
        <option value="">全部</option>
        <option value="webmcp">WebMCP</option>
        <option value="mcp">MCP</option>
        <option value="wordpress">WordPress</option>
      </select>
    </label>
    <label>筆數 <input name="limit" type="number" min="1" max="10" value="5" required></label>
    <button type="submit">搜尋</button>
  </form>
  <p id="status">檢查中…</p>
  <h2>搜尋結果</h2>
  <pre id="results">尚未搜尋</pre>
  <script type="module" src="./app.js"></script>
</body>
</html>
為了讓文章可以直接重現,先用靜態資料:
const articles = [
  {
    id: 1,
    title: 'WebMCP 入門',
    summary: '介紹 WebMCP 與 Browser Agent 的差異。',
    category: 'webmcp',
    url: '/articles/webmcp-intro',
    body: 'WebMCP 讓網站透過 Tool 提供能力。Browser Agent 可以依 Tool 的名稱、描述與 Schema 呼叫網站功能。此處是本地示範全文。'
  },
  {
    id: 2,
    title: 'MCP Server 實戰',
    summary: '建立一個簡單 MCP Server。',
    category: 'mcp',
    url: '/articles/mcp-server',
    body: 'MCP Server 將外部服務的能力提供給 AI 應用。本示範用這篇資料區分 MCP 與 WebMCP 相關搜尋結果。'
  }
];
真正上線時再把 articles 換成 REST API、Database 或 CMS。這裡的 url 是示範路徑,尚未建立對應文章頁;取得全文請使用 get_content。
async function searchContent({ keyword, category, limit = 5 }) {
  const normalizedKeyword = keyword.trim().toLowerCase();

  return articles
    .filter(item => {
      const matchesKeyword =
        item.title.toLowerCase().includes(normalizedKeyword) ||
        item.summary.toLowerCase().includes(normalizedKeyword);

      const matchesCategory =
        !category || item.category === category;

      return matchesKeyword && matchesCategory;
    })
    .slice(0, limit);
}
注意:這個 function 完全不知道 WebMCP 是什麼。
這是我前面一直強調的原則:
Business Logic
→ 可被 UI 用
→ 可被 WebMCP 用
→ 可被 API 用
在 app.js 的 searchContent() 後加入:
const form = document.querySelector('#search-form');
const resultsElement = document.querySelector('#results');

form.addEventListener('submit', async event => {
  event.preventDefault();
  const data = new FormData(form);
  const keyword = String(data.get('keyword')).trim();

  if (!keyword) {
    resultsElement.textContent = '請輸入非空白關鍵字。';
    return;
  }

  const results = await searchContent({
    keyword,
    category: String(data.get('category')) || undefined,
    limit: Number(data.get('limit'))
  });

  resultsElement.textContent = JSON.stringify({
    count: results.length,
    items: results.map(({ id, title, summary, url, category }) => ({
      id, title, summary, url, category
    }))
  }, null, 2);
});
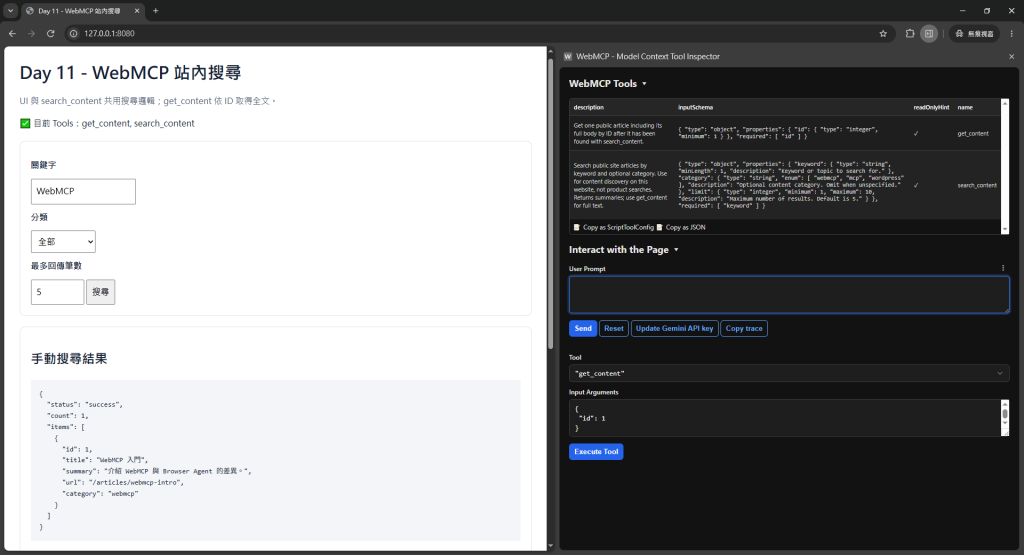
透過 localhost 開啟頁面,輸入 WebMCP、分類選「全部」、筆數填 5,再按「搜尋」。以本文兩筆資料為例,應找到 1 筆「WebMCP 入門」。
📸 圖片 1|使用搜尋介面找到 WebMCP 文章
在 UI 事件後,先加入支援檢查,再貼上下方 Tool 定義:
if (!document.modelContext) {
  document.querySelector('#status').textContent =
    'WebMCP 不可用;仍可手動搜尋,Tool 測試需支援的 Chrome 環境。';
  throw new Error('WebMCP is not available.');
}
await document.modelContext.registerTool({
  name: 'search_content',
  description: 'Search public site articles by keyword and optional category. Use this when the user wants to find content on this website.',
  inputSchema: {
    type: 'object',
    properties: {
      keyword: {
        type: 'string',
        minLength: 1,
        description: 'Keyword or topic to search for.'
      },
      category: {
        type: 'string',
        enum: ['webmcp', 'mcp', 'wordpress'],
        description: 'Optional content category.'
      },
      limit: {
        type: 'integer',
        minimum: 1,
        maximum: 10,
        description: 'Maximum number of results. Default is 5.'
      }
    },
    required: ['keyword']
  },
  annotations: {
    readOnlyHint: true
  },
  execute: async ({ keyword, category, limit = 5 }) => {
    const results = await searchContent({ keyword, category, limit });

    if (results.length === 0) {
      return JSON.stringify({
        status: 'no_results',
        message: 'No public content matched the current search.'
      });
    }

    return JSON.stringify({
      status: 'success',
      count: results.length,
      items: results.map(({ id, title, summary, url, category }) => ({
        id,
        title,
        summary,
        url,
        category
      }))
    });
  }
});
因為 Agent 不需要一次吃完整搜尋結果。
如果網站搜尋出 500 篇文章,直接全部回傳:
return JSON.stringify(results);
只會:
比較好的流程:
search_content
→ 回 5~10 筆摘要
→ Agent 選一筆
→ get_content(id)
→ 再拿完整內容
這就是 Search / Detail 拆兩個 Tools 的好處。
await document.modelContext.registerTool({
  name: 'get_content',
  description: 'Get one public article by ID after it has been found with search_content.',
  inputSchema: {
    type: 'object',
    properties: {
      id: {
        type: 'integer',
        minimum: 1
      }
    },
    required: ['id']
  },
  annotations: {
    readOnlyHint: true
  },
  execute: async ({ id }) => {
    const item = articles.find(item => item.id === id);

    if (!item) {
      return JSON.stringify({
        status: 'no_results',
        message: 'Article not found.'
      });
    }

    return JSON.stringify({
      status: 'success',
      item
    });
  }
});
完成兩個 Tool 的註冊後,在 app.js 最後加入:
const tools = await document.modelContext.getTools();
document.querySelector('#status').textContent =
  '目前 Tools:' + tools.map(tool => tool.name).join(', ');
重新整理網頁,確認頁面與 Inspector 都有 search_content、get_content。
在 Inspector 選擇 search_content,Input Arguments 貼上:
{
  "keyword": "WebMCP",
  "limit": 5
}
按 Execute Tool,預期 status 為 success、count 為 1,items 包含 id: 1 與「WebMCP 入門」。count 是此次回傳筆數,不是套用 limit 前的總命中數。
這個步驟先確認程式可執行;它尚未驗證模型能否從自然語言選對工具。Tool 的結果顯示在 Inspector;左側搜尋結果只有在手動按搜尋時更新,不要把左側舊結果當成這次 Tool 呼叫的證據。
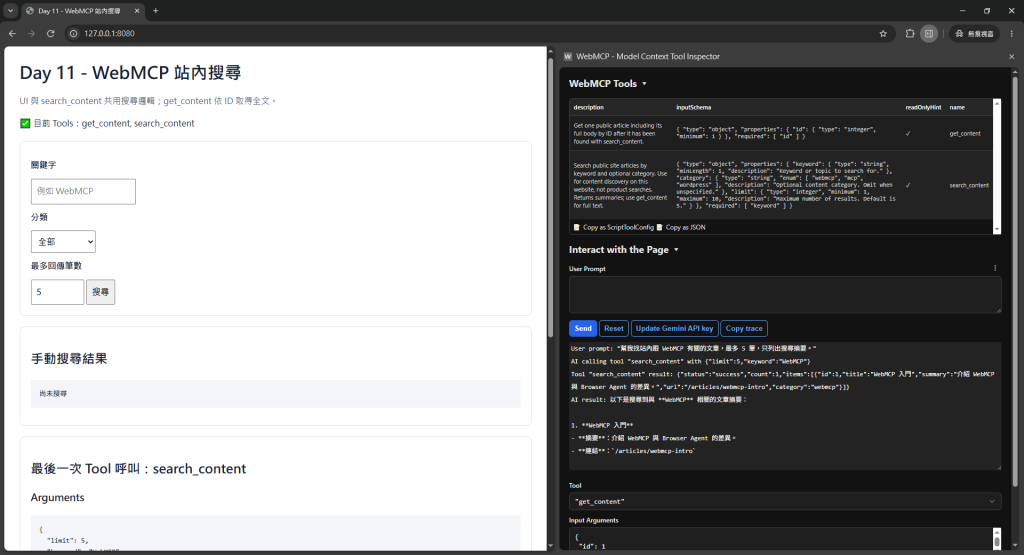
開啟 Inspector 的 Interact with the Page;若尚未設定,先用 Set Gemini API Key 完成設定,再輸入:
幫我找站內跟 WebMCP 有關的文章,最多 5 筆,只列出搜尋摘要。
確認 Agent 選擇 search_content,Arguments 的 keyword 是 WebMCP,並回傳搜尋結果。本資料集只有 1 筆符合,因此 limit: 5 不代表一定會有 5 筆。
📸 圖片 2|Agent 呼叫 search_content 取得搜尋摘要
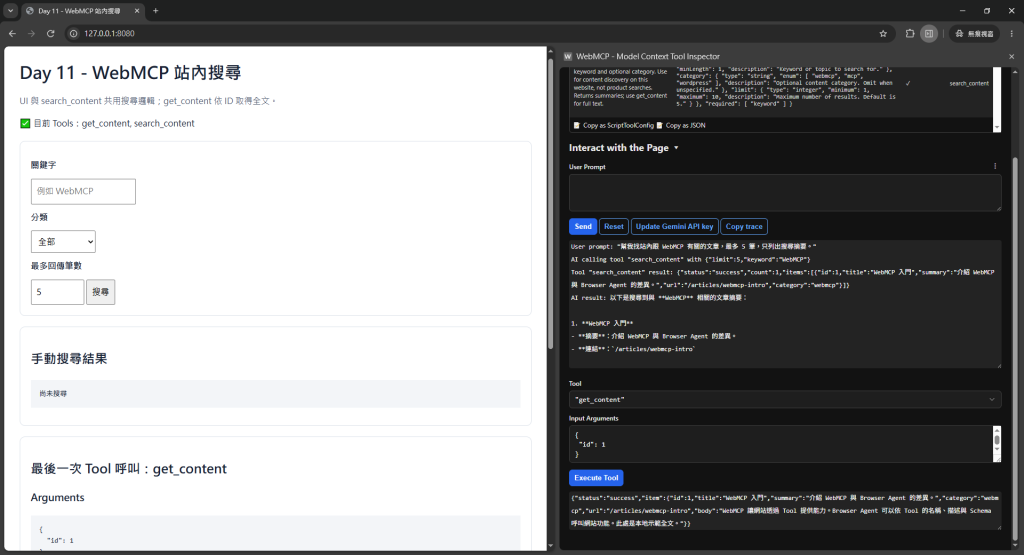
先在 Inspector 選擇 get_content,將剛剛查到的 id 填入:
{
  "id": 1
}
按 Execute Tool,預期 status 為 success,item 除了原本摘要,也包含 body。search_content 的 items 不包含 body,get_content 才回傳全文。
也可以接續 Agent 對話:「請讀取剛才找到的 WebMCP 入門全文」,觀察是否呼叫 get_content,並使用搜尋結果中的 id,而不是自行猜測。
📸 圖片 3|get_content 依文章 ID 回傳全文
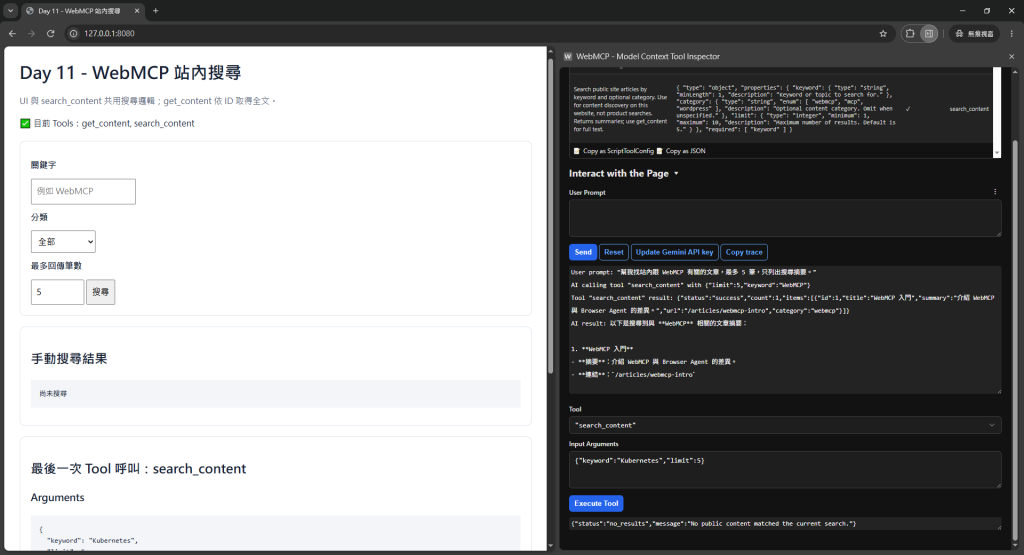
在 Inspector 選擇 search_content,輸入:
{
  "keyword": "Kubernetes",
  "limit": 5
}
按 Execute Tool,預期結果:
{
  "status": "no_results",
  "message": "No public content matched the current search."
}
📸 圖片 4|搜尋正常完成,但沒有符合文章
同一個任務:
幫我找站內跟 WebMCP 有關的文章。
UI 路徑可能是:
找到搜尋 icon
→ 展開搜尋框
→ 輸入 WebMCP
→ Enter
→ 等結果頁
→ 讀文章卡片
Tool 路徑:
search_content({ keyword: "WebMCP" })
這不是說 Tool 一定比較快,而是「搜尋能力」被明確建模後,Agent 不需要再理解每個網站不同的搜尋 UI。
1. 幫我找 WebMCP 的文章。
2. 找 WordPress 分類裡跟 AI 有關的內容。
3. 給我三篇 MCP 相關文章。
4. 找 Kubernetes 文件。  ← 預期 no_results
5. 幫我找商品。          ← 預期不應使用 search_content
本文只有兩筆示範資料:第 2 句因為沒有 WordPress 文章,預期 no_results;第 3 句以子字串比對 MCP,會同時命中 WebMCP 入門與 MCP Server 實戰,因此最多回傳 2 筆,不能為了湊滿三篇而捏造資料。
第五個是 Negative Test,也是 Evals 回歸測試的重要案例。請觀察 Agent 是否避免使用站內文章搜尋來找商品,這是模型選擇行為的測試,不能只靠手動 Execute 驗證。
readOnlyHint。


 iThome鐵人賽
 看影片追技術