
昨天已經能抓到「點到了什麼」,Console 印出來的是 odm_textured_model_geo_2 這類名字。今天要解決:點到彩蛋角色時,要能正確判斷出「這是彩蛋」。
公園跟彩蛋是 Day9 在 Blender 裡一起選取、一起匯出成同一個 blender_output.glb,所以不會有兩個檔案要分開載入,而是同一個 gltf.scene 裡面,同時包著公園跟彩蛋。
loader.load('blender_output.glb', (gltf) => {
  scene.add(gltf.scene);

  // ↓↓↓ 這整段只是用來「看」,確認完結構之後就可以刪掉,不是最終邏輯的一部分
  gltf.scene.traverse((obj) => {
    console.log('-'.repeat(obj.parent === gltf.scene ? 0 : 2), obj.name, `(${obj.type})`);
  });
  // ↑↑↑ 探索用的程式碼,到此結束
});
逐段拆解這段在做什麼:
gltf.scene.traverse(callback):依官方 Object3D 文件,「Executes the callback on this 3D object and all descendants」——對 gltf.scene 自己,以及它底下所有層級的子孫物件,一個一個執行這個函式。跟後面會用到的 traverseAncestors(只往上找祖先)方向相反,traverse 是往下找、找全部。印出來的實際結構是這樣:
Scene (Group)
└─ CharacterArmature (Object3D)
   ├─ Character (SkinnedMesh)      ← 彩蛋角色真正的「身體」
   ├─ Root (Bone)
   ├─ Body (Bone)
   ├─ Hips (Bone)
   ├─ ...
└─ odm_textured_model_geo (Group)  ← 公園本體,跟彩蛋是平輩
確認了「彩蛋角色的根節點真的叫 CharacterArmature」、「Character 這個 Mesh 確實是它的直接子物件」這兩件事之後,才能安心寫 getObjectByName('CharacterArmature')。如果沒有先探索就直接寫,萬一名字拼錯或結構跟想的不一樣,getObjectByName 會回傳 undefined,後面貼標籤那行會直接出錯,卻不知道問題出在哪。
也可以回頭對照 Day9 在 Blender 的 Scene Collection 裡看到的角色名稱,確認跟 Three.js 這裡讀到的名稱是一致的,如附圖,和 Three.js 這裡讀到的名稱是一致的
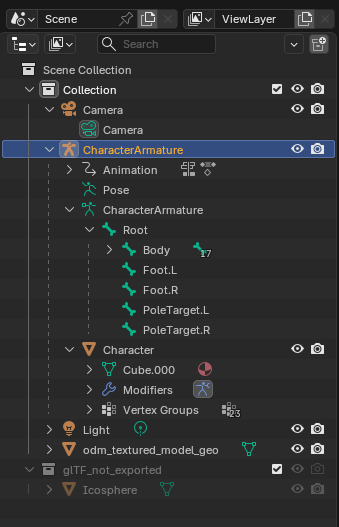
幾個重點:
Character,型態是 SkinnedMesh(支援骨架動畫的 Mesh)raycast() 是給 Mesh、Line、Points 這類有幾何形狀的物件實作的方法,Bone 沒有這個方法,Raycaster 永遠不會回報「點到了一根骨頭」Character 是 CharacterArmature 的直接子物件,結構很單純結論:只要對 CharacterArmature 這個節點貼一次標籤,就能代表整個彩蛋。
userData 和 getObjectByName依官方文件,userData 是「An object that can be used to store custom data about the 3D object」
=> 可以在任何物件上自己加一個欄位
依官方文件,getObjectByName(name) 會「Searches through an object and its children, starting with the object itself, and returns the first with a matching name」
=> 從某個物件開始,往下找出第一個名字相符的物件
loader.load('blender_output.glb', (gltf) => {
  scene.add(gltf.scene);

  const characterArmature = gltf.scene.getObjectByName('CharacterArmature');
  if (characterArmature) {
    characterArmature.userData.isEgg = true;
  } else {
    console.warn('找不到 CharacterArmature,請確認模型裡的物件名稱');
  }

  // ...(Box3、相機定位、controls.target 都不動)
});
玩家點到的一定是 Character(唯一的 Mesh),不是 CharacterArmature 本身,所以要往上找。依官方文件,traverseAncestors(callback) 是「Like traverse, but the callback will only be executed for all ancestors」——從某個物件開始,對它所有的祖先(parent、parent 的 parent……)依序執行一個函式。
function isPartOfEgg(object) {
  if (object.userData.isEgg) return true;
  let found = false;
  object.traverseAncestors((ancestor) => {
    if (ancestor.userData.isEgg) found = true;
  });
  return found;
}
為什麼要寫成「自己有標籤,或往上找得到標籤」兩種情況都檢查:這次 Character 只是 CharacterArmature 的直接子物件,往上找一層就夠;但這樣寫的函式比較保險,不管之後模型結構多包了幾層,都還是能正確判斷,不用特地去數現在是第幾層。
接在 Day17 的版本後面,// ★ 是今天新加的:
loader.load('blender_output.glb', (gltf) => {
  scene.add(gltf.scene);

  // ★ 找到彩蛋的根節點,貼標籤
  const characterArmature = gltf.scene.getObjectByName('CharacterArmature');
  if (characterArmature) {
    characterArmature.userData.isEgg = true;
  }

  const box = new THREE.Box3().setFromObject(gltf.scene);
  const center = box.getCenter(new THREE.Vector3());
  const size = box.getSize(new THREE.Vector3());
  const maxDim = Math.max(size.x, size.y, size.z);

  camera.position.set(center.x, center.y + maxDim, center.z + maxDim);
  camera.lookAt(center);
  camera.far = maxDim * 10;
  camera.updateProjectionMatrix();

  controls.target.copy(center);
});

// ★ 判斷某個物件是否屬於彩蛋
function isPartOfEgg(object) {
  if (object.userData.isEgg) return true;
  let found = false;
  object.traverseAncestors((ancestor) => {
    if (ancestor.userData.isEgg) found = true;
  });
  return found;
}

window.addEventListener('click', (event) => {
  pointer.x = (event.clientX / window.innerWidth) * 2 - 1;
  pointer.y = -(event.clientY / window.innerHeight) * 2 + 1;

  raycaster.setFromCamera(pointer, camera);
  const intersects = raycaster.intersectObjects(scene.children, true);

  if (intersects.length === 0) {
    console.log('沒點到任何東西');
    return;
  }

  const hit = intersects[0].object;

  // ★ 用新函式判斷,不是比對名字
  if (isPartOfEgg(hit)) {
    console.log('🎉 找到了!點到彩蛋的:', hit.name);
    alert('恭喜你找到彩蛋了!');
  } else {
    console.log('點到公園本體:', hit.name);
  }
});
最後確認點擊到預先埋好的人物後,有 alert 跳出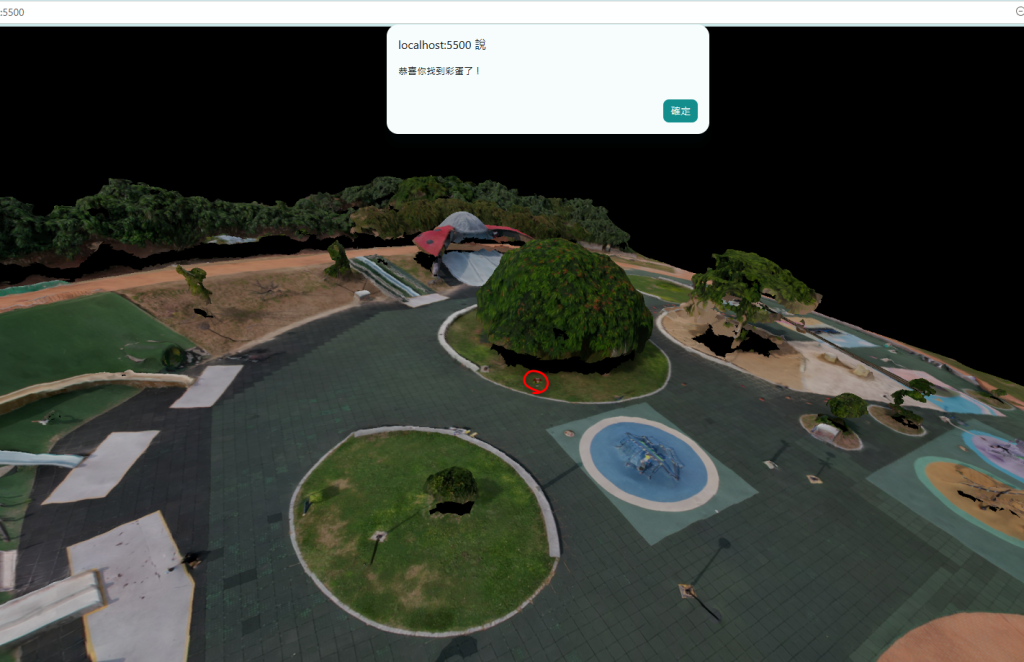
點擊判斷已經打通了,接下來要把 alert() 這種陽春的提示,換成更像遊戲的畫面回饋。


 iThome鐵人賽
 看影片追技術