

在本篇部落格文章中,我們將使用穩定版的 Angular Signal Forms API(@angular/forms/signals)建置登入互動視窗元件(SignInModalComponent),藉此處理電子郵件與密碼身分驗證。
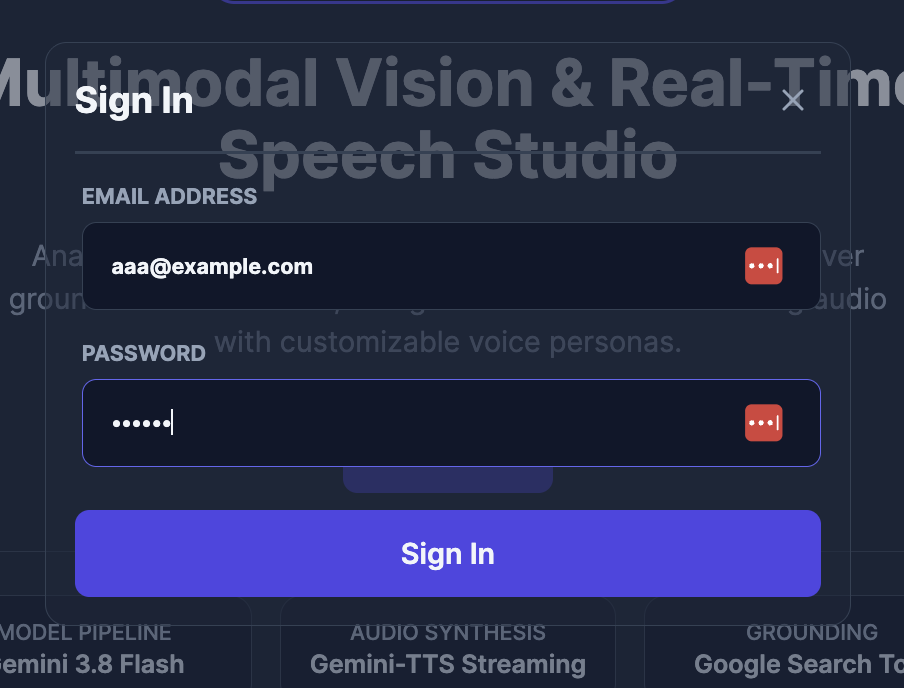
圖說:包含電子郵件與密碼欄位的登入對話框。
登入流程的運作方式如下:
email 與 password 欄位的 Signal Form。當送出表單且驗證失敗時,onInvalid 會自動將焦點移至第一個無效的表單控制項。SignInModalComponent 會呼叫 AuthService.signIn(),驗證所送出的電子郵件與密碼是否符合 Firebase Authentication 中的現有帳號。AuthService.isAuthenticated() 為 true)時,互動視窗會關閉並將使用者重新導向至 /dashboard 路由,讓使用者能在此執行 AI 任務。SignInModalComponent.signIn() 會更新其 errorMessage Signal('Failed to sign in. Please check your credentials and try again.'),並回傳 { kind: 'serverError', message: 'Failed to submit form' }。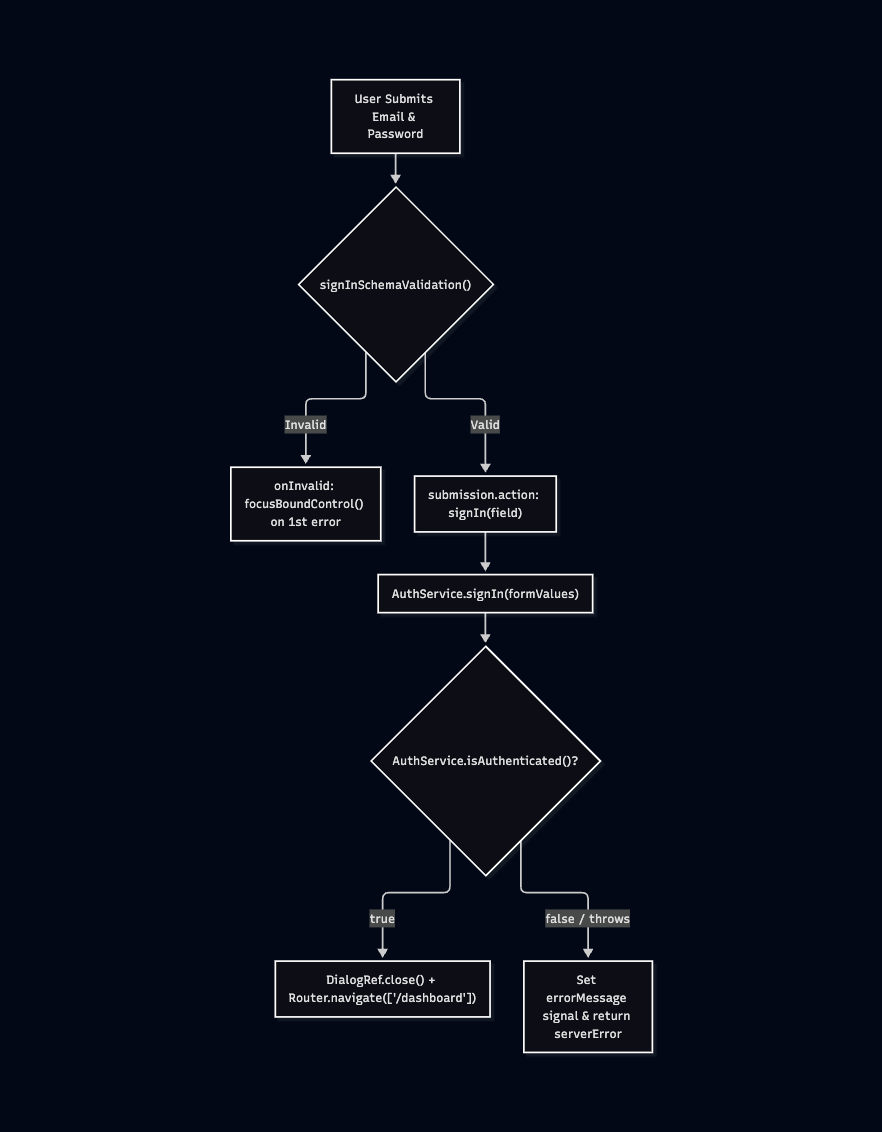
首先,我們從 @angular/forms/signals 匯入 required 與 email 驗證器來定義 signInSchemaValidation(),此函式會回傳 SchemaOrSchemaFn<AuthCredentials, PathKind.Root>:
required):required 驗證器會將 email 與 password 兩個欄位皆標記為必填,並設定自訂錯誤訊息({ message: 'Email is required' } 與 { message: 'Password is required' })。email):email 驗證器會檢查輸入的電子郵件值是否為格式正確的電子郵件地址,並在格式無效時回傳 { message: 'Invalid email format' }。// src/app/shared/ui/sign-in-modal/schemas/sign-in.schema.ts
import type { AuthCredentials } from '@/core/auth';
import type { PathKind, SchemaOrSchemaFn } from '@angular/forms/signals';
import { email, required } from '@angular/forms/signals';
export function signInSchemaValidation(): SchemaOrSchemaFn<AuthCredentials, PathKind.Root> {
return (schemaPath) => {
required(schemaPath.email, { message: 'Email is required' });
email(schemaPath.email, { message: 'Invalid email format' });
required(schemaPath.password, { message: 'Password is required' });
};
}
AuthService 建置 SignInModalComponent在 SignInModalComponent 中,我們注入所需的服務並初始化響應式表單模型:
AuthService 與 Router:負責處理登入後的 Firebase 電子郵件/密碼身分驗證與路由導覽。DialogRef:當使用者點擊關閉按鈕或登入成功時,透過 @angular/cdk/dialog(inject(DialogRef, { optional: true }))關閉互動視窗。errorMessage:當身分驗證失敗時,儲存並顯示警告訊息(signal<string | undefined>(undefined))。signInModel:作為 Signal Form 的底層狀態模型(signal<AuthCredentials>({ email: '', password: '' })),並將 email 與 password 欄位初始化為空字串。[!NOTE]
為什麼選擇@angular/cdk/dialog而非原生<dialog>元素?
如果您只需要在不依賴@angular/cdk的應用程式中實作單一互動視窗,原生的 HTML<dialog>元素會是更佳的零相依性選擇。然而,此存放庫原本就已包含@angular/cdk,且@angular/cdk/dialog內建完整的無障礙支援(a11y)——包含焦點鎖定(Focus Trapping)、焦點還原(Focus Restoration)、按Escape鍵關閉以及 ARIA 屬性。此外,由於我們在開啟互動視窗時也會動態匯入@angular/cdk/dialog,因此它完全不會增加初始打包大小(Initial Bundle Size),在這裡是個相當務實的選擇。
// src/app/core/auth/auth-credentials.interface.ts
export interface AuthCredentials {
  email: string;
  password: string;
}
// src/app/shared/ui/sign-in-modal/sign-in-modal.component.ts (Part 1a: Dependencies & Model)
@Component({
  imports: [FormField, FormRoot, CloseIconComponent, SpinnerIconComponent],
  selector: 'app-sign-in-modal',
})
export class SignInModalComponent {
  readonly #authService = inject(AuthService);
  readonly #dialogRef = inject(DialogRef, { optional: true });
  readonly #router = inject(Router);

  errorMessage = signal<string | undefined>(undefined);

  signInModel = signal<AuthCredentials>({
    email: '',
    password: '',
  });
接著,我們將 this.signInModel 與 signInSchemaValidation() 傳遞給 form() 函式以建立 signInForm。form() 函式會根據驗證綱要來驗證 signInModel,並設定表單送出行為:
submission.action):當驗證成功時,表單送出會執行 action 回呼,進而呼叫 this.signIn(field)。submission.onInvalid):當驗證失敗時,表單送出會執行 onInvalid 回呼以找出第一個驗證錯誤(field().errorSummary()[0]),並自動將焦點移至其繫結的表單控制項(firstError?.fieldTree().focusBoundControl())。// src/app/shared/ui/sign-in-modal/sign-in-modal.component.ts (Part 1b: Signal Form)
signInForm = form(this.signInModel, signInSchemaValidation(), {
submission: {
action: async (field) => this.signIn(field),
onInvalid: (field) => {
const firstError = field().errorSummary()[0];
firstError?.fieldTree().focusBoundControl();
},
},
});
onClose() 與 signIn()接下來,我們在 SignInModalComponent 中實作 onClose() 與 signIn() 方法:
onClose():當使用者點擊右上角的關閉按鈕時,呼叫 this.#dialogRef?.close() 以關閉互動視窗。signIn():呼叫 this.#authService.signIn(field().value()),向 Firebase Authentication 驗證所送出的表單憑證:
this.#authService.isAuthenticated() 的評估結果為 true 時,我們會關閉互動視窗(this.#dialogRef?.close())、導覽至 /dashboard 路由(await this.#router.navigate([APP_LINKS.DASHBOARD])),並回傳 undefined。this.errorMessage.set('Failed to sign in. Please check your credentials and try again.'),並回傳通用送出錯誤({ kind: 'serverError', message: 'Failed to submit form' }),讓 Signal Form 記錄送出失敗的狀態。// src/app/shared/ui/sign-in-modal/sign-in-modal.component.ts (Part 2: onClose & signIn)
onClose(): void {
this.#dialogRef?.close();
}
async signIn(field: FieldTree<AuthCredentials, string | number>): Promise<SignInSubmissionError | undefined> {
this.errorMessage.set(undefined);
await this.#authService.signIn(field().value());
if (this.#authService.isAuthenticated()) {
this.#dialogRef?.close();
await this.#router.navigate([APP_LINKS.DASHBOARD]);
return undefined;
}
this.errorMessage.set('Failed to sign in. Please check your credentials and try again.');
return { kind: 'serverError', message: 'Failed to submit form' };
}
}
現在,讓我們在 src/app/shared/ui/sign-in-modal/sign-in-modal.component.html 中將 signInForm 串接至元件範本:
onClose() 會透過 this.#dialogRef?.close() 關閉互動視窗。errorMessage() 包含訊息(@if (errorMessage(); as msg))時,範本會在表單上方渲染 <div role="alert">{{ msg }}</div>。[formRoot]):[formRoot] 指令會將 <form> 元素直接繫結至 signInForm 表單模型,將表單送出事件串接至我們在元件中定義的 submission 設定。[formField]):[formField] 指令會將 signInForm.email 繫結至電子郵件輸入欄位,並將 signInForm.password 繫結至密碼輸入欄位。touched())且該欄位無效(invalid())時,我們會使用 @for 走訪其 errors() 陣列,輸出每一則驗證錯誤訊息({{ error.message }})。submission.action 正在執行時,signInForm().submitting() 的評估結果會是 true。我們在送出按鈕上繫結 [disabled]="signInForm().submitting()",藉此在身分驗證期間停用按鈕並防止重複送出。<!-- src/app/shared/ui/sign-in-modal/sign-in-modal.component.html (Signal Form excerpt) -->
@if (errorMessage(); as msg) {
<div role="alert">{{ msg }}</div>
}
<form [formRoot]="signInForm">
<label for="sign-in-email">
EMAIL ADDRESS
<input id="sign-in-email" type="email" autocomplete="username" [formField]="signInForm.email" />
@if (signInForm.email().touched() && signInForm.email().invalid()) {
@for (error of signInForm.email().errors(); track error) {
<span>{{ error.message }}</span>
}
}
</label>
<label for="sign-in-password">
PASSWORD
<input id="sign-in-password" type="password" autocomplete="current-password" [formField]="signInForm.password" />
@if (signInForm.password().touched() && signInForm.password().invalid()) {
@for (error of signInForm.password().errors(); track error) {
<span>{{ error.message }}</span>
}
}
</label>
<button type="submit" [disabled]="signInForm().submitting()">
@if (signInForm().submitting()) {
<app-spinner-icon />
<span>Signing in...</span>
} @else {
<span>Sign In</span>
}
</button>
</form>
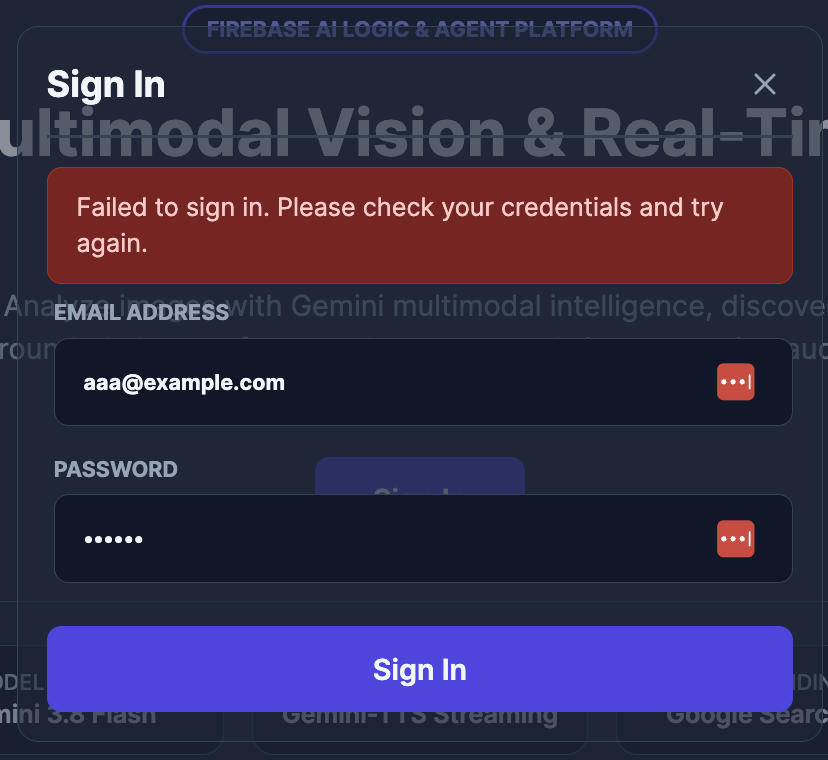
圖說:登入驗證失敗時的登入對話框。
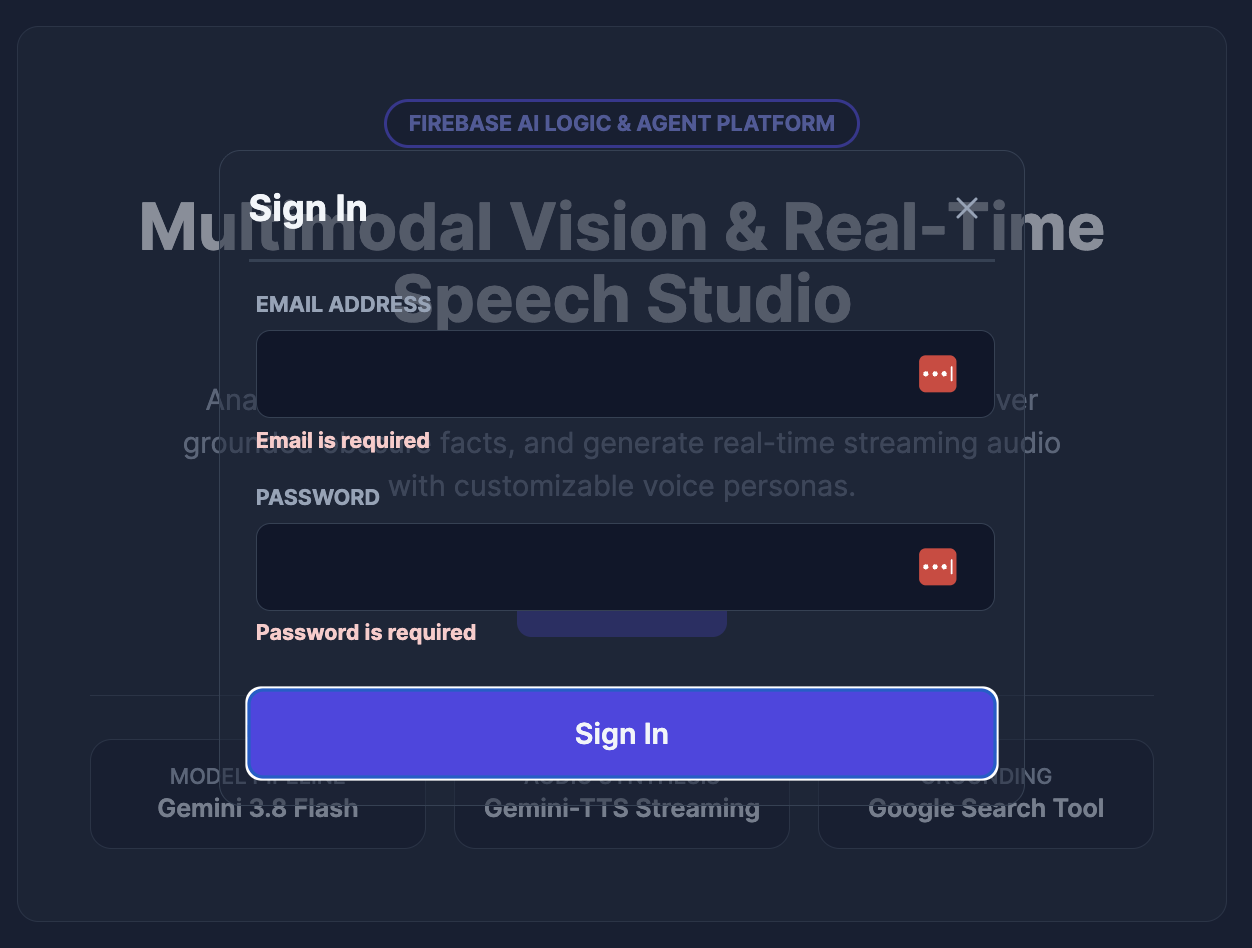
圖說:表單欄位違反必填欄位驗證規則時的登入對話框。
在第 2 部分中,我們建置了 SignInModalComponent 並將其與 AuthService 串接:
SignInModalComponent 使用 Angular Signal Forms 定義表單模型,並將每個欄位繫結至對應的 HTML <input> 元素。signInSchemaValidation() 負責驗證表單欄位。當驗證通過時,submission.action 會呼叫 AuthService.signIn() 以驗證使用者的憑證;當驗證失敗時,submission.onInvalid 會自動將焦點移至第一個發生錯誤的欄位。@angular/cdk 並非輕量級函式庫,我們仍會在從 Home 元件開啟互動視窗時動態匯入 SignInModalComponent 與 @angular/cdk/dialog。這能確保 main.js 與初始打包檔案保持精簡。在第 3 部分中,我們將建置一個輕量級的 Home 首頁畫面,其中包含可開啟 CDK Dialog 的 Sign In 按鈕。此外,我們也會更新 Header 元件以提供返回首頁導覽與登出的圖示。最後,我們將使用 AuthService.isAuthenticated() 計算型 Signal(Computed Signal),在首頁畫面上依條件顯示 Sign In 與 Launch Studio 按鈕,並在 Header 元件中重複使用同一個 Signal 來顯示或隱藏登出按鈕。


 iThome鐵人賽
 看影片追技術