今天分享
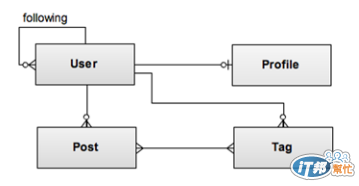
1.如何建立Domain class之間1對1、1對多以及多對多,如下圖,白話來說,1個user可以發表多個post,1個user對應到1個自己的Profile、1個User也可以建立多個Tag,1個Post可能有多的Tag,而User也可以follow其他User的Post
2.利用Grails的Scaffolding,快速建立基本網頁表單以及UI,並簡單個人化。
如果您有學過Hibernate,若不是老手想必一定對於1對1、1對多以及多對多,不管是寫xml或是annotation都有深刻的"痛楚"吧!?因為除了觀念要紮實,還需要時間try不同的case,在Grails這邊語法相當簡單,如果是一對一,則是
static hasOne = [ variable: Domain Class]
如果是一對多,則是
static hasMany = [ variable: Domain Class,....]
而在對應的Domain class若有Bidirectional的關係,則需宣告
static belongsTo=[variable : Domain class]
故若要實現下圖:
則需四個Domain Class:
User
class User {
String userId
String password
String personalPage
Date dateCreated
static hasOne = [profile : Profile]
//1對1 mapping
static hasMany = [posts:Post, tags:Tag, following: User]
/*與Post.groovy的BelongsTo搭配的話
 * 即為Hibernate中所謂的Bidirectional mapping
 */

static constraints = {
	//各欄位的限制條件,用來作Validation
	userId blank :false //不允許空白
	password size: 6..8 //密碼介於6到8個字元
	personalPage url: true //必須是網址
	tags() //強制排列在網頁上顯示次序
	posts()
}
static mapping ={
	//取得posts時自動排序,將參照Post class的設定
	posts sort: 'postedDate'
}
}
Profile
class Profile {
User user
String firstName
String lastName
String education
String email
String city
byte[] photo
static constraints = {

	education nullable:true
	email email:true, nullable:false
	city nullable:false
	photo nullable:true

}
}
Post
class Post {
String content
Date postedDate
static constraints = {
	content blank:false
}

static belongsTo=[user :User]
/*belongsTo亦隱含若post對應之user物件被刪除
 * 則post將一併被刪除,這對應到Hibernate的
 * Cascade參數,只是Grails命名不同,且不用寫
 * 又臭又長的annotation
 */
static mapping = {
	/*增加mapping closure block可增加額外條件
	 * 如sorting,這只是其中一種方法,GORM提供
	 * 語法亦可以直接取得sorted資料
	 */
	sort postedDate: 'desc'
}

static hasMnay=[tags:Tag]
}
Tag
class Tag {
String name
User user

static constraints = {
	name blank:false
}

static hasMany=[posts:Post]
static belongsTo=[User, Post]
/*若Tag與Post屬一對多,但又宣告belongsTo
 * 則cascade原則將是刪除posts並不會連帶
 * 刪除對應的tag,任何user被刪除,tag也
 * 相同地不會連帶刪除
 */
}
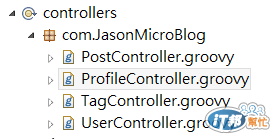
建立好Domain Class後下一步便是產生CRUD的網頁,若版面layout自己還沒有想好或是沒有專業的designer幫忙設計版面,則Grails提供Scaffolding,簡單說就是產生一個簡易樣板供網站快速成形使用,第一步必須產生各個Domain class所必須對應的Controller
新增->Controller->命名以[Domain Class Name]Controller,如下圖
用GGTS產生的Controller預設scaffolding是false,故須自行改為true(每一個Controller都需要),如下code
class ProfileController {

	static scaffold = true
	//def index() { }
}
以上動作都完成後,就可以run-app,會發現原本的畫面多了很多Controller
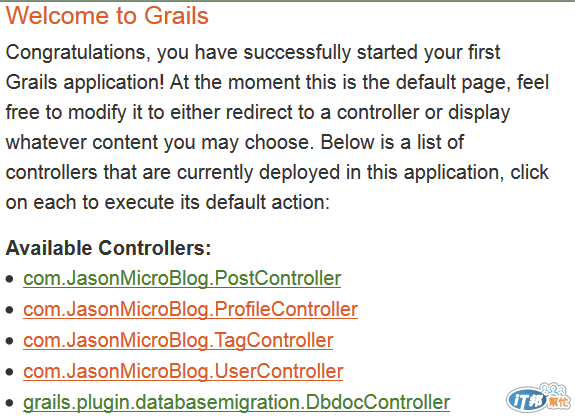
點選UserController,則應出現以下畫面
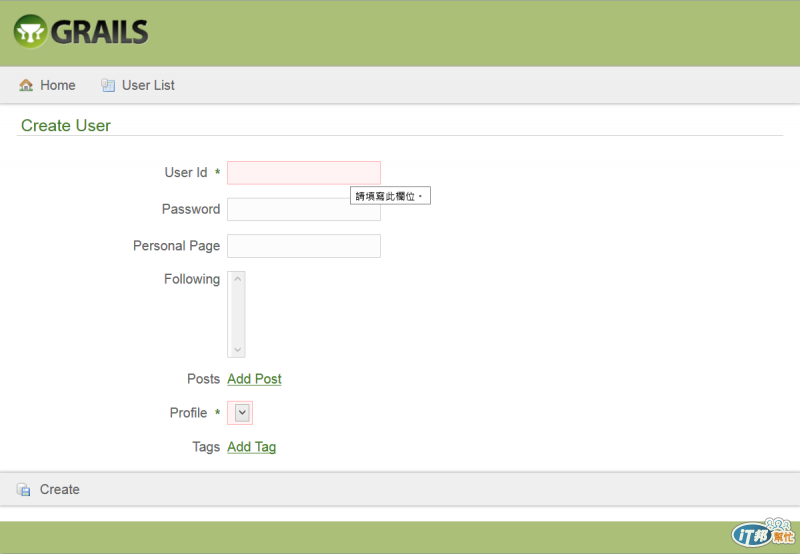
基本的UI以及表單已經成形,但是不可能把這樣的UI給大家看吧!?
所以部分小修改是必要的,例如logo換掉,配色換掉(CSS)等,用Scaffolding產生出來的網頁layout放在view/layout/main.gsp裡
<!--[if lt IE 7 ]> <html lang="en" class="no-js ie6"> <![endif]-->
<!--[if IE 7 ]>    <html lang="en" class="no-js ie7"> <![endif]-->
<!--[if IE 8 ]>    <html lang="en" class="no-js ie8"> <![endif]-->
<!--[if IE 9 ]>    <html lang="en" class="no-js ie9"> <![endif]-->
<!--[if (gt IE 9)|!(IE)]><!--> <html lang="en" class="no-js"><!--<![endif]-->

		<meta http-equiv="Content-Type" content="text/html; charset=UTF-8">
		<meta http-equiv="X-UA-Compatible" content="IE=edge,chrome=1">
		<title><g:layoutTitle default="Welcome"/>-Jason's MicroBlog</title>
		<meta name="viewport" content="width=device-width, initial-scale=1.0">
		<link rel="shortcut icon" href="${resource(dir: 'images', file: 'favicon.ico')}" type="image/x-icon">
		<link rel="apple-touch-icon" href="${resource(dir: 'images', file: 'apple-touch-icon.png')}">
		<link rel="apple-touch-icon" sizes="114x114" href="${resource(dir: 'images', file: 'apple-touch-icon-retina.png')}">
		<link rel="stylesheet" href="${resource(dir: 'css', file: 'main.css')}" type="text/css">
		<link rel="stylesheet" href="${resource(dir: 'css', file: 'mobile.css')}" type="text/css">
		<g:layoutHead/>
		<r:layoutResources />


		<div id="myLogo" role="banner"><img src="${resource(dir: 'images', file: 'mylogo.png')}" alt="JasonMicroBlog" align="left"/></div>
		<g:layoutBody/>
		<div class="footer" role="contentinfo">
			<div id="footerText" align="center">Jason's MicroBlog Powered by Grails</div>
		</div>
		<div id="spinner" class="spinner" style="display:none;"><g:message code="spinner.alt" default="Loading…"/></div>
		<g:javascript library="application"/>

		<r:layoutResources />
故我做的第一件事就是把logo換掉,上網搜尋free的logo template再用GIMP改一下,第二是簡單修改一下css檔,main.css是放在web-app/main.css底下,字型顏色改一下,底色改一下,相關網頁畫面取如下
Create User

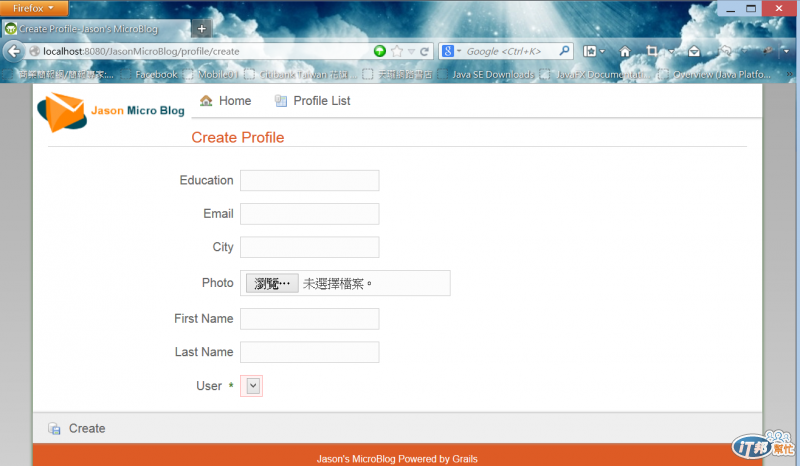
Create Profile
Create Post

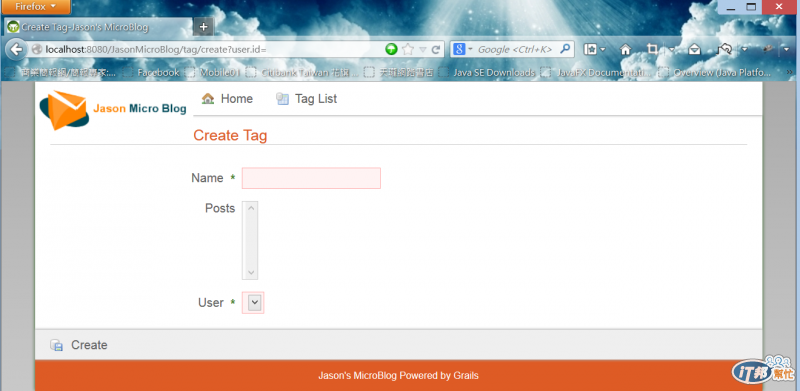
Create Tag
當然還有很多小地方可以修改,時間的關係,今天就先分享到這裡,版面的修改我自己再花時間做。