歡迎來我Blog看完整範例:http://wcc723.github.io/d3js/2014/10/03/Ironman-30-days-04/
這次來到Path的最後一個屬性A,A是所謂的弧形,和先前不同的是,弧形一個屬性可以比上一章全部的難度...。這次看看能不能用硬派的方式來學習Arcs弧形...。
本篇建議使用超過720px裝置觀看
教程參考:http://tutorials.jenkov.com/svg/
弧形就本質上來說,是屬於圓形或是橢圓的一部份,因此Mozilla MDN也介紹他擁有以下的屬性,我認為直接觀看這些屬性還是很難理解,所以決定都用硬派的方式標上坐標!。
a使用方法:
A rx ry x-axis-rotation large-arc-flag sweep-flag x y
Example 1
參考http://www.oxxostudio.tw/articles/201406/svg-05-path-2.html。
A rx ry x-axis-rotation large-arc-flag sweep-flag x y
//剛剛的值
A 1 2 0 0 1 310 215
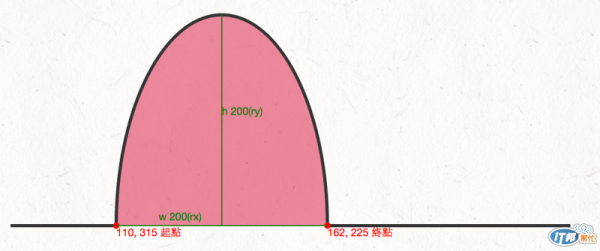
rx、ry如果小於起點到終點的長度,那麼會是依比率的,所以是1:2的橢圓形;sweep-flag為1,是順時鐘方向(逆時鐘會往下跑);310 215是終點的位置
<svg width="100%" height="250">
<path d="M10 215
L 110 215
A 1 2 0 0 1 310 215
L 540 215" stroke="#333" fill="Crimson" stroke-width="3" fill-opacity="0.5"/>
<!-- 硬派Circles! -->
<circle cx="110" cy="215" r="3" fill="red"/>
<text x="110" y="225" fill="red">110, 315 起點</text>
<circle cx="310" cy="215" r="3" fill="red"/>
<text x="310" y="225" fill="red">162, 225 終點</text>
<line x1="110" y1="215" x2="310" y2="215" style="stroke: green;"/>
<text x="150" y="210" fill="green">w 200(rx)</text>
<line x1="210" y1="215" x2="210" y2="15" style="stroke: green;"/>
<text x="210" y="110" fill="green">h 200(ry)</text>
</svg>
Example 2
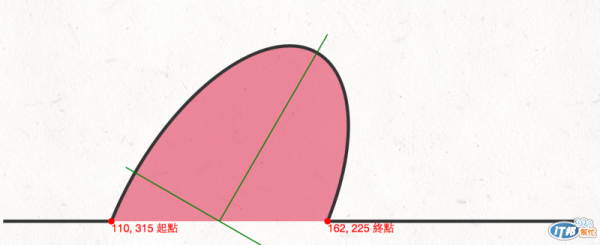
接下來我們在旋轉的角度上補了30,弧形的角度就會旋轉(綠色的線,僅有旋轉,並沒有修正成圓心的位置)。
<svg width="100%" height="250">
<path d="M10 215
L 110 215
A 1 2 30 0 1 310 215
L 540 215" stroke="#333" fill="Crimson" stroke-width="3" fill-opacity="0.5"/>
<!-- 硬派Circles! -->
<circle cx="110" cy="215" r="3" fill="red"/>
<text x="110" y="225" fill="red">110, 315 起點</text>
<circle cx="310" cy="215" r="3" fill="red"/>
<text x="310" y="225" fill="red">162, 225 終點</text>
<line x1="110" y1="215" x2="310" y2="215" style="stroke: green;" transform="rotate(30, 210, 215)"/>
<line x1="210" y1="215" x2="210" y2="15" style="stroke: green;" transform="rotate(30, 210, 215)"/>
</svg>
Example sweep-flag & large-arc-flag
範例取自於https://developer.mozilla.org/en-US/docs/Web/SVG/Tutorial/Paths。
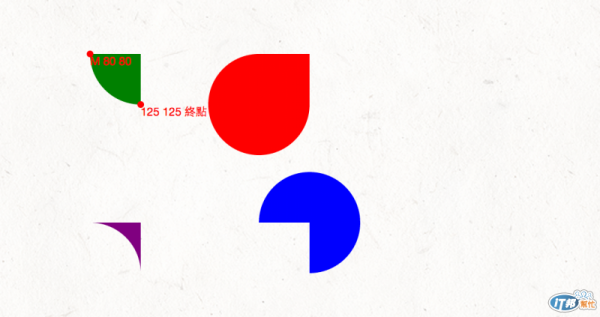
M 80 80125 125 終點
http://www.oxxostudio.tw/articles/201406/svg-05-path-2.html 有很棒的解釋,這部分我要用個人的方式解釋囉~
這張圖,據說可以解釋 “sweep-flag & large-arc-flag”,那麼就來試著說說看吧。
//這個範例僅有改變 large-arc-flag sweep-flag 兩個值,其餘皆相同
A rx ry x-axis-rotation large-arc-flag sweep-flag x y
思考一下這以下可能代表什麼
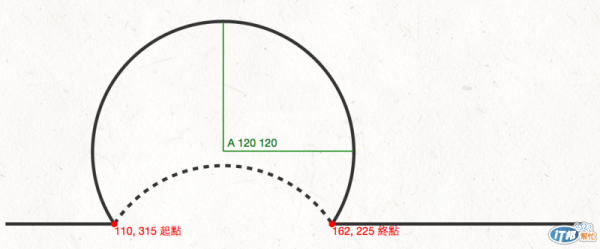
rx ry必須大於半徑才能產生長弧線及短弧線
試試看
所以在稍早的範例,只要增加A的rx、ry也可以這樣做喔~。將rx、ry調整後,large-arc-flag也可以使用,值為1就會採用較長的弧線(實線的部分),值為0就會採用短的弧線(虛線的部分)。
<svg width="100%" height="250">
<path d="M10 215
L 110 215
A 120 120 0 1 1 310 215
L 540 215" stroke="#333" fill="none" stroke-width="3" fill-opacity="0.5"/>
<path d="M10 215
L 110 215
A 120 120 0 0 1 310 215
L 540 215" stroke="#333" stroke-dasharray="5, 5" fill="none" stroke-width="3" fill-opacity="0.5"/>
<!-- 硬派Circles! -->
<circle cx="110" cy="215" r="3" fill="red"/>
<text x="110" y="225" fill="red">110, 315 起點</text>
<circle cx="310" cy="215" r="3" fill="red"/>
<text x="310" y="225" fill="red">162, 225 終點</text>
<line x1="210" y1="215" x2="210" y2="95" style="stroke: green;" transform="translate(0 -67)"/>
<line x1="210" y1="215" x2="330" y2="215" style="stroke: green;" transform="translate(0 -67)"/>
<text x="214" y="144" fill="green">A 120 120</text>
</svg>
真的超級難懂,不過自己試著做一次,就會好懂很多。


 iThome鐵人賽