歡迎來我Blog看完整範例:http://wcc723.github.io/d3js/2014/10/02/Ironman-30-days-03/
這部分會持續幾篇,主要是我先前Blog整理出來的,不會相當的深入,是為了解SVG的使用方式。另外這次鐵人賽也有高手是介紹SVG,如果有興趣也可以參考其他高手的文章。
今天要介紹的是線段系列,可以想像成Illustrator的鋼筆工具(也不知道為什麼要翻譯鋼筆工具,據說是設計師不會懂貝茲曲線...),分為line、polygon、polyline、path,而其中我認為最難的是path...,希望今天能夠突破他。我將用非天才型的硬派學習法!
本篇建議使用超過720px裝置觀看
教程參考:http://tutorials.jenkov.com/svg/
這是最簡單的,只要標注上起點以及終點就完成了,起點是x1、y1,終點則是x2、y2。
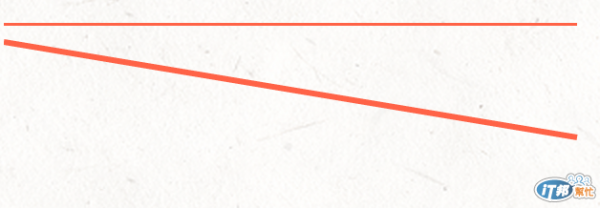
<svg width="100%" height="100">
<line x1="0" y1="0" x2="300" y2="0" style="stroke: Tomato;stroke-width: 3px"/>
<line x1="0" y1="10" x2="300" y2="60" x3="0" y3="80" style="stroke: Tomato; stroke-width: 3px"/>
</svg>
我也試試看能不能三點,寫了x3、y3都是沒用的(白目)。
Polyline我查到的中文翻譯是折線,它主要是繪製多點線段。來源...
點的位置’40,0’,40代表x,0代表y,兩個點中間會接一個空格。
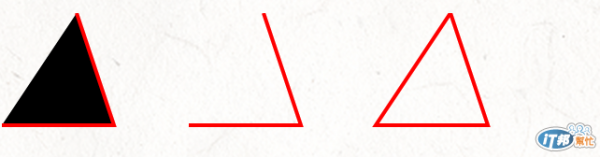
<svg width="100%" height="100">
<polyline points="40,0 60,60 0,60" style=" stroke:red; stroke-width:2"/>
<polyline points="140,0 160,60 100,60" style="fill:none; stroke:red; stroke-width:2"/>
<polyline points="240,0 260,60 200,60 240,0" style="fill:none; stroke:red; stroke-width:2"/>
</svg>
Polyline開始類似Illustrator的鋼筆工具(但還不能繪製弧線),在線段之間還能填入色彩,但特別要注意的是他並不是自動封閉線段。
Polygon中文翻譯為多邊形,用來繪製不少於3個邊的圖形,使用方式和Polyline完全相同。
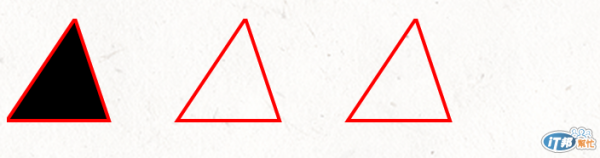
<svg width="100%" height="100">
<polygon points="40,0 60,60 0,60" style=" stroke:red; stroke-width:2"/>
<polygon points="140,0 160,60 100,60" style="fill:none; stroke:red; stroke-width:2"/>
<polygon points="240,0 260,60 200,60 240,0" style="fill:none; stroke:red; stroke-width:2"/>
</svg>
刻意使用和polyline相同的程式碼,兩者只有標簽不同,從這樣比較能夠比對出兩個不同的地方,重點就是Polygon會自動連接最後點到第一個點。
SVG <path>是相當有難度的一個章節,每次打開到這個章節,都會想要關掉網頁。它的難度就我目前看來,就是用鍵盤畫貝茲曲線吧...。
參考資料
這一張有一定的難度,所以在範例上我參考以下網站。
http://tutorials.jenkov.com/svg/path-element.html
http://www.w3schools.com/svg/svg_path.asp
https://developer.mozilla.org/en-US/docs/Web/SVG/Tutorial/Paths
在w3c school的教程裡有提到path常用的屬性,這在path是相當重要的所以先列出來。
其實我一直在逃避學習Path,因為他真的很複雜,所以我採用最熱血的學習方式!要用手工的方式把坐標,標在SVG上!
M = moveto
L = lineto
H = horizontal lineto
V = vertical lineto
C = curveto
S = smooth curveto
Q = quadratic Bézier curve
T = smooth quadratic Bézier curveto
A = elliptical Arc
Z = closepath
接下來就用以上的資料,嘗試畫一個圖形。
Example M、L
M、L使用方法:
M x y
L x y
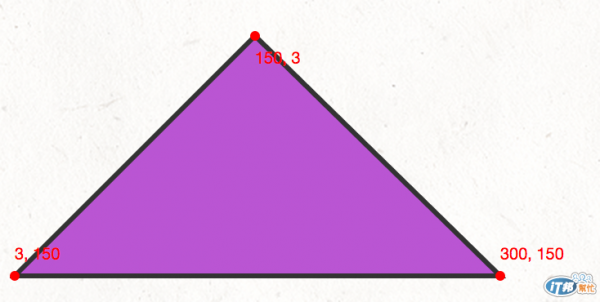
<svg width="100%" height="200">
<path d="M150 3 L300 150 L3 150 Z" style=" stroke: #333; stroke-width:3; fill: MediumOrchid"/>
<!-- 硬派Circles! -->
<circle cx="150" cy="3" r="3" fill="red"/>
<text x="150" y="20" fill="red">150, 3</text>
<circle cx="300" cy="150" r="3" fill="red"/>
<text x="300" y="140" fill="red">300, 150</text>
<circle cx="3" cy="150" r="3" fill="red"/>
<text x="3" y="140" fill="red">3, 150</text>
</svg>
這個三角形的範例,M150 3 這樣是一個群組,所以第一個點是移動到M150 3開始,接下來劃線到L300 150這個點,再來是劃線到L0 150,最後直接用Z來封閉曲線。
因此,path的第一點通常是M: move to
H、V使用方法:
M x
V y
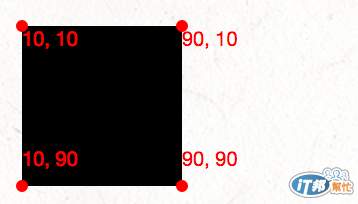
<svg width="100%" height="100">
<path d="M10 10 H 90 V 90 H 10 L 10 10" fill="black"/>
<!-- 硬派Circles! -->
<circle cx="10" cy="10" r="3" fill="red"/>
<text x="10" y="20" fill="red">10, 10</text>
<circle cx="10" cy="90" r="3" fill="red"/>
<text x="10" y="80" fill="red">10, 90</text>
<circle cx="90" cy="90" r="3" fill="red"/>
<text x="90" y="80" fill="red">90, 90</text>
<circle cx="90" cy="10" r="3" fill="red"/>
<text x="90" y="20" fill="red">90, 10</text>
</svg>
這一個範例,是利用H、V來取代垂直以及水平移動。這一段的內容是移動到10 10,再來垂直到x90的位置,再來是水平到y90,然後再到垂直向上到x10,最後用L拉線回到10 10的位置。
最後的L也可以直接用Z來close path
C使用方法:
C x1 y1, x2 y2, x y
這是Mozilla所提供的示意圖,看了這個圖,認為還是自己畫一個可能比較了解,所以動手來試試看吧~。
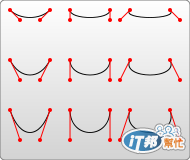
圖片來源:https://developer.mozilla.org/@api/deki/files/159/=Cubic_Bezier_Curves.png
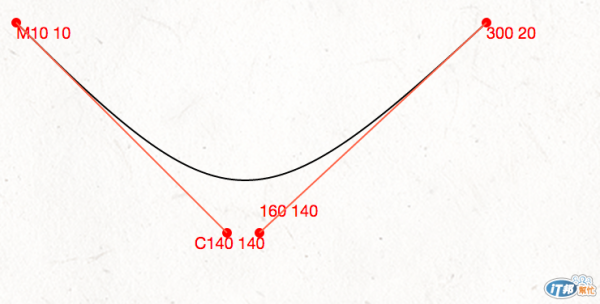
用這樣的圖是不是更了解呢,首先定義第一個起始點位置M10 10,接下來加入C貝茲曲線,這邊開始就幻想著自己正在畫Illustrator,首先加入C140 140,這是第一根手把的位置,之後補一個,,在依序把後面的點完成。這之間可以對照上面的範例。
<svg width="100%" height="200px">
<path d="M10 10 C140 140,160 140,300 10" stroke="black" fill="none"/>
<!-- 硬派Circles! -->
<circle cx="10" cy="10" r="3" fill="red"/>
<text x="10" y="20" fill="red">M10 10</text>
<circle cx="140" cy="140" r="3" fill="red"/>
<text x="120" y="150" fill="red">C140 140</text>
<circle cx="160" cy="140" r="3" fill="red"/>
<text x="160" y="130" fill="red">160 140</text>
<circle cx="300" cy="10" r="3" fill="red"/>
<text x="300" y="20" fill="red">300 20</text>
<line x1="10" y1="10" x2="140" y2="140" style="stroke: Tomato;"/>
<line x1="160" y1="140" x2="300" y2="10" style="stroke: Tomato;"/>
</svg>
s使用方法:
S x2 y2, x y
我用超硬派學習法,徹底了解了它的特徵...。
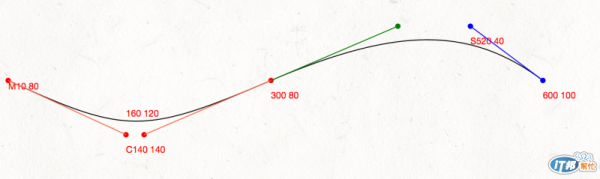
透過超硬派學習法,一個一個刻出每個點的位置,感受到腦細胞的大量死亡,上圖的紅點是C所在的位置,C總共會有三個坐標,包含兩個手把以及最後一個點,而S是緊接在最後一個點的後方,延伸出一個綠色的手把(這一個不需要給坐標),再補上一個藍色手把以及做後一個藍色點。
<svg width="100%" height="200px">
<path d="M10 80 C140 140,160 140 , 300 80 S 520 20,600 80" stroke="black" fill="none"/>
<!-- 硬派Circles! -->
<circle cx="10" cy="80" r="3" fill="red"/>
<text x="10" y="90" fill="red">M10 80</text>
<circle cx="140" cy="140" r="3" fill="red"/>
<text x="140" y="160" fill="red">C140 140</text>
<circle cx="160" cy="140" r="3" fill="red"/>
<text x="140" y="120" fill="red">160 120</text>
<circle cx="300" cy="80" r="3" fill="red"/>
<text x="300" y="100" fill="red">300 80</text>
<circle cx="520" cy="20" r="3" fill="blue"/>
<text x="520" y="40" fill="blue">S520 40</text>
<circle cx="600" cy="80" r="3" fill="blue"/>
<text x="600" y="100" fill="blue">600 100</text>
<line x1="10" y1="80" x2="140" y2="140" style="stroke: Tomato;"/>
<line x1="160" y1="140" x2="300" y2="80" style="stroke: Tomato;"/>
<line x1="520" y1="20" x2="600" y2="80" style="stroke: blue;"/>
<circle cx="440" cy="20" r="3" fill="green"/>
<line x1="300" y1="80" x2="440" y2="20" style="stroke: green;"/>
</svg>
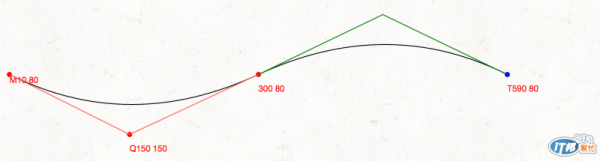
Q、T使用方法:
Q x1 y1, x y
T x y
剛剛提到,C有三個點,兩個是手把,一個是終點,Q則是兩個點,一個共用手把,加上終點。T則是在Q後方,在複製一個相同的點,有點類似S的翻版。
<svg width="100%" height="200px">
<path d="M10 80 Q150 150, 300 80" stroke="black" fill="none"/>
<!-- 硬派Circles! -->
<circle cx="10" cy="80" r="3" fill="red"/>
<text x="10" y="90" fill="red">M10 80</text>
<circle cx="150" cy="150" r="3" fill="red"/>
<text x="150" y="170" fill="red">Q150 150</text>
<circle cx="300" cy="80" r="3" fill="red"/>
<text x="300" y="100" fill="red">300 80</text>
<line x1="10" y1="80" x2="150" y2="150" style="stroke: Tomato;"/>
<line x1="300" y1="80" x2="150" y2="150" style="stroke: Tomato;"/>
</svg>
透過本篇的超硬派教學,對於幾種線段應該會更了解吧,至少我很了解了(泣...)。SVG的文章不會太多,D3js至少會有20篇以上,大家可以放心~。
另外在D3.js的教學裡面,超複雜的Path有很簡單的處理方式...,所以只要先大致了解就可以了。


 iThome鐵人賽