使用過 Illustrator 的朋友應該都會知道,裏頭有一個重要的繪圖功能,就是剪裁和遮色片,這也是在圖形處理上頗為重要的兩個功能,而在 SVG 裏頭這兩個功能也沒有缺席。( oxxostudio.tw 同步發表:SVG 研究之路 (9) - Clipping and Masking )

和之前 製作文字跟隨路徑 以及 漸層填色 相同的做法,在製作剪裁或遮色片的時候,我們也必須先建立定義檔defs,就可以輕鬆做出 Clipping ( 剪裁 ) 和 Masking ( 遮色片 ) 的效果囉!
1. Cliping
要建立一個 Clipping 的圖形,首先要在定義檔內放入<clipPath></clipPath>的標籤,記得要放入 id,這樣要被剪裁的圖形才能夠對應,接著在<clipPath></clipPath>裏頭放入一些圖形,這些圖形代表的是:這些圖形以外的都會被剪裁,可以看看下面的範例,圓形原本還有黃色線的面積,但是因為被藍色的矩形剪裁了,所以藍色區域以外的圓形都消失了。
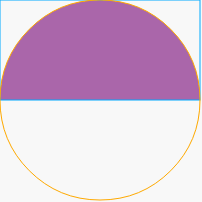
<defs>
  <clipPath id="a1">
  <rect x="0" y="0" width="200" height="100" />
</clipPath>
</defs>
<circle cx="100" cy="100" r="100" clip-path="url(#a1)" fill="#000" />
而 clipping 裏頭還可以套用 clipping,就可以做出許多不同的變化。( 或是自己用 path 去畫也是可以 )

<clipPath id="a1">
    <polygon id="a1Shape" points="100,10 40,180 190,60 10,60 160,180 100,10" stroke="blue" />
</clipPath>

<clipPath id="a2">
    <circle id="a2Shape" cx="100" cy="100" r="65" />
</clipPath>

<!-- Intersection -->
<clipPath id="b1" clip-path="url(#a1)">
    <use x="0" y="0" width="200" height="200" xlink:href="#a2Shape" />
</clipPath>

<clipPath id="b2">
    <use x="0" y="0" width="200" height="200" xlink:href="#a1Shape" />
    <use x="0" y="0" width="200" height="200" xlink:href="#a2Shape" />
</clipPath>

<rect x="10" y="10" width="180" height="180" fill="#c00"
    clip-path="url(#a1)" />
<rect x="10" y="10" width="180" height="180" fill="#0a0"
    clip-path="url(#a2)" transform="translate(200)"/>
<rect x="10" y="10" width="180" height="180" fill="#09c"
    clip-path="url(#b1)" transform="translate(400)" />
<rect x="10" y="10" width="180" height="180" fill="#f90"
    clip-path="url(#b2)" transform="translate(600)" />
上面的程式碼用到了一個很有趣的標籤:<use>,這個標籤其實用法就跟字面上一樣,就是去使用一個帶有 id 的物件,把這個物件放在<use>所指定的位置上,換句話說就是複製一個同樣的物件,但這個物件本體改了,<use>裏頭的也會被改掉,就像是火影忍者裏頭的鳴人的影分身一樣,如果把鳴人換成佐助,影分身出來的就會是佐助而不是鳴人了,如果鳴人本體死亡,影分身自然也就會死亡了,差不多的意思哈哈!

<rect id="box" x="50" y="50" width="50" height="50" fill="#069"/>
<use xlink:href="#box" x="50" y="50" style="fill:#f00;" />
如果物件的本體有設定 fill 或 stroke ,則<use>就無法使用 style 去控制,如果沒有設定,則可以使用 style 控制樣式。
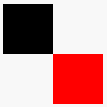
 <rect id="box" x="50" y="50" width="50" height="50"/>
<use xlink:href="#box" x="50" y="50" style="fill:#f00;" />
2. Masking
遮色片的觀念對於設計師來說一定不陌生,也應該是每個設計師吃飯的必備工具之一,若轉換為程式看起來,概念也是差不多,只需要把握一個原則:越黑越透明,越白越不透明,而遮色片只有黑到白的灰階分布,所以如果作為遮色片的顏色是灰階以外的顏色,都會被轉換為灰階。
有了觀念之後,就來看看程式怎麼寫,和Cliping相同的作法,在defs裏頭寫下<mask></mask>的標籤並給它一個 id,接著在裡面放入要當成遮色片的圖形,接著再用需要遮色片的物件去跟這個遮色片連結即可。
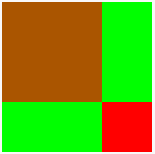
<defs>
  <mask id="mask1">
    <rect  x="50" y="50" width="100" height="100" fill="#ccc"/>
    <rect  x="150" y="150" width="50" height="50" fill="#fff"/>
  </mask>
</defs>
  <rect id="box1" x="50" y="50" width="150" height="150" fill="#0f0"/>
  <rect id="box2" x="50" y="50" width="150" height="150" fill="#f00" mask="url(#mask1)"/>
從上面我們可以看到,比較灰色的部分 ( #ccc ),透明度就比較高,如果還是不太清楚,可以參考下面的範例,用不同灰階的遮色片,做出不同的透明度。

<defs>
  <mask id="mask1">
    <rect  x="0" y="0" width="50" height="50" fill="#fff"/>
  </mask>
  <mask id="mask2">
    <rect  x="50" y="0" width="50" height="50" fill="#bbb"/>
  </mask>
  <mask id="mask3">
    <rect  x="100" y="0" width="50" height="50" fill="#999"/>
  </mask>
  <mask id="mask4">
    <rect  x="150" y="0" width="50" height="50" fill="#666"/>
  </mask>
  <mask id="mask5">
    <rect  x="200" y="0" width="50" height="50" fill="#222"/>
  </mask>
</defs>
  <rect x="0" y="0" width="50" height="50" fill="#f00" mask="url(#mask1)"/>
  <rect x="50" y="0" width="50" height="50" fill="#f00" mask="url(#mask2)"/>
  <rect x="100" y="0" width="50" height="50" fill="#f00" mask="url(#mask3)"/>
  <rect x="150" y="0" width="50" height="50" fill="#f00" mask="url(#mask4)"/>
  <rect x="200" y="0" width="50" height="50" fill="#f00" mask="url(#mask5)"/>
除了純色,遮色片也可以做漸層的變化。
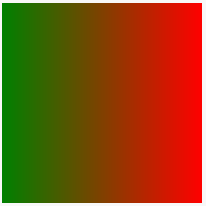
<defs>
  <linearGradient id="Gradient">
    <stop offset="0" stop-color="white" stop-opacity="0" />
    <stop offset="1" stop-color="white" stop-opacity="1" />
  </linearGradient>
  <mask id="Mask">
    <rect x="0" y="0" width="200" height="200" fill="url(#Gradient)"  />
  </mask>
</defs>

<rect x="0" y="0" width="200" height="200" fill="green" />
<rect x="0" y="0" width="200" height="200" fill="red" mask="url(#Mask)" />
其實我自己在向量圖的時候,遮色片倒是是比較少用,大部分都是用在 photoshop 裏頭使用,不過如果可以用程式控制遮色片和剪裁,相信也可以做出許多不錯的變化。不過剪裁和遮色片還有許多的用法,有興趣的也可以直接參考 W3C 的文章喔!
