網誌好讀版:http://hungys.logdown.com/posts/238921-azure-documentdb-using-python
在本系列文章中,我們曾經與讀者介紹過如何在 Azure 上部署 NoSQL 資料庫的方式,當時是以在社群中較為熱門的 MongoDB 為例,然而微軟官方其實在今年也推出了繼 Table Storage 後的第二個 NoSQL 服務,也就是 DocumentDB,筆者將在本文簡單介紹這項服務並示範如何使用 Python 來操作。
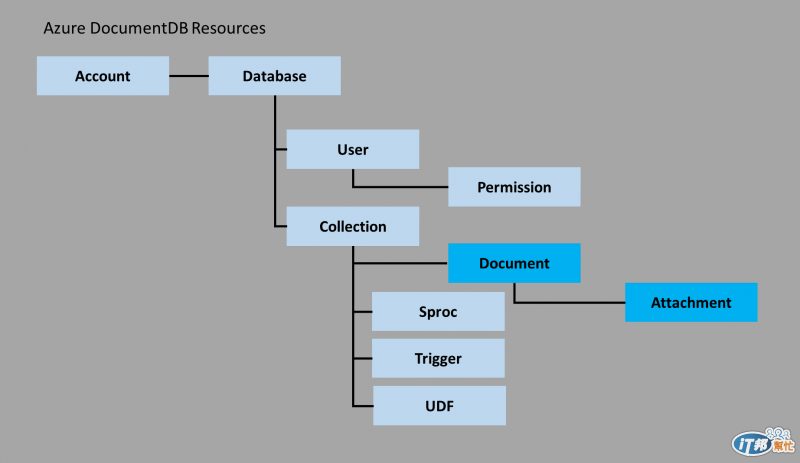
DocumentDB 本身與 MongoDB 相同,是一種 Document-Based 的 NoSQL 服務,而且值得注意的是,它所使用的名稱(或術語)與 MongoDB 相同,一樣是區分為**「Database」、「Collection」、「Document」**三個階層,所以有使用 MongoDB 經驗的讀者應該能夠輕易的來上手。而其中最特殊的地方在於,DocumentDB 本身的查詢語言是使用 SQL 語法,也就是傳統的 RDBMS 使用者不需要再去學習新的查詢方式,例如在 MongoDB 中的 query criteria 及相關的 operator,反之可以直接透過過去所熟悉的語法來操作 DocumentDB,希望能夠增加傳統開發人員的接受度。
DocumentDB 本身幾乎是基於 REST API 在操作的,所以對於每個 Database、Collection、Document 都有對應的 endpoint,這點在稍待會示範時會讓讀者一探究竟。而官方針對這項服務也提供了包括 .NET、Node.js、JavaScript 及 Python 等四種語言的 SDK 支援:
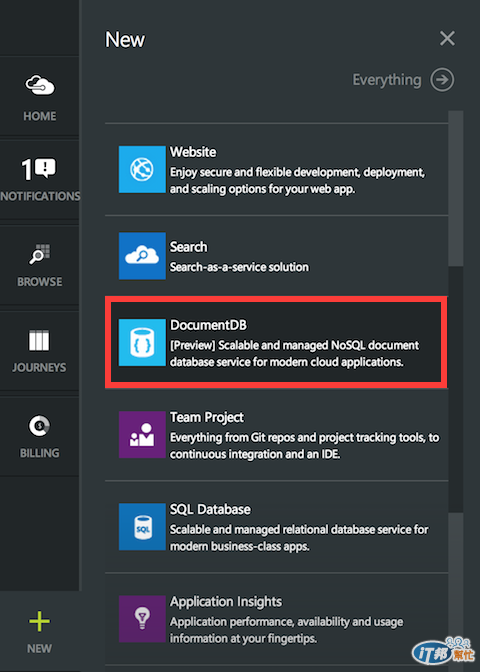
這系列 Azure 的新功能包含 DocuemtnDB 部分,都必須使用新的 Preview Portal 來建立與管理,請開啟 Portal 並點選左下角的**「New」**來新增一個 DocumentDB 服務:
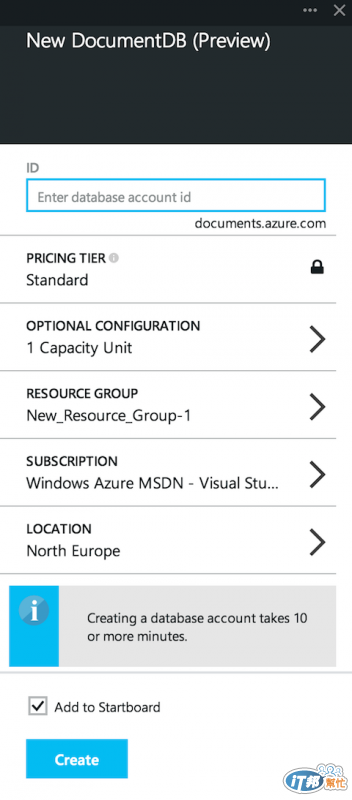
點選建立之後請有點耐心,因為目前 Preview Portal 的反應速度還不是很好,待讀取完成後請填入相關資訊來建立 DocumentDB,目前 Preview 階段並不支援部署在亞洲資料中心,您可以使用別的資料中心來進行測試,最後按下**「Create」**開始建立,這個過程需花費 5 至 10 分鐘:
建立完成後便可以透過圖形化介面來管理 DocumentDB,在最新的 Preview 版本已經提供了圖形化介面的 Document Explorer,根據微軟官方在 AzureConf 的說法,這些功能會持續增強!接著請讀者點選**「Keys」**按鈕來取得等會操作時所需要的連線資訊,包含了一個 URI 及一組 Primary Key:

微軟官方提供了 pydocumentdb 這個 Library 讓您可以輕鬆的使用 Python 來操作 DocumentDB 服務,您可以透過 pip來安裝,由於目前還處於預覽階段,請加上 --pre 的選項來安裝預覽版本,或直接指明您所要安裝的版本號:
(venv)$ pip install --pre pydocumentdb
官方提供了「精簡」的文件供您查詢,不過因為真的很精簡、教學資源也還很缺乏,所以推薦搭配 GitHub 上的 source code 一起服用。
因為目前相關的教學資源還很缺乏,所以筆者稍微 trace 了一下 SDK 的原始碼才對整個 Library 更加了解,雖然還有許多沒有接觸到的功能還沒有很熟悉。
基本上,任何操作都需要透過 document_client.py 這個檔案裡所定義的 DocumentClient 類別,這點與本系列文章所介紹過的 pymoongo 的設計就不太一樣,例如要在 Collection 中對 Document 做查詢時,以 pymongo 的設計可以直接在 Collection 物件上使用 find() 方法來操作,但在 pydocumentdb 中,則都還是需要靠 DocumentClient 的實體之下的方法來完成,這個類別本身負責了所有相關的 REST API 操作。
接下來的範例會直接使用 Python Shell 來操作,要建立一個 DocumentClient 實體相當簡單,只需要傳入服務的 URI 及 Primary Key 即可:
>>> client = document_client.DocumentClient('<YOUR URI>', {'masterKey': '<YOUR KEY>'})
這個 Client 底下包含了許多 CRUD 操作的方法,以與 Database 操作相關的為例:
針對 Collection 也有對應的方法可以呼叫:
最後則是與 Document 相關的 method:
上面的 method 定義包含了許多「link」參數,其實這些都是 REST API 的端點,以 ReadDocuments() 為例,這個方法是要讀出某個 Collection 之下所有的 Document,所以必須傳入的是該 Collection 的 endpoint。
現在筆者要開始示範如何建立一個 Database,這時可以呼叫 CreateDatabase() 參數,而值得注意的是,這個方法所要帶的參數是「body」,而非過去所認知的「name」,這個 body 可以是一個字典物件,而未來要存取資料庫時,必須先用QueryDatabases 方法搭配 SQL 語法來**「查詢」**出該資料庫,這個設計可以說是相當新奇。
>>> db = client.CreateDatabase({'id': 'azure'})
上述程式碼建立一了一個 Database,而他的「body」為 {'id': 'azure'}。未來若要取出該資料庫,可以透過 SQL 查詢語言來 match 到 id 這個欄位的值:
>>> dbs = client.QueryDatabases('SELECT * FROM root r WHERE r.id = "azure"')
>>> print dbs
<pydocumentdb.query_iterable.QueryIterable object at 0x7f85fdb53fd0>
>>> db_list = list(dbs)
>>> print db_list
[{u'_self': u'dbs/7E1LAA==/', u'_colls': u'colls/', u'_ts': 1414069367, u'_rid': u'7E1LAA==', u'_etag': u'00000600-0000-0000-0000-5448fc770000', u'_users': u'users/', u'id': u'azure'}]
其中,QueryDatabases() 回傳的是一個 QueryIterable 物件,將它轉成一個 list 後便可以看到我們剛剛所建立的 Database,最後我們可以用 db_list[0] 來取出這個資料庫實體。此外,請讀者特別注意到 _self 這個欄位,它的值dbs/7E1LAA==/ 其實代表的就是這個 Database 的 REST endpoint。您也可以使用 ReadDatabase() 方法並傳入該端點來取出這個資料庫:
>>> db = client.ReadDatabase('dbs/7E1LAA==/')
>>> print db
{u'_self': u'dbs/7E1LAA==/', u'_colls': u'colls/', u'_ts': 1414069367, u'_rid': u'7E1LAA==', u'_etag': u'00000600-0000-0000-0000-5448fc770000', u'_users': u'users/', u'id': u'azure'}
接下來我們要在剛剛建立的 Database 中新增一個 Collection,方法跟建立 Database 非常類似,可以透過呼叫CreateCollection() 方法來達成,其中必須要傳入兩個參數,分別是 Database 的 URI 及欲新增的 Collection 之「body」:
>>> collection = client.CreateCollection(db['_self'], {'id': 'products'})
>>> print collection
{u'_self': u'dbs/7E1LAA==/colls/7E1LAMN6awE=/', u'_udfs': u'udfs/', u'_sprocs': u'sprocs/', u'_ts': 1414069967, u'_rid': u'7E1LAMN6awE=', u'_etag': u'00000200-0000-0000-0000-5448fecf0000', u'_triggers': u'triggers/', u'_docs': u'docs/', u'indexingPolicy': {u'indexingMode': u'consistent', u'ExcludedPaths': [], u'automatic': True, u'IncludedPaths': [{u'Path': u'/', u'indexType': u'Hash', u'StringPrecision': 3, u'NumericPrecision': 3}, {u'Path': u'/"_ts"/?', u'indexType': u'Range', u'NumericPrecision': 6}]}, u'id': u'products', u'_conflicts': u'conflicts/'
從上面的輸出可以看出 Collection 也有相對應的 REST endpoint 存放在 _self 欄位。到此若讀者已經有一些 sense,應該可以猜到我們可以用同樣的方式使用 QueryCollections() 來查詢出該 Collection:
>>> collections = client.QueryCollections(db['_self'], 'SELECT * FROM root r WHERE r.id = "products"')
>>> collections_list = list(collections)
>>> print collections_list
[{u'_self': u'dbs/7E1LAA==/colls/7E1LAMN6awE=/', u'_udfs': u'udfs/', u'_sprocs': u'sprocs/', u'_ts': 1414069966, u'_rid': u'7E1LAMN6awE=', u'_etag': u'00000700-0000-0000-0000-5448fece0000', u'_triggers': u'triggers/', u'_docs': u'docs/', u'indexingPolicy': {u'indexingMode': u'consistent', u'ExcludedPaths': [], u'automatic': True, u'IncludedPaths': [{u'Path': u'/', u'indexType': u'Hash', u'StringPrecision': 3, u'NumericPrecision': 3}, {u'Path': u'/"_ts"/?', u'indexType': u'Range', u'NumericPrecision': 6}]}, u'id': u'products', u'_conflicts': u'conflicts/'}]
當然若您有 Collection 的 endpoint,也可以直接呼叫 ReadCollection() 方法:
>>> collection = client.ReadCollection('dbs/7E1LAA==/colls/7E1LAMN6awE=/')
>>> print collection
{u'_self': u'dbs/7E1LAA==/colls/7E1LAMN6awE=/', u'_udfs': u'udfs/', u'_sprocs': u'sprocs/', u'_ts': 1414069967, u'_rid': u'7E1LAMN6awE=', u'_etag': u'00000200-0000-0000-0000-5448fecf0000', u'_triggers': u'triggers/', u'_docs': u'docs/', u'indexingPolicy': {u'indexingMode': u'consistent', u'ExcludedPaths': [], u'automatic': True, u'IncludedPaths': [{u'Path': u'/', u'indexType': u'Hash', u'StringPrecision': 3, u'NumericPrecision': 3}, {u'Path': u'/"_ts"/?', u'indexType': u'Range', u'NumericPrecision': 6}]}, u'id': u'products', u'_conflicts': u'conflicts/'
Document 的操作也相當類似,可以透過 CreateDocument() 方法,傳入 Collection 的 URI 及 Document 的內容即可:
>>> document = client.CreateDocument(collection['_self'], {'name': 'Virtual Machines', 'abbr': 'vm'})
>>> print document
{u'_self': u'dbs/7E1LAA==/colls/7E1LAMN6awE=/docs/7E1LAMN6awEBAAAAAAAAAA==/', u'name': u'Virtual Machines', u'_ts': 1414070520, u'_rid': u'7E1LAMN6awEBAAAAAAAAAA==', u'_etag': u'00000300-0000-0000-0000-544900f80000', u'abbr': u'vm', u'_attachments': u'attachments/', u'id': u'bc0f4aed-a84b-4b56-bf48-28f36a52bc4b'}
與 Database 及 Collection 相同,您可以透過 QueryDocuments() 及 ReadDocument() 方法來查詢,在此就留給讀者自行練習了!基本上操作的概念都是一脈相承的。
在您取出一個 Document 後,它會是一個 dict 物件,所以可以直接進行相關的欄位操作,例如我們新增一個 url 欄位,透過 ReplaceDocument() 方法並指向該 Document 的 URI 來取代舊內容:
>>> replaced_document = client.ReplaceDocument(document['_self'], document)
>>> print replaced_document
{u'_self': u'dbs/7E1LAA==/colls/7E1LAMN6awE=/docs/7E1LAMN6awEBAAAAAAAAAA==/', u'name': u'Virtual Machines', u'url': u'http://azure.microsoft.com/zh-tw/services/virtual-machines/', u'_ts': 1414070793, u'_rid': u'7E1LAMN6awEBAAAAAAAAAA==', u'_attachments': u'attachments/', u'abbr': u'vm', u'id': u'bc0f4aed-a84b-4b56-bf48-28f36a52bc4b', u'_etag': u'00000400-0000-0000-0000-544902090000'}
最後,筆者要示範的是刪除一個 Document,您可以透過 DeleteDocument() 方法並傳入 Document 的 URI 來達成:
>>> client.DeleteDocument(document['_self'])
本文針對如何使用 Python 操作 DocumentDB 做了初步性的介紹,但其他還包括了像 User、Permission、Trigger、Attachment 等等特性待讀者自行去探索,而就筆者體驗 DocumentDB 的感覺,還是比較喜歡 MongoDB 的查詢方式,雖說 DocumentDB 本身支援 SQL 查詢,但遇到要刪除 Document 時卻還是得透過 DeleteDocument() 方法並傳入 URI 來達成,更麻煩的是沒辦法一次刪除多筆 Document,期望微軟在未來能夠修補這部分的缺失,或是透過支援 DELETE 的 SQL 語法來操作。


 iThome鐵人賽