這篇要介紹的是 React Native 的基本骨架,也就是 Reactjs。如果對於 Reactjs 的概念沒有透徹了解的話,貿然進入 React Native 是一件相當危險的事。
然而關於 Reactjs,其實有很多部分可以講,在這,我假設讀者對於 Reactjs 已經有基本的認識。所以,我會直接進入我認為較為關鍵的部分,並試著去理解 react 的設計理念。
如果有寫過 Android 的,應該會知道 Android 的最基本畫面,是由一個 Activity 所組成的。一個 Activity 在從 instance 被 create 到被關掉,然後被 Garbage collector 收回,總共會經過不同個階段。在這邊我簡單列一下(因為我沒有寫過 iOS,所以以Android 做舉例)

從 onCreate() 開始,到 onDestroy() 結束,總共會分很多個階段,在這邊我們可以注意到的是,只要 Activity 被放在背景的話,那他其實是處於 onStop 階段的。只要畫面又背拉回來前景,那 Android 系統又回將這個 Activity 往前回到 onResume 的階段。
在這個過程中,並沒有一個single source 可以保存各個元件的狀態。在每個階段,如果想要改某個 component 的顯示狀態,我只能 call 系統提供的每一個針對的 function,去改我想要改的某個 component 的狀態。
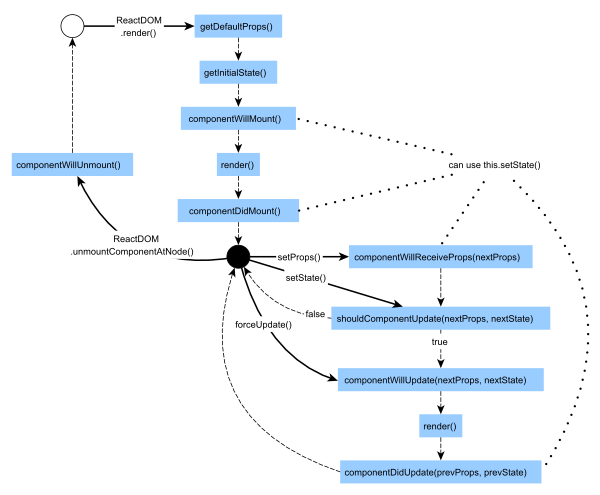
而 React Component 呢?則是如下:

就我個人認為,我覺得 React Component 的 lifecycle 是比較好的 lifecycle,也是一個比較好的 data flow 模式。這部分我覺得可以肇因於 reactjs 天生優良的兩大特性
有了這兩大特性,只要我想要更改畫面的顯示,我就 call setState(),而畫面如何顥示,就全部都交給 render() 來解決,達到關注點分離的效果。 要處理畫面如何顯示在哪裡?render() 裡面。要處理顯示什麼資料,在哪裡?除了 render() 之外的其它地方。
了解上面設計的概念之後,我們再回來探究 react component 的 lifecycle,那就會更加的了解。React component 的 lifecycle 主要分成 Mount 和 Update 兩種事件,分別代表最初插入到真實DOM(注意,React Native 沒有 DOM,但是 React 是 Learn once, Write anywhere 的,因此 React Native 還是可以適應手機平台不同於網頁的特性),以及更新state 和 props 時,會call的 function。根據時間的先後,又可以分成 Will 和 Did,代表即將要做,和已經做完。
懂了這些的差別之後,我們再回來思考一下各類型的事件要放在哪了
constructor()
constructor() {
	this.state = {
		page: 1,
	}
}
componentDidMount()
componentDidMount() {
	fetch('xxx.xxx.xx.com/api/get-data', data => {
		this.setState({
			data,
		})
	})
}
componentWillMount()
componentWillMount() {
	this.setState({
		seat: calSeat(this.props.name, this.props.id)
	})
}
注意,千萬不要在 constructor 或者 render 裡 setState(),這是因為 constructor 已含 this.state={} ,而 render 裡 setState 會造成無窮回圈,setState -> render -> setState -> render ......
能做的setState,只要是render前,就放在componentWillMount,render後,就放在 componentDidMount。這兩個 function 是 react lifecycle 中,最常使用的兩個。當然啦,還有其它的部分,那就交給客倌們自行研究和推敲它們的使用時機囉!
總會有 Component 是不需要上面那些 lifecycle 的,只要render的吧?是的,如果我們有 stateless 的 component,那我們可以照這個方式寫
const stateless => ({ props1, ...rest }) => {
	return (
		<div>{props1}</div>
	)
}
寫成 stateless component 的好處主要有兩個
講完了 lifecycle,該要來談談 state 和 props 會遇到的一些細節了。這邊假設你已經假設會使用 props 和 states,但還不知道他們的真義,以及一些使用細節。
他們倆最大的差別,就是一個是由父Component 傳來,一個是在自己 Component 內部產生的。由父Component傳來的,理所當然不能改,你怎麼捨得違背你爸的意願呢?而自己內部產生的,理所當然就可以改囉。
要非常注意的一點是,props 對該 component 是 immutable 的,而 state 則是 mutable 的。props 唯一能變的條件取決於他的父親,當父元件改變子元件的 props 的時候,子元件會 call componentWillReceiveProps(),這時候,可以在這個 function 裡面進行一些比較。
這個 design pattern 是非常重要的,是 reactjs 的關鍵精髓,之後再講到 Container vs Component 章節的時候,就會發現它的妙用。
因為 props 是由父元素傳來的,可能會傳錯型態,或者沒有傳值。那麼這時候我們會使用 PropTypes 和 defaultProps 來保護這個 component,避免可能發生的意外。
class Student extends React.Component {
	constructor(props) {
        super(props);
        this.state = {}
    }

	render() {
        return (
            <div>
				<p>{`ID: ${this.props.id}`}</p>
				<p>{`Student: ${this.props.name}`}</p>
			</div>
        )
    }
}

// Props 的型態,如果給錯型態,會跳warning。
Student.propTypes = {
  	name: React.PropTypes.string,
	id: React.PropTypes.number,
}

// Props 預設值
Student.defaultProps = {
 	name: 'Harry',
	id: 1,
}
這章講的是有關 reactjs 的設計理念,是相當重要的一個環節,唯有把這邊都搞懂了,之後設計程式才不會發生莫名其妙的錯誤!
