Angular 2.3 最近發布,而最有特色的部分莫過於組件繼承 (Component Inheritance) 的部分了。如同類別可以繼承一般,組件繼承可以讓程式碼變得更加強大且更有重複使用性。
所以組件繼承帶來甚麼?
Component Inheritance 包含了:
@Input、@Output 等,會覆蓋先前所有在繼承鏈裡面的 metadata,不然則採用基本的類別 (父類別) 的 metadata。ngOnInit、 ngOnChanges會被呼叫,就算他們在衍伸類別沒有被定義。組件繼承不包括 template 和 style。任何被分享的 DOM 或是行為都會被分別的處理。
接著要實際做組件繼承了,想像今天有個組件是用來做「分頁」,你很喜歡它的樣子,功能也達到你的期望,所以你想要使用它,但你想要用自己的風格。
可以先看看 Plunker 完成後的樣子。
原本的組件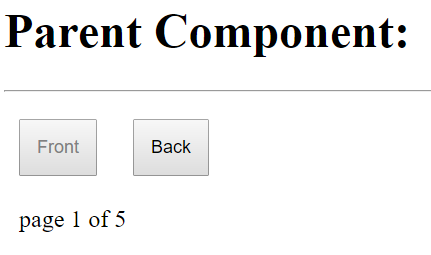
我們改的組件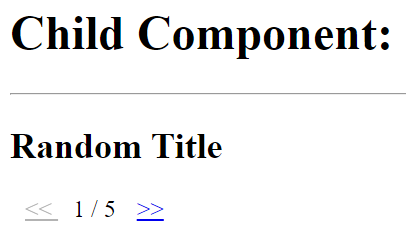
我們將改變:
原本的組件長這樣
// simple-pagination.component.ts

import { Component, Input, Output, EventEmitter } from '@angular/core';

@Component({
  selector: 'simple-pagination',
  template: `
    <button (click)="previousPage()" [disabled]="!hasPrevious()">Previous</button>
    <button (click)="nextPage()" [disabled]="!hasNext()">Next</button>

    <p>page {{ page }} of {{ pageCount }}</p>
  `
})
export class SimplePaginationComponent {
  @Input()
  pageCount: number;

  @Input()
  page: number;

  @Output()
  pageChanged = new EventEmitter<number>();

  nextPage() {
    this.page ++;
    this.pageChanged.emit(this.page);
  }

  previousPage() {
    this.page --;
    this.pageChanged.emit(this.page);
  }

  hasPrevious(): boolean { return +this.page > 1; }

  hasNext(): boolean { return +this.page < +this.pageCount; }

}
一切盡在 code 裡。用到兩個@Input來呈現當前頁面與總頁面數。每次頁面變換都會觸發 pageChanged 事件。當達到最前面或最後面的時候,將按鈕鎖住。
現在我們改一些程式碼,變成新的組件,但是用繼承的方式。
// my-pagination.component.ts

import { Component } from '@angular/core';
import { SimplePaginationComponent } from './simple-pagination.component';

@Component({
  selector: 'my-pagination',
  template: `
    <a (click)="previousPage()" [class.disabled]="!hasPrevious()"
      href="javascript:void(0)">
      ««
    </a>
    <span>{{ page }} / {{ pageCount }}</span>
    <a (click)="nextPage()" [class.disabled]="!hasNext()"
      href="javascript:void(0)" >
      »»
    </a>
  `
})
export class MyPaginationComponent extends SimplePaginationComponent {
}
首先,我們引入 SimplePaginationComponent,接著 extends (延伸)SimplePaginationComponent。然後我們改變模板,變成用超連結的方式顯示頁碼。然後可以看到我們將 SimplePaginationComponent 裡面的 inputs、outputs 和 function 都用在我們的新模板中了。
原來組件長這樣
// simple-pagination.component.ts

@Component({
  selector: 'simple-pagination',
  template: `
    <button (click)="previousPage()" [disabled]="!hasPrevious()">{{ previousText }}</button>
    <button (click)="nextPage()" [disabled]="!hasNext()">{{ nextText }}</button>

    <p>page {{ page }} of {{ pageCount }}</p>
  `
})
export class SimplePaginationComponent {
  ...

  @Input()
  previousText = 'Previous';

  @Input()
  nextText = 'Next';

  ...

}
現在我不想要 previousText 和 nextText 裡面的樣子,在我們建立的繼承組件中,我們可以直接重寫,就可以覆蓋掉他們,而沒動的地方則是繼續繼承。
// my-pagination.component.ts

...
...

export class MyPaginationComponent extends SimplePaginationComponent {
  @Input()
  previousText = '<<'; // 覆蓋原本的文字

  @Input()
  nextText = '>>'; // 覆蓋原本的文字

  ...
}
那我們想要在繼承的組件中增加東西怎麼辦?
只要在原本的組件上面先定義好我們要的特性,但是不使用它,然後在繼承的組件上加上 @Input,這樣繼承的組件之後就可以直接用定義過的特性來改變了!
 // my-pagination.component.ts

@Component({

...

export class MyPaginationComponent extends SimplePaginationComponent {
  @Input()
  title: string; // 只用來改 child component

  ...
}