

側邊欄是一個非常常用的一種功能,這次在 Android 嘗試通過做一個。
通過一個 DrawerActivity 做為容器,NavigationView 做為側邊欄,
當使用者點選不同的 item 時,通知 DrawerActivity 去切換當中的 fragment.
首先需要在 app/build.gradle 引入依賴包
dependencies {
  compile 'com.android.support:design:25.2.0'
}
建立側邊欄的內容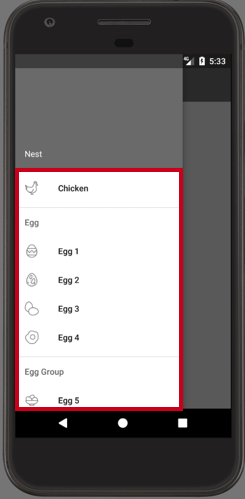
建立 /menu/drawer_view.xml 文件
通過 Group 可以實現類似 iOS 的 Section 的功能,可以為 Header 設定文字,並且會得到一條分割線。
<?xml version="1.0" encoding="utf-8"?>
<menu xmlns:android="http://schemas.android.com/apk/res/android">

    <group android:checkableBehavior="single">
        <item
            android:id="@+id/nav_1_fragment"
            android:icon="@drawable/icon_chicken"
            android:title="Chicken" />

        <item android:title="Egg">
            <menu>
                <group android:checkableBehavior="single">
                    <item
                        android:id="@+id/nav_2_fragment"
                        android:icon="@drawable/icon_egg1"
                        android:title="Egg 1" />

                    <item
                        android:id="@+id/nav_4_fragment"
                        android:icon="@drawable/icon_egg3"
                        android:title="Egg 2" />
                    <item
                        android:id="@+id/nav_5_fragment"
                        android:icon="@drawable/icon_egg4"
                        android:title="Egg 3" />
                    <item
                        android:id="@+id/nav_7_fragment"
                        android:icon="@drawable/icon_egg6"
                        android:title="Egg 4" />
                </group>
            </menu>
        </item>

        <item android:title="Egg Group">
            <menu>
                <group android:checkableBehavior="single">
                    <item
                        android:id="@+id/nav_3_fragment"
                        android:icon="@drawable/icon_egg2"
                        android:title="Egg 5" />

                    <item
                        android:id="@+id/nav_6_fragment"
                        android:icon="@drawable/icon_egg5"
                        android:title="Egg 6" />

                </group>
            </menu>
        </item>


    </group>
</menu>
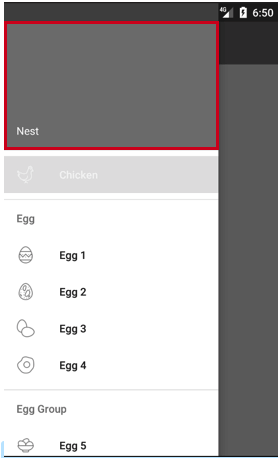
我們建立 /res/layout/nav_header.xml 文件來為 NavigationView 提供一個 Header
<LinearLayout xmlns:android="http://schemas.android.com/apk/res/android"
    android:layout_width="match_parent"
    android:layout_height="192dp"
    android:background="?attr/colorPrimaryDark"
    android:padding="16dp"
    android:theme="@style/ThemeOverlay.AppCompat.Dark"
    android:orientation="vertical"
    android:gravity="bottom">

    <TextView
        android:layout_width="match_parent"
        android:layout_height="wrap_content"
        android:text="Nest"
        android:textColor="@android:color/white"
        android:textAppearance="@style/TextAppearance.AppCompat.Body1"/>

</LinearLayout>
通過在 activity_detail.xml 文件中的 <android.support.design.widget.NavigationView /> 加入屬性就可以引用了
app:headerLayout="@layout/nav_header"
為了能夠可以讓側邊欄可以在 ActionBar 上滑動,我們需要建立 Toolbar
/res/layout/toolbar.xml
<android.support.v7.widget.Toolbar
xmlns:android="http://schemas.android.com/apk/res/android"
xmlns:app="http://schemas.android.com/apk/res-auto"
android:id="@+id/toolbar"
android:layout_height="wrap_content"
android:layout_width="match_parent"
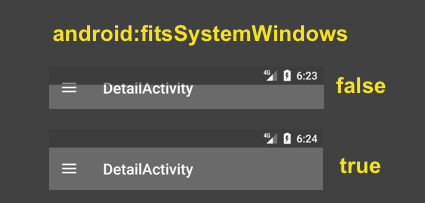
android:fitsSystemWindows="true"
android:minHeight="?attr/actionBarSize"
app:theme="@style/ThemeOverlay.AppCompat.Dark.ActionBar"
android:background="?attr/colorPrimaryDark">
</android.support.v7.widget.Toolbar>
需要特別注意的是這個屬性,這個值會影響 statusBar 是否會獨立佔有一定的空間。
android:fitsSystemWindows="true"
我們建立了一個名為 DetailActiviy,並提供了幾個屬性,並初始化他們。
    lateinit var drawer: DrawerLayout
    lateinit var toolbar: Toolbar
    lateinit var navigationView: NavigationView
    lateinit var fragmentManager: FragmentManager
        drawer = findViewById(R.id.drawer_layout)
        toolbar = findViewById(R.id.toolbar)
        navigationView = findViewById(R.id.nvView)
設定漢堡按鈕
        // set a toolbar to replace the actionBar
        val toggle = ActionBarDrawerToggle(this, drawer, toolbar, R.string.drawer_open, R.string.drawer_close)
        drawer.addDrawerListener(toggle)
        toggle.syncState()
        setSupportActionBar(toolbar)
設定 DrawerActivity 初始化的 Fragment
        // set default fragment
        fragmentManager = supportFragmentManager
        fragmentManager.beginTransaction().replace(R.id.flContent, Chicken1Fragment()).commit()
建立一個 listener 用來監控使用者點擊側邊欄的狀況
        // set navigation select Listener
        navigationView.setNavigationItemSelectedListener(navigationItemSelectedListener)
發現使用者點擊時,我們將會做幾個動作
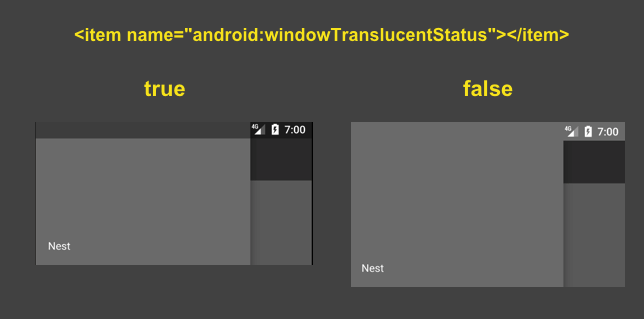
通過在 /res/values-v19/styles.xml 中的設定,可以讓 StatusBar 變透明
<resources>
    <!-- Base application theme. -->
    <style name="AppTheme" parent="Theme.AppCompat.Light.NoActionBar">
        <!-- Customize your theme here. -->
        <item name="android:windowTranslucentStatus">true</item>
    </style>
</resources>
和 iOS 相比 Android 更方便的地方
在 Android 開發中,使用 Layout Editor 就像是 iOS 的 Storyboard 一樣,但有個更方便的地方。
如果我們建立了兩個 layout 文件(相當於 iOS 的兩個 xib 文件),這時候在其中一個 layout 中引入另外一個 layout ,
Android 的 Editor 是可以直接看到畫面呈現的效果的,而 iOS 需要在模擬器中才看得到。
初始化方法
在 iOS 中,我們通過下面的方法來將 XIB 中設定好的介面給初始化出來
public init(nibName nibNameOrNil: String?, bundle nibBundleOrNil: Bundle?)
而在 Android 中,可以通過下面的方法(runtime 中初始化)
val header = navigationView.inflateHeaderView(R.layout.nav_header)
val headerPhotoImageView = header.findViewById(R.id.imageView)
也可以直接在 Layout Editor 的 xml 文件中加入
app:headerLayout="@layout/nav_header"
TODO: 在側邊欄加入可展開多層的功能
TODO: 更多 customise 的 layout

