本文同步發佈於:Claire's BLOG
ng generate component heroes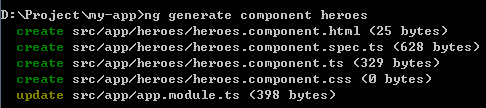
用這個指令,CLI會為我們初始化一個新的元件樣版
這時我們開啟app/heroes/heroes.component.ts
import { Component, OnInit, ViewEncapsulation } from '@angular/core';

@Component({
  selector: 'app-heroes',
  templateUrl: './heroes.component.html',
  styleUrls: ['./heroes.component.css'],
  encapsulation: ViewEncapsulation.None
})
export class HeroesComponent implements OnInit {
  hero = 'heroes works!';//增加一個變數
  constructor() { }

  ngOnInit() {
  }

}
只要創建元件,都必需從Angular去import Component。 而@Component則是用來定義這一個元件的相關資訊,有三個metadata
selector: the components CSS element selector以及在HTML裡要宣告的TAG名稱templateUrl: 要使用的HTML樣版位置styleUrls: 專為這個元件設定的CSS要注意的是,我們通常會使用export class,以方便在其他的模組裡可以import來使用
打開heroes.component.ts
import { Component, OnInit, ViewEncapsulation } from '@angular/core';

@Component({
  selector: 'app-heroes',
  templateUrl: './heroes.component.html',
  styleUrls: ['./heroes.component.css'],
  encapsulation: ViewEncapsulation.None
})
export class HeroesComponent implements OnInit {
  hero = 'heroes works!';//增加一個變數
  constructor() { }

  ngOnInit() {
  }

}
修改heroes.component.html,使用{{hero}}來顯示剛剛在TS檔裡定義的變數
<h1>{{hero}}</h1>
打開src/app/app.component.html
<app-heroes></app-heroes>
這時候就可以在頁面中看到剛剛我們所增加的內容
創建一個Hero物件 src/app/hero.ts
export class Hero {
   id: number;
   name: string;
}
打開src/app/heroes/heroes.component.ts,給予物件正確的值
import { Component, OnInit } from '@angular/core';
import { Hero } from '../hero';

@Component({
selector: 'app-heroes',
templateUrl: './heroes.component.html',
styleUrls: ['./heroes.component.css']
})
export class HeroesComponent implements OnInit
{
//在這邊設定物件內容
hero: Hero = {
id: 1,
name: 'Windstorm'
};

constructor() { }

ngOnInit() {
}

}
顯示在heroes.component.ts所設定的值
<h2>{{ hero.name }} Details</h2>
<div><span>id: </span>{{hero.id}}</div>
<div><span>name: </span>{{hero.name}}</div>
如果希望將變數格式化 則可以使用
<h2>{{ hero.name | uppercase }} Details</h2>
這個格式化的功能叫做Pipes,更多的說明請見Pipes說明
Angular一個很方便的功能就是可以支持雙向繫結,使用[(ngModel)]能做到當欄位的值改變時,TS裡變數的值也同時被更改。 這個功能在做表單驗證時非常方便 詳細使用說明請見:NgModules
使用方法:
在src/app/heroes/heroes.component.html加上下面這段
<div>
    <label>name:
      <input [(ngModel)]="hero.name" placeholder="name">
    </label>
</div>
接著要去app.module.ts去加上import資訊讓專案能夠使用ngModel標籤 要注意是在app.module.ts裡喔!
先import並且將FormsModule加進@ngModule的imports列表內,讓下面所有的元件都可以使用FormsModule的功能
import { FormsModule } from '@angular/forms'; // <-- NgModel lives here
imports: [
  BrowserModule,
  FormsModule
],
接著,要把剛剛我們所建立的元件HeroesComponent放進@NgModule.declarations裡
import { HeroesComponent } from './heroes/heroes.component';
在app.module.ts的@NgModule增加
declarations: [
  AppComponent,
  HeroesComponent
],
這時,我們會發現我們更動input裡的文字時,model的值也會被更改
今日練習成果下載:live example / download example.
再跟著教程走時
在雙向繫結的部分似乎有遺漏
import { FormsModule } from '@angular/forms';

imports: [
    BrowserModule,
    FormsModule
  ]
還是說有其他種方式能取代呢?
謝謝你的回應,已經補上了!當時我也是邊做邊學,有時遇到BUG搞半天回來就忘了寫到那..XD...有疏漏的地方真不好意思!真謝謝你這麼認真看>///<!有什麼其他問題也請多多提出!我會認真補完它們的
打開src/app/app.component.html
這時候就可以在頁面中看到剛剛我們所增加的內容
沒有耶XD