圖. 影像標題(Image Captioning),圖片來源:cs231n_2017_lecture11 Detection and Segmentation
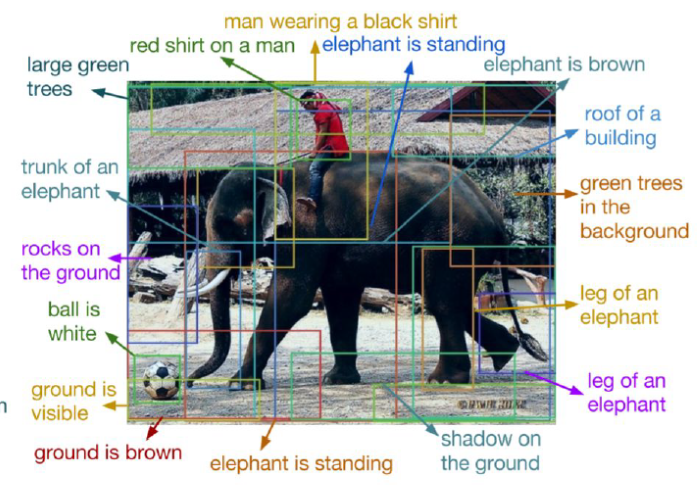
影像辨識的發展,可以從 ImageNet ILSVRC 挑戰賽(Large Scale Visual Recognition Challenge)題目一窺端倪,2011年題目為影像分類(Classification)、影像分類及定位(Classification with Localization),到了2017年題目為物體定位(Object Localization)、物體偵測(Object Detection)、影片物體偵測(Object Detection from Video),就可以了解整個技術的演進,我們看看下圖,電腦視覺的應用概分為下列幾類:
之前在『Day 10:CNN 應用 -- 找出相似的照片』一篇介紹如何找到我們如何找到相似的物體,問題再延伸一點,我們還要知道物體所在的位置及大小,進而把它標註出來,以利使用者迅速找到關注的物體,例如從監視器找嫌疑犯,如果能在每一幀(Frame)標註嫌疑犯,那警察抓嫌疑犯就方便多了。所以,我們就來看看怎麼實作。
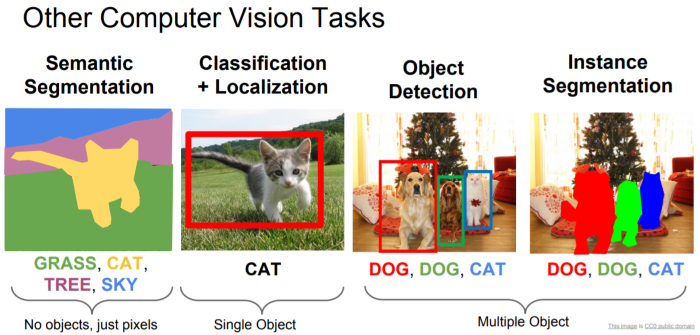
實作的基礎還是應用『Day 09:CNN 經典模型應用』介紹的方法,先找出符合的物體,之後再判斷哪一區域有符合的物體,且機率最高,即將該區域以方框標註,如下圖,CNN後分別接兩種全連階層,一個作分類(Classification),另一個標註符合的區域。
圖. 定位演算法模型,圖片來源:CS231n第八課:目標檢測定位學習記錄 - IT閱讀
至於,標註區域的方式有下列幾類演算法:
滑動視窗(Sliding Window):這是一種窮舉法,設定各種尺寸的區域,從左上角開始滑動,找出所有區域,然後,看哪一個區域符合的機率最高。這種方法最簡單,但是也相對耗時。
圖. 滑動視窗(Sliding Window)模型,圖片來源:CS231n第八課:目標檢測定位學習記錄 - IT閱讀
Region Proposals:利用了圖像中的紋理、邊緣、顏色等信息,人為定義可能含有目標的RoI(Regions of Interest)區域,只針對這些區域比較符合的機率,每秒可過濾上千個區域,相關演算法有 R-CNN、Fast R-CNN、Faster R-CNN...等。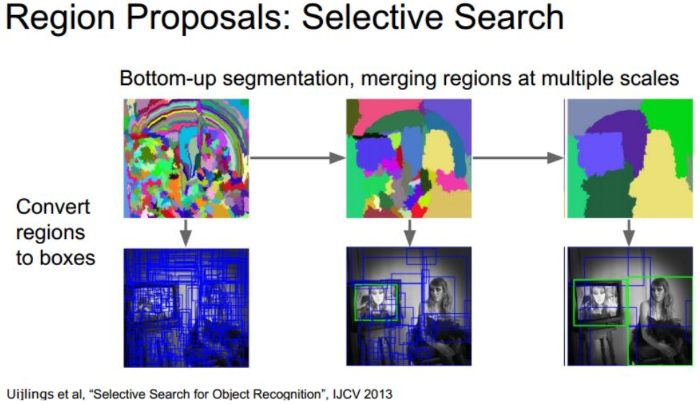
圖. Region Proposals 示意圖,圖片來源:CS231n第八課:目標檢測定位學習記錄 - IT閱讀
迴歸方法:將圖片切成小方塊(Grid),再以小方塊中心點選擇幾種尺寸的區域,利用迴歸方法計算每個區域含有目標的機率。這種方法較 Region Proposals 慢,但適合即時(Real Time)偵測,目前相關演算法有有 YOLO(You Only Look Once)、SSD(Single Shot MultiBox Detector)...等。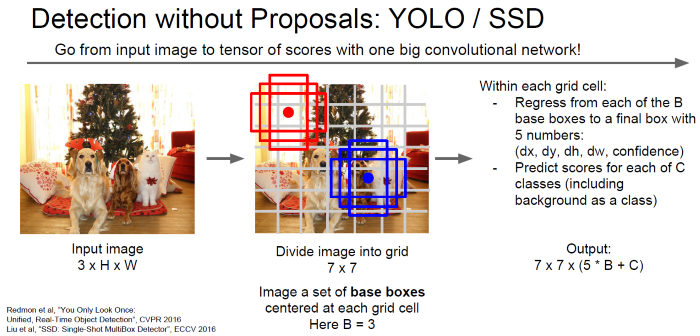
圖. 迴歸方法說明,圖片來源:cs231n_2017_lecture11 Detection and Segmentation
我們就舉 SSD 演算法為例來測試看看效果如何。
本程式來自Object Detection · Martin Thoma,程式較長,不易說明,我將部分參數固定(Hard Code),並加上註解,放在SSD資料夾,可在這裡找到,其中 weights_SSD300.hdf5 檔案過大,請自https://mega.nz/#F!7RowVLCL!q3cEVRK9jyOSB9el3SssIA 下載,放在SSD資料夾中,再準備一組照片檔(*.jpg"),辨識內容限20類照片 -- 飛機、單車、鳥、小船、瓶子、巴士、轎車、貓、椅子、牛、餐桌、狗、馬、機車、人、盆栽、羊、沙發、火車、顯示器等,放在程式所在目錄下的images子目錄,然後執行下列指令:
python ssd_test.py
"""
Run object detection with VOC classes.

This is just a minor modification of code from
https://github.com/rykov8/ssd_keras
"""

from keras.applications.imagenet_utils import preprocess_input
from keras.preprocessing import image
import matplotlib.pyplot as plt
import numpy as np
from scipy.misc import imread
import sys

from ssd import SSD300
from ssd_utils import BBoxUtility
import os
from os.path import basename

def create_overlay(img, results, , plt_fname):
    plt.clf()
    # Parse the outputs.
    det_label = results[:, 0]
    det_conf = results[:, 1]
    det_xmin = results[:, 2]
    det_ymin = results[:, 3]
    det_xmax = results[:, 4]
    det_ymax = results[:, 5]

    # Get detections with confidence higher than 0.6.
    top_indices = [i for i, conf in enumerate(det_conf) if conf >= 0.6]

    top_conf = det_conf[top_indices]
    top_label_indices = det_label[top_indices].tolist()
    top_xmin = det_xmin[top_indices]
    top_ymin = det_ymin[top_indices]
    top_xmax = det_xmax[top_indices]
    top_ymax = det_ymax[top_indices]
    colors = plt.cm.hsv(np.linspace(0, 1, 21)).tolist()

    plt.imshow(img / 255.)
    currentAxis = plt.gca()
    currentAxis.axis('off')

    for i in range(top_conf.shape[0]):
        xmin = int(round(top_xmin[i] * img.shape[1]))
        ymin = int(round(top_ymin[i] * img.shape[0]))
        xmax = int(round(top_xmax[i] * img.shape[1]))
        ymax = int(round(top_ymax[i] * img.shape[0]))
        score = top_conf[i]
        label = int(top_label_indices[i])
        label_name = voc_classes[label - 1]
        display_txt = '{:0.2f}, {}'.format(score, label_name)
        coords = (xmin, ymin), xmax - xmin + 1, ymax - ymin + 1
        color = colors[label]
        currentAxis.add_patch(plt.Rectangle(*coords,
                                            fill=False,
                                            edgecolor=color,
                                            linewidth=2))
        currentAxis.text(xmin, ymin, display_txt,
                         bbox={'facecolor': color, 'alpha': 0.5})
    plt.savefig(plt_fname)
    print("save "+plt_fname)

if __name__ == "__main__":
    import glob
    imagesList = glob.glob("images/*.jpg")

    # Load the model
    voc_classes = ['Aeroplane', 'Bicycle', 'Bird', 'Boat', 'Bottle',
                   'Bus', 'Car', 'Cat', 'Chair', 'Cow', 'Diningtable',
                   'Dog', 'Horse', 'Motorbike', 'Person', 'Pottedplant',
                   'Sheep', 'Sofa', 'Train', 'Tvmonitor']
    NUM_CLASSES = len(voc_classes) + 1
    input_shape = (300, 300, 3)
    model = SSD300(input_shape, num_classes=NUM_CLASSES)
    model.load_weights('weights_SSD300.hdf5', by_name=True)
    bbox_util = BBoxUtility(NUM_CLASSES)

    # Load the inputs
    inputs = []
    images = []
    for img_path in imagesList:
        print("process " + img_path)
        img = image.load_img(img_path, target_size=(300, 300))
        img = image.img_to_array(img)
        images.append(imread(img_path))
        inputs.append(img.copy())
    # 前置處理
    print("前置處理...")
    inputs = preprocess_input(np.array(inputs))

    # 預測
    print("預測...")
    preds = model.predict(inputs, batch_size=1, verbose=1)
    # 取得預測結果
    results = bbox_util.detection_out(preds)
    print("results[0]=")
    print(results[0][0][1])

    # create folder if not exist
    output_directory="results"
    if not os.path.exists(output_directory):
        os.makedirs(output_directory)
    # proces images
    for i, img in enumerate(images):
        # 產生有框的 output files
        create_overlay(img, results[i], voc_classes,
           output_directory+"/{}.png".format(basename(os.path.splitext(imagesList[i])[0])))
    # Garbage collection, to prevent from TensorFlow error
    import gc
    gc.collect()
程式不像前兩篇,這次的程式很快就可以執行完,程式流程說明如下:
from keras.utils.vis_utils import plot_model
plot_model(model, to_file='model_plot.png', show_shapes=True, show_layer_names=True)
針對執行結果有以下幾點說明:
有關影像的辨識就介紹到這裡,其實,筆者還很想花時間作一些實驗,但迫於鐵人賽不等人,只好等賽程結束,再好好重整旗鼓了,下一次開始我們就要開始『自然語言處理』之旅,它涉及的知識範圍更廣,筆者會花更多的篇幅,與大家一起努力。
版主你好
請問若不想利用現成以訓練好的資料庫
想要自行訓練一筆資料
請問有什麼參考方法可以提供嗎?
如果不是要辨識 voc 的20類物品,要重新訓練其他物品,可以不要載入權重,即將下行拿掉:
model.load_weights('weights_SSD300.hdf5', by_name=True)
再將訓練資料集放入模型中,重新訓練即可。
了解~
不好意思,因為對於SSD的架構還不是太了解。
"再將訓練資料集放入模型中,重新訓練即可。"
意思是再撰寫一份train.py的檔案output成.hdf5就可以了嗎?
因為看專案裡面好像沒有提供訓練的code。
麻煩版主
請參考下列這一篇:
https://ithelp.ithome.com.tw/articles/10191404
將原先的
model.load_weights('weights_SSD300.hdf5', by_name=True)
改為進行訓練,x/y 為自行準備的訓練資料
train_history = model.fit(x=x_Train_norm, y=y_TrainOneHot, validation_split=0.2, epochs=10, batch_size=800, verbose=2)
邦友你好
謝謝你做關於此tensorflow的文章,
我也對對於如何製作自己的train model感到疑惑,
也有參考樓上的留言但是還是不太了解。
因為其中的 model.load_weights('weights_SSD300.hdf5', by_name=True)
是指讀取weights_SSD300.hdf5
其中day2的mnist訓練方法也適用於SSD300嗎?
如何製作一個適合SSD300的trainning model.hdf5不太了解該怎麼進行..
謝謝您
Keras 的程序是固定的
建立模型:本例如下,SSD300 定義在 ssd.py
model = SSD300(input_shape, num_classes=NUM_CLASSES)
訓練模型:model.fit,本例直接載入事先訓練的參數(model.load_weights),未進行訓練,故要自行訓練,則需改為fit
評估模型:model.evaluate
預測:model.predict
day2 展示自行訓練的完整程序,所以,本例要自行訓練,可參考day2。
要儲存訓練結果,請參考day4,或執行下列指令:
from keras.models import load_model
model.save('model.h5') # creates a HDF5 file 'model.h5'
您好
謝謝你的回答,請問若只需要訓練兩類(指非A即B)
那我model.fit裡面變數該怎麼撰寫呢?
因為不太了解內部變數的意義。
不好意思麻煩你
版主您好,
感謝您這篇文章的教學,我也照著您的Day2及Day4兩篇文章使用Cifar-10這個數據集完成了訓練並且存成了hdf5檔,
但是使用model.load_weights匯入hdf5檔後,預測出來的框完全是錯誤的(很多都是標空白處),
想請問這樣的情況是因為訓練圖片大小的問題嗎(3232)? 是否一定要用300300得圖檔來訓練呢??
還是預測程式這邊有參數設定錯誤了??? 還麻煩版主您解答了。
應該是圖片大小的問題,必須是 300x300 以上,程式會自動 resize,解析度過低無法解析。Cifar-10解析度只有32x32。
你好
用ssd訓練時 圖片不是會resize
那我們輸入的標記框不需要修改大小嗎?
ssd_test.py 第90行
img = image.load_img(img_path, target_size=(300, 300))
會自動 resize
謝謝你的回答
還有想請問訓練時的priors應該如何設置

