
收到版主通知,才知道已經熬過10天了。
言歸正傳,昨天剛好看到一個新聞『催生全球首位AI繪師Andy,美圖搶攻人工智慧卻面臨一大挑戰』,號稱花了1.99億元人民幣,團隊成員超過60人,研發了『美圖秀秀』的App,我們就來研究看看它的核心『畫風轉換』是怎麼做的?
這是另一個 CNN 應用,我們將使用 VGG 模型進行『風格轉換』(Style Transfer),也就是將一張照片換成另一幅畫的畫風,如下圖,讀者也可以下載『Prisma』App,它提供近二十種大師畫風轉換,提供照相並即時轉換,只是速度有點慢,不過,如果你執行下面的範例,相較之下,你就會覺得它怎麼那樣快,難怪它曾搶盡風頭。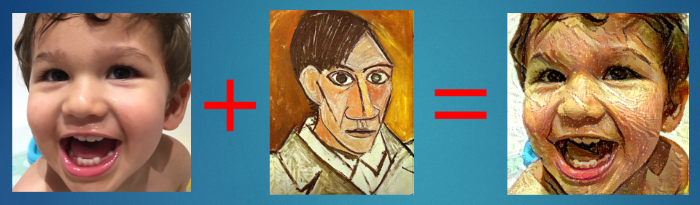
圖. 左圖為原圖,中間為畢卡索畫作,右邊為轉換的結果
2015年 Gatys等三人發表A Neural Algorithm of Artistic Style這篇文章,說明如何使用CNN進行『風格轉換』(Style Transfer),他們主要是認為只要模擬『顏色』及『紋理』,就可以讓人感覺是某種畫風,因此,對原圖(Content Image)取出內容,對風格圖(Style Image)取出風格,兩者加以合成,即可達到風格轉換的效果,步驟如下:
首先使用VGG模型,分別對原圖及風格圖萃取特徵,方法與上一篇『照片比對』相同。
定義原圖的損失函數,即『原圖與合成圖的特徵差距』,類似第三篇所講的『預測值與實際值的差距』,公式如下:
其中 P 是原圖內容的特徵向量,F 是合成圖內容的特徵向量。
定義風格圖的損失函數,即『風格圖與合成圖的特徵差距』,重點是他們找到一個公式,能較接近的反應畫風的差距,公式如下: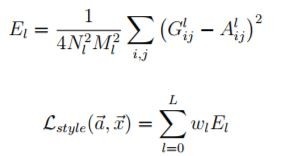
其中 A 是原圖風格的特徵向量,G 是合成圖風格的特徵向量。
所以,總損失函數 = 原圖的損失函數 + 風格圖的損失函數,利用 Keras 的 Functional API 模型,最小化『總損失函數』,就可以求得合成圖的的特徵向量,再將它還原為影像,就搞定了。其中最小化『總損失函數』的方法就是使用梯度下降法,計算各別的偏微分即可,公式如下:
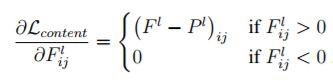
圖. 原圖的偏微分公式

圖. 風格圖的偏微分公式
大致的原理就是這樣,對照下面的程式碼及註解,就會比較清楚。
這個程式範例來自這裡,將近290行,我把部分參數固定(Hard code)並加了一些註解,可自這裡下載,檔名為style_transfer.py,程式碼如下:
'''
執行方式:python style_transfer.py
'''
from __future__ import print_function
from keras.preprocessing.image import load_img, img_to_array
from scipy.misc import imsave
import numpy as np
from scipy.optimize import fmin_l_bfgs_b
import time
import argparse
from keras.applications import vgg19
from keras import backend as K
base_image_path = "images/input.jpg"
style_reference_image_path = "images/style.jpg"
result_prefix = "output"
iterations = 10
# 原圖與風格圖佔output比重
content_weight = 0.025
style_weight = 1.0
# 損失總差異預設值
total_variation_weight = 1.0
# output 圖的寬高
width, height = load_img(base_image_path).size
img_nrows = 400
img_ncols = int(width * img_nrows / height)
# 轉換成 VGG 19 input 格式
def preprocess_image(image_path):
img = load_img(image_path, target_size=(img_nrows, img_ncols))
img = img_to_array(img)
img = np.expand_dims(img, axis=0)
img = vgg19.preprocess_input(img)
return img
# 將特徵向量轉換成 image
def deprocess_image(x):
if K.image_data_format() == 'channels_first':
x = x.reshape((3, img_nrows, img_ncols))
x = x.transpose((1, 2, 0))
else:
x = x.reshape((img_nrows, img_ncols, 3))
# 設定RGB顏色的中心點 (Remove zero-center by mean pixel)
x[:, :, 0] += 103.939
x[:, :, 1] += 116.779
x[:, :, 2] += 123.68
# 'BGR'->'RGB'
x = x[:, :, ::-1]
x = np.clip(x, 0, 255).astype('uint8')
return x
# 設定 Keras 變數 base_image = 原圖 向量
base_image = K.variable(preprocess_image(base_image_path))
# 設定 Keras 變數 style_reference_image = 風格圖 向量
style_reference_image = K.variable(preprocess_image(style_reference_image_path))
# 設定合成圖的起始值
if K.image_data_format() == 'channels_first':
combination_image = K.placeholder((1, 3, img_nrows, img_ncols))
else:
combination_image = K.placeholder((1, img_nrows, img_ncols, 3))
# 合併原圖、風格圖、合成圖 向量
input_tensor = K.concatenate([base_image,
style_reference_image,
combination_image], axis=0)
# 載入 VGG 19 模型,不包括加在最後3層的卷積層
model = vgg19.VGG19(input_tensor=input_tensor,
weights='imagenet', include_top=False)
# get the symbolic outputs of each "key" layer (we gave them unique names).
# 讀取 VGG 19 模型的每一層的名稱與output
outputs_dict = dict([(layer.name, layer.output) for layer in model.layers])
# 計算 風格 loss 的 gram matrix
def gram_matrix(x):
if K.image_data_format() == 'channels_first':
features = K.batch_flatten(x)
else:
features = K.batch_flatten(K.permute_dimensions(x, (2, 0, 1)))
gram = K.dot(features, K.transpose(features))
return gram
# 計算 風格 loss
def style_loss(style, combination):
assert K.ndim(style) == 3
assert K.ndim(combination) == 3
S = gram_matrix(style)
C = gram_matrix(combination)
channels = 3
size = img_nrows * img_ncols
return K.sum(K.square(S - C)) / (4. * (channels ** 2) * (size ** 2))
# 計算 content loss
def content_loss(base, combination):
return K.sum(K.square(combination - base))
# the 3rd loss function, total variation loss,
# designed to keep the generated image locally coherent
# 計算 損失總差異(total variation loss),以利合成圖的連貫性
def total_variation_loss(x):
assert K.ndim(x) == 4
if K.image_data_format() == 'channels_first':
a = K.square(x[:, :, :img_nrows - 1, :img_ncols - 1] - x[:, :, 1:, :img_ncols - 1])
b = K.square(x[:, :, :img_nrows - 1, :img_ncols - 1] - x[:, :, :img_nrows - 1, 1:])
else:
a = K.square(x[:, :img_nrows - 1, :img_ncols - 1, :] - x[:, 1:, :img_ncols - 1, :])
b = K.square(x[:, :img_nrows - 1, :img_ncols - 1, :] - x[:, :img_nrows - 1, 1:, :])
return K.sum(K.pow(a + b, 1.25))
# 彙總上面三項的損失(loss)
loss = K.variable(0.)
layer_features = outputs_dict['block5_conv2']
base_image_features = layer_features[0, :, :, :]
combination_features = layer_features[2, :, :, :]
loss += content_weight * content_loss(base_image_features,
combination_features)
feature_layers = ['block1_conv1', 'block2_conv1',
'block3_conv1', 'block4_conv1',
'block5_conv1']
for layer_name in feature_layers:
layer_features = outputs_dict[layer_name]
style_reference_features = layer_features[1, :, :, :]
combination_features = layer_features[2, :, :, :]
sl = style_loss(style_reference_features, combination_features)
loss += (style_weight / len(feature_layers)) * sl
loss += total_variation_weight * total_variation_loss(combination_image)
# 計算合成圖的梯度(gradients)
grads = K.gradients(loss, combination_image)
# 建立 Keras function API 模型
outputs = [loss]
if isinstance(grads, (list, tuple)):
outputs += grads
else:
outputs.append(grads)
f_outputs = K.function([combination_image], outputs)
# 依梯度下降法,評估模型
def eval_loss_and_grads(x):
if K.image_data_format() == 'channels_first':
x = x.reshape((1, 3, img_nrows, img_ncols))
else:
x = x.reshape((1, img_nrows, img_ncols, 3))
outs = f_outputs([x])
loss_value = outs[0]
if len(outs[1:]) == 1:
grad_values = outs[1].flatten().astype('float64')
else:
grad_values = np.array(outs[1:]).flatten().astype('float64')
return loss_value, grad_values
# 評估模型類別
# this Evaluator class makes it possible
# to compute loss and gradients in one pass
# while retrieving them via two separate functions,
# "loss" and "grads". This is done because scipy.optimize
# requires separate functions for loss and gradients,
# but computing them separately would be inefficient.
class Evaluator(object):
def __init__(self):
self.loss_value = None
self.grads_values = None
def loss(self, x):
assert self.loss_value is None
loss_value, grad_values = eval_loss_and_grads(x)
self.loss_value = loss_value
self.grad_values = grad_values
return self.loss_value
def grads(self, x):
assert self.loss_value is not None
grad_values = np.copy(self.grad_values)
self.loss_value = None
self.grad_values = None
return grad_values
# 執行模型評估
evaluator = Evaluator()
# run scipy-based optimization (L-BFGS) over the pixels of the generated image
# so as to minimize the neural style loss
x = preprocess_image(base_image_path)
# 在每一週期產生合成圖
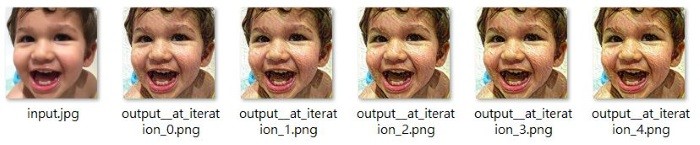
for i in range(iterations):
print('Start of iteration', i)
start_time = time.time()
x, min_val, info = fmin_l_bfgs_b(evaluator.loss, x.flatten(),
fprime=evaluator.grads, maxfun=20)
print('Current loss value:', min_val)
# 儲存每一週期的output合成圖
img = deprocess_image(x.copy())
fname = result_prefix + '_at_iteration_%d.png' % i
imsave(fname, img)
end_time = time.time()
print('Image saved as', fname)
print('Iteration %d completed in %ds' % (i, end_time - start_time))

基本上,使用 VGG 19 與 VGG 16 並無太大的差異,你可以改用 VGG 16 ,縮短執行時間,但是,比較好的方式是改變它的演算法,因此,後來有很多篇文章都在討論如何快速產生合成圖,有興趣的讀者可請教谷大神『fast style transfer』,後續如有餘力,也許我們回頭來研究一下可行的作法。
您好,
嘗試復現上述程式碼,出現下列錯誤訊息,google很久找不到合適解方,想請教您能否協助~
萬分感謝~
((程式碼在一桌面資料夾中,同層有一images資料夾內有input, style兩檔案
tensorflow.python.framework.errors_impl.FailedPreconditionError: Error while reading resource variable block4_conv1/bias from Container: localhost. This could mean that the variable was uninitialized. Not found: Resource localhost/block4_conv1/bias/class tensorflow::Var does not exist.
[[{{node block4_conv1/BiasAdd/ReadVariableOp}}]]
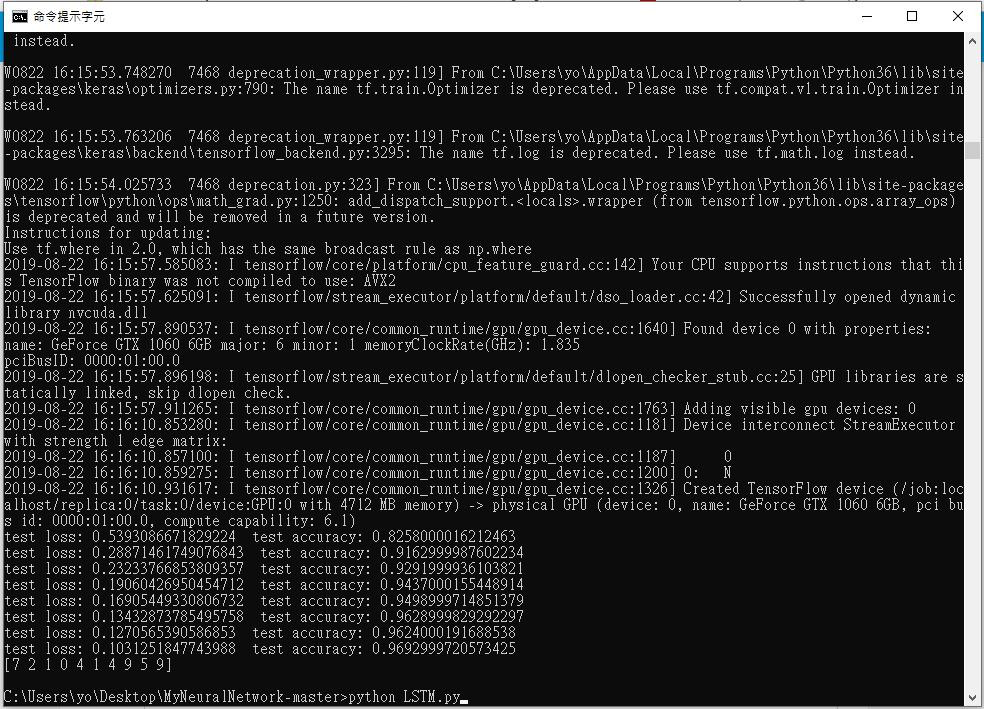
請問我執行lstm之後這個是對的嗎
謝謝您的回答
對的,無錯誤。
謝謝回覆,但我不太明白這個程式
是以哪邊的數字來進行辨識的
test loss , test accuracy 是兩邊比較則達到96.6%的嗎
loss 是損失函數的大小,單位不是 %
你好,我有一個問題,上述coed似乎每次更換圖片後(比如將小孩的圖片換成其他的然後風格不變)都會重新學習一次,這樣光是學習就花了很多的時間,我有辦法說直接餵一張新的圖然後風格不變的情況下直接轉換新圖的風格嗎?
理論上是有可能,把模型存起來直接 decode,不過我沒試過。


 iThome鐵人賽