
上篇簡單的介紹了一下,整體架構的部分!? 突然發現好像沒有講得很深XD
本文開始,將深入Debug Module(DM)的部分進行探討!
未來系列的文章中將以RISC-V External Debug Support 0.13為主,並將相關的實作一併附上,希望能夠引導讀者了解底層系統除錯架構的設計!一起加入Debugger的世界吧
Debug Module是整個架構的中心,負責處理來自外部的訊號,
以及處理內部Hart(RISC-V中hardware thread的最小單位)的狀態訊號、狀態控制等等。
主要提供以下功能:
以上內容翻譯自RISC-V External Debug Support 0.13,幾本上整個Debug Module就是圍繞在實現上述功能上,並提供一系列相關Registers讓外部Debug Translator(忘記的話請參考上篇Day 07: RISC-V Introduction)控制!
另外一個比較爭議的地方是,Program Buffer雖然在Spec.為定位為可選的部分,不過實際上為了能夠對Memory進行相關操作,還是必須要存在!?
在目前RISC-V OpenOCD的實現中,Program Buffer只少需要2-Words,詳細資料可以參考:
OpenOCD should support targets that don't implement a program buffer #112
或是至少需要System Bus相關操作的能力來對Memory進行相關操作!!
主要功能為負責將Debug Transport Module(Bus Master)所接收到的訊號轉發至Debug Module(Bus Slave)中!
實作上而言,可以是簡單的Master-to-Slave Bus或是可以用TileLink(SiFive所提供的interface bus IP)、AMBA APB(Advanced
Peripheral Bus)等等!
根據Spec.中的定義,DMI中的Address切成兩部分,0 ~ 6 address bits保留給DM使用,其餘的地方,可供其他Debug Device或是其他用途!
另外,在0 ~ 6 address bits保留給DM使用的地方,則切割成兩部分:
詳見下圖:
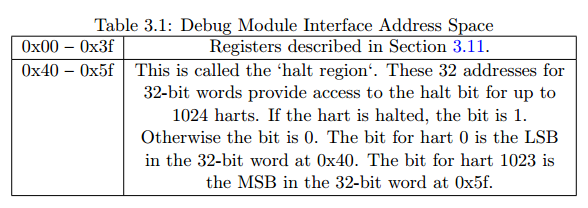
---引用自RISC-V External Debug Support 0.13
Debug Module Registers的部分會留待後面文章中再詳細解析!
Halt region,這部分比較特別一點,在其中的每個Bits分別代表一個Hart的狀態:
參考下圖的範例: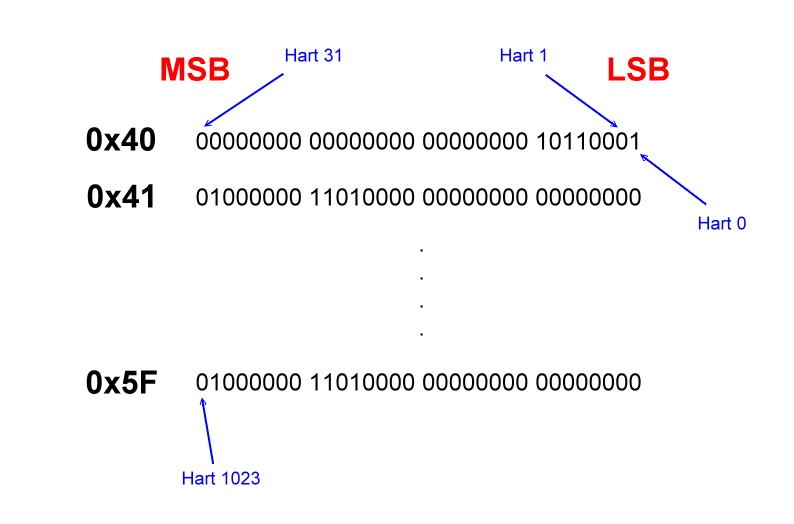
所以在整個Address Space的設計上,總共支援(0x5f - 0x40 + 1) * 32 = 1024個Harts
以上是Spec.的部分,接下來要介紹到DMI Access操作(Read/Write)的實作!
主要分成以下三個部分:
首先是DMI Read Operation,以下程式碼請參考src/target/riscv/riscv-013.c
static uint64_t dmi_read(struct target *target, uint16_t address)
{
    select_dmi(target);

    dmi_status_t status;
    uint16_t address_in;

    unsigned i = 0;

    // This first loop ensures that the read request was actually sent
    // to the target. Note that if for some reason this stays busy,
    // it is actually due to the previous dmi_read or dmi_write.
    for (i = 0; i < 256; i++) {
        status = dmi_scan(target, NULL, NULL, DMI_OP_READ, address, 0,
                false);
        if (status == DMI_STATUS_BUSY) {
            increase_dmi_busy_delay(target);
        } else if (status == DMI_STATUS_SUCCESS) {
            break;
        } else {
            LOG_ERROR("failed read from 0x%x, status=%d", address, status);
            break;
        }
    }

    if (status != DMI_STATUS_SUCCESS) {
        LOG_ERROR("Failed read from 0x%x; status=%d", address, status);
        abort();
    }

    // This second loop ensures that we got the read
    // data back. Note that NOP can result in a 'busy' result as well, but
    // that would be noticed on the next DMI access we do.
    uint64_t value;
    for (i = 0; i < 256; i++) {
        status = dmi_scan(target, &address_in, &value, DMI_OP_NOP, address, 0,
                false);
        if (status == DMI_STATUS_BUSY) {
            increase_dmi_busy_delay(target);
        } else if (status == DMI_STATUS_SUCCESS) {
            break;
        } else {
            LOG_ERROR("failed read (NOP) at 0x%x, status=%d", address, status);
            break;
        }
    }

    if (status != DMI_STATUS_SUCCESS) {
        LOG_ERROR("Failed read (NOP) from 0x%x; value=0x%" PRIx64 ", status=%d",
                address, value, status);
        abort();
    }

    return value;
}
第一個Loop是將資料"敲"進去DMI中,第二個Loop是將NOP敲入DMI中,並將資料"擠出"DMI!
之後文章中如果有提到JTAG的部分,還會再做詳細的介紹!
以下是相關的Log:
Debug: 505 654 riscv-013.c:237 scan(): 41b r 00000000 @11 -> + 00000000 @00
Debug: 506 654 riscv-013.c:237 scan(): 41b - 00000000 @11 -> + 00030c82 @11
第一行將OP_READ和Register的Address 0x11敲入DMI中;
第二行則是將OP_NOP敲入DMI中,並將Data 0x00030c82從中讀取出來
再來是DMI Write Operation,以下程式碼請參考src/target/riscv/riscv-013.c
static void dmi_write(struct target *target, uint16_t address, uint64_t value)
{
    select_dmi(target);
    dmi_status_t status = DMI_STATUS_BUSY;
    unsigned i = 0;

    // The first loop ensures that we successfully sent the write request.
    for (i = 0; i < 256; i++) {
        status = dmi_scan(target, NULL, NULL, DMI_OP_WRITE, address, value,
                address == DMI_COMMAND);
        if (status == DMI_STATUS_BUSY) {
            increase_dmi_busy_delay(target);
        } else if (status == DMI_STATUS_SUCCESS) {
            break;
        } else {
            LOG_ERROR("failed write to 0x%x, status=%d", address, status);
            break;
        }
    }

    if (status != DMI_STATUS_SUCCESS) {
        LOG_ERROR("Failed write to 0x%x;, status=%d",
                address, status);
        abort();
    }

    // The second loop isn't strictly necessary, but would ensure that
    // the write is complete/ has no non-busy errors before returning from this function.
    for (i = 0; i < 256; i++) {
        status = dmi_scan(target, NULL, NULL, DMI_OP_NOP, address, 0,
                false);
        if (status == DMI_STATUS_BUSY) {
            increase_dmi_busy_delay(target);
        } else if (status == DMI_STATUS_SUCCESS) {
            break;
        } else {
            LOG_ERROR("failed write (NOP) at 0x%x, status=%d", address, status);
            break;
        }
    }
    if (status != DMI_STATUS_SUCCESS) {
        LOG_ERROR("failed to write (NOP) 0x%" PRIx64 " to 0x%x; status=%d", value, address, status);
        abort();
    }
}
類似DMI Read,
第一個Loop是將資料"敲"進去DMI中,第二個Loop是將NOP敲入DMI中,確認是否完成動作!
以下是相關的Log:
Debug: 509 655 riscv-013.c:237 scan(): 41b w 80000001 @10 -> + 00000000 @00
Debug: 510 656 riscv-013.c:237 scan(): 41b - 00000000 @10 -> + 80000001 @10
最後是核心DMI Scan(Exec)的部分,
首先介紹DMI傳輸的Format,見下圖:

---引用自RISC-V External Debug Support 0.13
主要分成三個部分:
以下程式碼請參考src/target/riscv/riscv-013.c
/**
 * exec: If this is set, assume the scan results in an execution, so more
 * run-test/idle cycles may be required.
 */
static dmi_status_t dmi_scan(struct target *target, uint16_t *address_in,
        uint64_t *data_in, dmi_op_t op, uint16_t address_out, uint64_t data_out,
        bool exec)
{
    riscv013_info_t *info = get_info(target);
    uint8_t in[8] = {0};
    uint8_t out[8];
    struct scan_field field = {
        .num_bits = info->abits + DTM_DMI_OP_LENGTH + DTM_DMI_DATA_LENGTH,
        .out_value = out,
        .in_value = in
    };

    assert(info->abits != 0);

    buf_set_u64(out, DTM_DMI_OP_OFFSET, DTM_DMI_OP_LENGTH, op);
    buf_set_u64(out, DTM_DMI_DATA_OFFSET, DTM_DMI_DATA_LENGTH, data_out);
    buf_set_u64(out, DTM_DMI_ADDRESS_OFFSET, info->abits, address_out);

    /* Assume dbus is already selected. */
    jtag_add_dr_scan(target->tap, 1, &field, TAP_IDLE);

    int idle_count = info->dmi_busy_delay;
    if (exec)
        idle_count += info->ac_busy_delay;

    if (idle_count) {
        jtag_add_runtest(idle_count, TAP_IDLE);
    }

    int retval = jtag_execute_queue();
    if (retval != ERROR_OK) {
        LOG_ERROR("dmi_scan failed jtag scan");
        return DMI_STATUS_FAILED;
    }

    if (data_in) {
        *data_in = buf_get_u64(in, DTM_DMI_DATA_OFFSET, DTM_DMI_DATA_LENGTH);
    }

    if (address_in) {
        *address_in = buf_get_u32(in, DTM_DMI_ADDRESS_OFFSET, info->abits);
    }

    dump_field(&field);

    return buf_get_u32(in, DTM_DMI_OP_OFFSET, DTM_DMI_OP_LENGTH);
}
主要提醒一下:
這邊的out指的是OpenOCD出(out)到Target端;
in指的是從Target得(in)到OpenOCD端!
這邊主要是講解Target的狀態控制,這要分成以下三部分:
分別對應RISC-V External Debug Support 0.13中的3.2 Reset Control和3.4 Run Control!
在Spec.中的Reset分成兩種:
另外需要注意一點,ndmreset中,如果對DMI進行相關操作,DMI並不保證操作能夠正確執行,同時這個行為是Undefined behavior!!
這版的Spec.中又多出了一項設計--"havereset state bit",
當Hart如果有進行過Reset,則該Bit會自動拉成1(比如說: Watchdog做Reset)!
Debug Module(DM)中有一個用來Target狀態控制的Register: Debug Module Control (dmcontrol, at 0x10),裡面包含三種用來做狀態的Bits:
OpenOCD可藉由設定 這三個Bits來達到Target狀態控制的目的!
簡單介紹到這邊,下面直接看實作的部分
在OpenOCD,Reset的流程主要分成兩步驟:
首先是Assert reset的部分,以下程式碼請參考src/target/riscv/riscv-013.c
static int assert_reset(struct target *target)
{
    RISCV_INFO(r);

    select_dmi(target);

    uint32_t control_base = set_field(0, DMI_DMCONTROL_DMACTIVE, 1);

    if (target->rtos) {
        ....省略不放上來!

    } else {
        // Reset just this hart.
        uint32_t control = set_field(control_base, DMI_DMCONTROL_HARTSEL,
                r->current_hartid);
        control = set_field(control, DMI_DMCONTROL_HALTREQ,
                target->reset_halt ? 1 : 0);    ///譯註1: 這邊判斷是否需要haltreq (halt request)
        control = set_field(control, DMI_DMCONTROL_HARTRESET, 1);
        dmi_write(target, DMI_DMCONTROL, control);

        /// 譯註2: 判斷hartreset是否能夠成功被寫入!
        // Read back to check if hartreset is supported.
        uint32_t rb = dmi_read(target, DMI_DMCONTROL);
        if (!get_field(rb, DMI_DMCONTROL_HARTRESET)) {
            // Use ndmreset instead. That will reset the entire device, but
            // that's probably what OpenOCD wants anyway.
            control = set_field(control, DMI_DMCONTROL_HARTRESET, 0);
            control = set_field(control, DMI_DMCONTROL_NDMRESET, 1);
            dmi_write(target, DMI_DMCONTROL, control);
        }
    }

    target->state = TARGET_RESET;

    return ERROR_OK;
}
還記得Day 04: OpenOCD常用Commands簡介中,OpenOCD提供以下幾種Reset的方式:
另外上面有提到,"hartreset (hart reset)"並不一定有被硬體實做出來,因此這邊的做法是先「試試看」能否正確的執行"hartreset",如果不行,還記的"# 2.1 Reset Control"中有提到的ndmreset,也同樣可以達到Target進入Reset狀態的功能!?
詳細過程可以參考"譯註2"的地方!
再來是Deassert reset的部分,以下程式碼請參考src/target/riscv/riscv-013.c
static int deassert_reset(struct target *target)
{
    RISCV_INFO(r);
    RISCV013_INFO(info);
    select_dmi(target);

    LOG_DEBUG("%d", r->current_hartid);

    // Clear the reset, but make sure haltreq is still set
    uint32_t control = 0;
    control = set_field(control, DMI_DMCONTROL_HALTREQ, target->reset_halt ? 1 : 0);
    control = set_field(control, DMI_DMCONTROL_HARTSEL, r->current_hartid);
    control = set_field(control, DMI_DMCONTROL_DMACTIVE, 1);
    dmi_write(target, DMI_DMCONTROL, control);

    uint32_t dmstatus;
    int dmi_busy_delay = info->dmi_busy_delay;
    time_t start = time(NULL);

    if (target->reset_halt) {
        ///Part 1: Reset halt

        LOG_DEBUG("Waiting for hart to be halted.");
        do {
            dmstatus = dmi_read(target, DMI_DMSTATUS);
            if (time(NULL) - start > riscv_reset_timeout_sec) {
                LOG_ERROR("Hart didn't halt coming out of reset in %ds; "
                        "dmstatus=0x%x; "
                        "Increase the timeout with riscv set_reset_timeout_sec.",
                        riscv_reset_timeout_sec, dmstatus);
                return ERROR_FAIL;
            }
            target->state = TARGET_HALTED;
        } while (get_field(dmstatus, DMI_DMSTATUS_ALLHALTED) == 0);

        ///譯註1: 確認Target進入Halted後,將haltreq放掉(清成0)
        control = set_field(control, DMI_DMCONTROL_HALTREQ, 0);
        dmi_write(target, DMI_DMCONTROL, control);

    } else {
        ///Part 2: Reset run

        LOG_DEBUG("Waiting for hart to be running.");
        do {
            dmstatus = dmi_read(target, DMI_DMSTATUS);
            if (get_field(dmstatus, DMI_DMSTATUS_ANYHALTED) ||
                    get_field(dmstatus, DMI_DMSTATUS_ANYUNAVAIL)) {
                LOG_ERROR("Unexpected hart status during reset. dmstatus=0x%x",
                        dmstatus);
                return ERROR_FAIL;
            }
            if (time(NULL) - start > riscv_reset_timeout_sec) {
                LOG_ERROR("Hart didn't run coming out of reset in %ds; "
                        "dmstatus=0x%x; "
                        "Increase the timeout with riscv set_reset_timeout_sec.",
                        riscv_reset_timeout_sec, dmstatus);
                return ERROR_FAIL;
            }
        } while (get_field(dmstatus, DMI_DMSTATUS_ALLRUNNING) == 0);
        target->state = TARGET_RUNNING;
    }
    info->dmi_busy_delay = dmi_busy_delay;
    return ERROR_OK;
}
主要分成"Part 1: Reset halt"、"Part 2: Reset run"這兩部分,
在Part 1: Reset halt中,當確認Target進入Halted後,即可將haltreq放掉(清成0),請參考"譯註1"的部分!
在Target Resume(Run)的部分也類似,以下程式碼請參考src/target/riscv/riscv-013.c
static void riscv013_step_or_resume_current_hart(struct target *target, bool step)
{
    ....省略不放上來!

    /* Issue the resume command, and then wait for the current hart to resume. */
    uint32_t dmcontrol = dmi_read(target, DMI_DMCONTROL);
    dmcontrol = set_field(dmcontrol, DMI_DMCONTROL_RESUMEREQ, 1);
    dmi_write(target, DMI_DMCONTROL, dmcontrol);

    for (size_t i = 0; i < 256; ++i) {
        ///譯註: 確認Target是否完成Resume
        usleep(10);
        uint32_t dmstatus = dmi_read(target, DMI_DMSTATUS);
        if (get_field(dmstatus, DMI_DMSTATUS_ALLRESUMEACK) == 0)
            continue;
        if (step && get_field(dmstatus, DMI_DMSTATUS_ALLHALTED) == 0)
            continue;

        dmcontrol = set_field(dmcontrol, DMI_DMCONTROL_RESUMEREQ, 0);
        dmi_write(target, DMI_DMCONTROL, dmcontrol);
        return;
    }

    ....省略不放上來!
}
主要將resumereq拉上,並持續確認直到Target順利進入Resume後,
將resumereq恢復成0,再離開這個Loop!
以上就是Debug Module Overview的部分!
Debug Module整份資料要介紹的東西比想像中的還要多很多,本來預計一篇就要解決,
看起來目前應該是會分成(上)、(中)、(下)至少三篇!!
預計明天的主題會介紹整個Debug Moduel核心功能:

