
經過昨天的鏖戰後,終於來到倒數第二篇啦!!
今天就講點輕鬆的東西,看看上層GDB如何跟OpenOCD之間溝通!
GDB、OpenOCD和Target端的整體架構和連線關係,可以參考下圖:
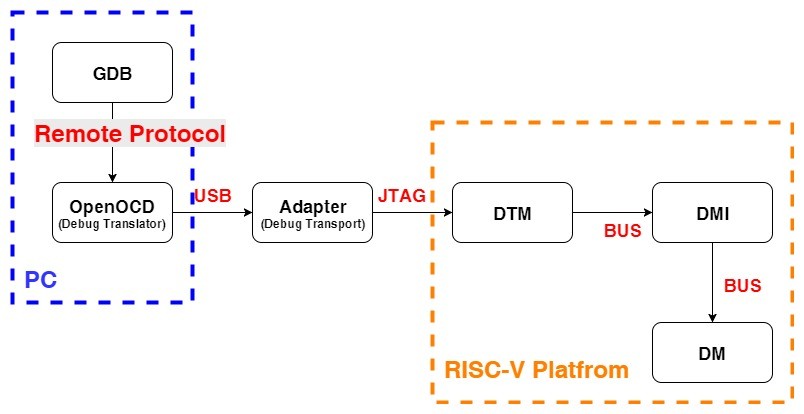
首先是GDB跟OpenOCD之間的溝通,主要是透過TCP/IP,並依照「GDB Remote Serial Protocol」的規定做溝通,OpenOCD那邊會負責建立GDB Server並等待GDB的連接,目前的設計中,
一個Target會開啟一個Port!
============================== 我是分隔線 ==============================
再來是OpenOCD跟Adapter(又稱為Debug Transport Hardware)之間,主要是依靠USB進行通訊,而通訊的內容則依照Debug Transport Hardware的不同,而有不同的設計,前些日子的介紹中,我們選擇Olimex ARM-USB-TINY-H作為我們的Demo,而Olimex ARM-USB-TINY-H主要是內建FTDI FT2232H作為USB轉JTAG,因此OpenOCD與Adapter之間則必須依照Command Processor for MPSSE的規範進行通訊!
詳細內容可以參考以下幾篇:
============================== 我是分隔線 ==============================
接下來,來到Adapter與DTM(Debug Transport Module)之間!
由於這個DTM目前僅支援JTAG作為主要傳輸介面,因此在Adapter與DTM之間,則必須要遵照JTAG連線的規範!
詳細內容可以參考以下兩篇:
============================== 我是分隔線 ==============================
最後,終於來到Platfrom內部Module跟Module之間的溝通,這部分可以使用簡單的Master-to-Slave Bus,或是更高階的TileLink(SiFive所提供的interface bus IP)、AMBA APB(Advanced Peripheral Bus)等等! 詳細的設計內容,則交由硬體設計負責!
另外可以參考以下這兩篇的簡介
本章節主要會帶過GDB Remote Serial Protocol,並稍微解釋一下"Packets"的部分!
並配合實際運作的例子給大家看看!!
不過由於整個Remote Serial Protocol支援的功能超級超級多,
所以只會挑一些常用的來研究,剩下就請讀者自行參考!!
在GDB Remote Serial Protocol中的格式如下
<Command>#<Checksum>
中間的'#'作為Command的終止符號(terminating character),最後面則接上一個兩位數的"Checksum"用來校驗傳輸的正確性!
然後是一些傳輸的規格,放在下面給大家參考:
packet-data consists of a sequence of characters with the exception of ‘#’ and ‘$’ (see ‘X’ packet for additional exceptions).

Fields within the packet should be separated using ‘,’ ‘;’ or ‘:’. Except where otherwise noted all numbers are represented in HEX with leading zeros suppressed.

Implementors should note that prior to GDB 5.0, the character ‘:’ could not appear as the third character in a packet (as it would potentially conflict with the sequence-id).

Binary data in most packets is encoded either as two hexadecimal digits per byte of binary data. This allowed the traditional remote protocol to work over connections which were only seven-bit clean. Some packets designed more recently assume an eight-bit clean connection, and use a more efficient encoding to send and receive binary data.

The binary data representation uses 7d (ASCII ‘}’) as an escape character. Any escaped byte is transmitted as the escape character followed by the original character XORed with 0x20. For example, the byte 0x7d would be transmitted as the two bytes 0x7d 0x5d. The bytes 0x23 (ASCII ‘#’), 0x24 (ASCII ‘$’), and 0x7d (ASCII ‘}’) must always be escaped. Responses sent by the stub must also escape 0x2a (ASCII ‘*’), so that it is not interpreted as the start of a run-length encoded sequence (described next).

Response data can be run-length encoded to save space. Run-length encoding replaces runs of identical characters with one instance of the repeated character, followed by a ‘*’ and a repeat count. The repeat count is itself sent encoded, to avoid binary characters in data: a value of n is sent as n+29. For a repeat count greater or equal to 3, this produces a printable ASCII character, e.g. a space (ASCII code 32) for a repeat count of 3. (This is because run-length encoding starts to win for counts 3 or more.) Thus, for example, ‘0* ’ is a run-length encoding of “0000”: the space character after ‘*’ means repeat the leading 0 32 - 29 = 3 more times.

The printable characters ‘#’ and ‘$’ or with a numeric value greater than 126 must not be used. Runs of six repeats (‘#’) or seven repeats (‘$’) can be expanded using a repeat count of only five (‘"’). For example, ‘00000000’ can be encoded as ‘0*"00’.

The error response returned for some packets includes a two character error number. That number is not well defined.

For any command not supported by the stub, an empty response (‘$#00’) should be returned. That way it is possible to extend the protocol. A newer GDB can tell if a packet is supported based on that response.
--引用自GDB Remote Serial Protocol - E.1 Overview
痾~ 太多英文了,不過基本上就是講一下字元的使用等等!
底下會從GDB Remote Serial Protocol的Packets中,挑選出幾個常用到的Command,
並將其分類將分類,配合著實際的例子來看,這樣比較有感覺XD!
在GDB操作當中,可以輸入底下的這個Commmand,讓GDB將Remote連線中,傳送/接收的Packets印出:
(gdb) set debug remote 1
另外由於我們讀寫Memory會涉及ELF檔的操作,因此利用下面這個Command,
強迫GDB實際去讀取Target端的資料:
(gdb) set trust-readonly-sections off
"g"
讀取所有Gerneal Registers的值
回傳的格式為xxxxxxxx00000000xxxxxxxx00000000....,後面一路接上general registers
比方說下面的範例,試著讀取$x1的值:
(gdb) p/x $x1
Sending packet: $g#67...Packet received: 00000000000000001407404000000000f03f008000000000100800800000000000000000000000000807404000000000000000800000000000000000000000000004000000000000000000000000000000000000000000004c0740400000000000000000000000000100000000000000000000000000000078030080000000001f00000000000000000000000000000000000000000000000000000000000000000000000000000000000000000000000000000000000000000000000000000000000000000000000000000000000000000000000000000000000000000000000000000000000000000000000000000000000000000000000000000000000000
"m addr,length": 從addr的地方讀取length-bytes的資料
"M addr,length:XX…": 將後面two-digit hexadecimal的資料寫入指定的位置
比方說下面這個範例,讀取0x0位置的資料:
(gdb) x *(0x0)
Sending packet: $m0,4#fd...Packet received: 00000000
0x0:    0x00000000
"p n": 讀取指定編號的Register
"P n…=r…": 將資料寫入指定編號的Register
比方說下面讀取$dpc的範例:
(gdb) p/x $dpc
Sending packet: $p94#dd...Packet received: ffffffffffffffff
$16 = 0xffffffffffffffff
或是將0x123寫入$tdata1中:
(gdb) p/x $tdata1=0x123
Sending packet: $P90=2301000000000000#fc...Packet received: OK
"s [addr]": 執行Single Step,或是從addr的地方開始執行Single Step
例如簡單的執行Single Step:
(gdb) si
Sending packet: $vCont?#49...Packet received:
Packet vCont (verbose-resume) is NOT supported
Sending packet: $Hc0#db...Packet received: OK
Sending packet: $s#73...Packet received: T05        <-- 這裡!!!!!
Sending packet: $p20#d2...Packet received: 0000000000000000
Sending packet: $g#67...Packet received: 00000000000000001407404000000000f03f008000000000100800800000000000000000000000000807404000000000000000800000000000000000000000000004000000000000000000000000000000000000000000004c0740400000000000000000000000000100000000000000000000000000000078030080000000001f00000000000000000000000000000000000000000000000000000000000000000000000000000000000000000000000000000000000000000000000000000000000000000000000000000000000000000000000000000000000000000000000000000000000000000000000000000000000000000000000000000000000000
"X addr,length:XX…"
很類似上面提到的"Write Memory M addr,length:XX…",
只不過這邊後面接的是Binary的資料!
比方說對0x0的位置寫入0x12345678:
(gdb) p *0x0=0x12345678
Sending packet: $X0,4:xV4\022#36...Packet received: OK
$21 = 305419896
由於這部分比較類似,放在一起講解!
首先是Software Breakpoint:
比方說在0x40400000的位置上插入Sofware Breakpoint
(gdb) b *0x40400000
Sending packet: $m40400000,2#53...Packet received: 9711
Breakpoint 2 at 0x40400000: file freedom-e-sdk/bsp/env/start.S, line 17.
(gdb) si
Sending packet: $Z0,0,2#44...Packet received: OK
Packet Z0 (software-breakpoint) is supported
.....
GDB會先從0x40400000的位置上讀取指令回來:
Sending packet: $m40400000,2#53...Packet received: 9711
然後再依照指令的長度,去插入適合的Sofware Breakpoint,
以這個例子來說,會插入一個2-Bytes的ebreak:
Sending packet: $Z0,0,2#44...Packet received: OK
再來是Hardware Breakpoint!
以上面的例子來說,現在改插入Hardware Breakpoint:
(gdb) hb *0x40400000
Sending packet: $m40400000,2#53...Packet received: 9711
Hardware assisted breakpoint 1 at 0x40400000: file freedom-e-sdk/bsp/env/start.S, line 17.
(gdb) c
Continuing.
Sending packet: $Z1,40400000,2#9d...Packet received: OK
Packet Z1 (hardware-breakpoint) is supported
然後Write Watchpoint
再來Read Watchpoint
最後Access Watchpoint
都是類似的內容,就不多加贅述啦XDDD!
總算來到倒數第二篇,鐵人賽終於快結束啦!!!
今天主要簡單的介紹GDB Remote Serial Protocol,並看看實際對應的操作成果!
明天,筆者將會寫一個簡短的回顧,回顧這30天的內容!!不得不承認這篇真的蠻混的,跟前篇比起來的話

