
經過上篇苦戰後,截至昨日為止,已經說明完整個OpenOCD的架構/實作,
從上層Target支援開始,一路到底層FTDI-based Adapter支援的整個流程!
接下來的幾天中(鐵人賽大概剩下約莫4篇左右),讓我們來研究一下其他好玩的東西!
今天主要會探討OpenOCD中,對"Flash"的支援!
讓我們開始吧!
先來看一下NOR Flash基本的架構:
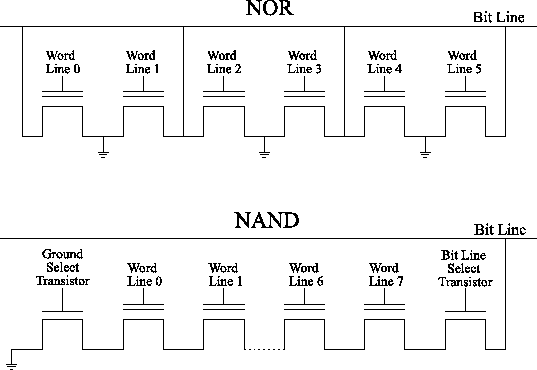
---引用自成大資工 Wiki - Flash
然後剩下的就請自行參考Wiki
不過這邊要提一下主要的特點:
以之前使用的Arty開發版為例,上面就內建16MB的Quad-SPI Flash(Micron N25Q128A)

---引用自
Artix-7 35T Arty FPGA Evaluation Kit
經後範例中出現的Flash也是以這顆為主!!
好! 報告完畢!
在這節中,要先說明一下Flash中Memory的組成,基本上可以參考下圖:
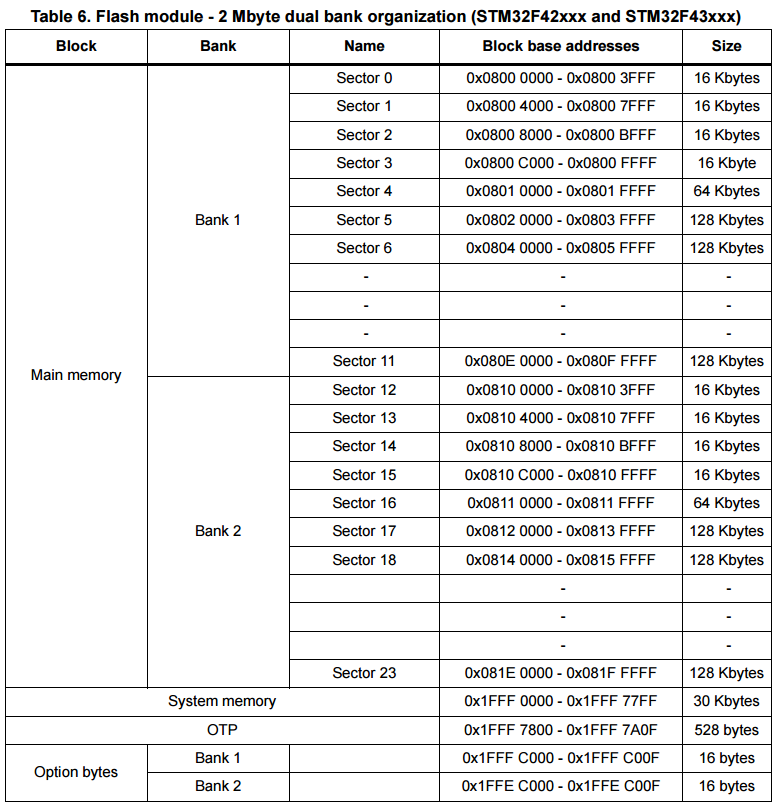
---引用自成大資工 Wiki - Flash
一塊Flash裡面會切成一個或多個"Bank";
一個"Bank"中,裡面還會再切成多個"Sector"!
每個Sector中會有自己的大小、Offset(跟Flash起始位置間的偏移)、狀態等等!
另外針對一個"Bank",還要有一套"Flash Driver",提供一系列的函式用來驅動(讀取/寫入/初始化)這個Bank!
基本上OpenOCD就是遵循這個觀念在設計整體架構!
首先,我們來看一下,一個"Bank"所需要包含的東西,
請參考(src/flash/nor/core.h):
struct flash_bank {
    const char *name;

    struct target *target; /**< Target to which this bank belongs. */

    struct flash_driver *driver; /**< Driver for this bank. */
    void *driver_priv; /**< Private driver storage pointer */

    int bank_number; /**< The 'bank' (or chip number) of this instance. */
    uint32_t base; /**< The base address of this bank */
    uint32_t size; /**< The size of this chip bank, in bytes */

    int chip_width; /**< Width of the chip in bytes (1,2,4 bytes) */
    int bus_width; /**< Maximum bus width, in bytes (1,2,4 bytes) */

    /** Erased value. Defaults to 0xFF. */
    uint8_t erased_value;

    /** Default padded value used, normally this matches the  flash
     * erased value. Defaults to 0xFF. */
    uint8_t default_padded_value;

    /**
     * The number of sectors on this chip.  This value will
     * be set intially to 0, and the flash driver must set this to
     * some non-zero value during "probe()" or "auto_probe()".
     */
    int num_sectors;
    /** Array of sectors, allocated and initialized by the flash driver */
    struct flash_sector *sectors;

    /**
     * The number of protection blocks in this bank. This value
     * is set intially to 0 and sectors are used as protection blocks.
     * Driver probe can set protection blocks array to work with
     * protection granularity different than sector size.
     */
    int num_prot_blocks;
    /** Array of protection blocks, allocated and initilized by the flash driver */
    struct flash_sector *prot_blocks;

    struct flash_bank *next; /**< The next flash bank on this chip */
};
主要內容如下:
再來我們看一下"Sector"所包含的東西,請參考(src/flash/nor/core.h):
struct flash_sector {
    /** Bus offset from start of the flash chip (in bytes). */
    uint32_t offset;
    /** Number of bytes in this flash sector. */
    uint32_t size;
    /**
     * Indication of erasure status: 0 = not erased, 1 = erased,
     * other = unknown.  Set by @c flash_driver_s::erase_check.
     *
     * Flag is not used in protection block
     */
    int is_erased;
    /**
     * Indication of protection status: 0 = unprotected/unlocked,
     * 1 = protected/locked, other = unknown.  Set by
     * @c flash_driver_s::protect_check.
     *
     * This information must be considered stale immediately.
     * A million things could make it stale: power cycle,
     * reset of target, code running on target, etc.
     *
     * If a flash_bank uses an extra array of protection blocks,
     * protection flag is not valid in sector array
     */
    int is_protected;
};
內容很簡單啦:
底下會介紹幾個在OpenOCD中常用到的Flash Commands!
這個Command主要用在定義一個Flash內的Bank,基本內容如下:
使用方式可以參考底下範例:
set _CHIPNAME riscv
set _TARGETNAME $_CHIPNAME.cpu

flash bank spi0 fespi 0x40000000 0 0 0 $_TARGETNAME 0x20004000
這邊標示出,有個Bank叫spi0,需要使用fespi來驅動,
Bank的位置在0x40000000!
最後面的0x20004000則是fespi需要的參數,後面會提到!
這個Command主要用在燒錄Flash上,主要參數如下:
使用方式可以參考底下範例:
flash write_image erase hello.elf
這個Command,是我比較常用到,用來燒錄Flash的Command,
基本上他把燒錄的動作簡化,並可以再燒錄完畢後執行指定的動作!
內容如下:
使用方式可以參考底下範例:
program hello.bin verify reset exit
這個實作也蠻有趣的,主要是用一個TCL檔包裝這個Commmand,
請參考(src/flash/startup.tcl):
proc program {filename args} {
    set exit 0

    foreach arg $args {
        if {[string equal $arg "verify"]} {
            set verify 1
        } elseif {[string equal $arg "reset"]} {
            set reset 1
        } elseif {[string equal $arg "exit"]} {
            set exit 1
        } else {
            set address $arg
        }
    }

    # make sure init is called
    if {[catch {init}] != 0} {
        program_error "** OpenOCD init failed **" 1
    }

    # reset target and call any init scripts
    if {[catch {reset init}] != 0} {
        program_error "** Unable to reset target **" $exit
    }

    # start programming phase
    echo "** Programming Started **"
    if {[info exists address]} {
        set flash_args "$filename $address"
    } else {
        set flash_args "$filename"
    }

    if {[catch {eval flash write_image erase $flash_args}] == 0} {  ###譯註: 燒錄
        echo "** Programming Finished **"
        if {[info exists verify]} {
            # verify phase
            echo "** Verify Started **"
            if {[catch {eval verify_image $flash_args}] == 0} { ###譯註: 驗證
                echo "** Verified OK **"
            } else {
                program_error "** Verify Failed **" $exit
            }
        }

        if {[info exists reset]} {
            # reset target if requested
            # also disable target polling, we are shutting down anyway
            poll off
            echo "** Resetting Target **"
            reset run                       ###譯註: Reset Target
        }
    } else {
        program_error "** Programming Failed **" $exit
    }

    if {$exit == 1} {
        shutdown                            ###譯註: 關閉OpenOCD
    }
    return
}
今天簡單的介紹了一下Flash相關的背景知識,明天將會深入探討,
Sifive中,Flash Driver的實作和背後原理!

