
終於又來到Lab的時間啦!
經過前面六篇的分析後,想必對OpenOCD在RISC-V架構上的支援有更深一層的了解!
現在就讓我們來操作一下,看看程式是如何執行!!
順便來個總複習!
本次主要參考Sifve的E51平台 這邊沒有廣告喔
主要的需求如下:
基本上就是把Arty板子連到PC上後,就可以使用Xilinex的Vivado來做燒綠FPGA的動作!
幾本流程如下:
這樣應該就會完成燒錄了!
或是習慣用TCL Command的話,可以參考以下我的TCL範例,在"Vivado Tcl Shell"中使用:
#譯註: 檔名放這裡啊!
set PROGRAMMING_FILE {SiFive_E51_Coreplex_FPGA_Evaluation_v1p0_r0.mcs}

open_hw
connect_hw_server
open_hw_target


# Target-specific parameters
set MY_DEVICE [lindex [get_hw_devices xc7a35t_0] 0]
set MY_MEM_DEVICE [lindex [get_cfgmem_parts {n25q128-3.3v-spi-x1_x2_x4}] 0]
current_hw_device $MY_DEVICE


# Create a hardware configuration memory
set MY_HW_CFGMEM [create_hw_cfgmem -hw_device [lindex [get_hw_devices] 0] -mem_dev $MY_MEM_DEVICE]
set_property PROGRAM.ADDRESS_RANGE {use_file} $MY_HW_CFGMEM
set_property PROGRAM.FILES $PROGRAMMING_FILE $MY_HW_CFGMEM
set_property PROGRAM.UNUSED_PIN_TERMINATION {pull-none} $MY_HW_CFGMEM
program_hw_devices [lindex [get_hw_devices] 0]
set_property PROGRAM.BLANK_CHECK 0 $MY_HW_CFGMEM
set_property PROGRAM.ERASE 1 $MY_HW_CFGMEM
set_property PROGRAM.CFG_PROGRAM 1 $MY_HW_CFGMEM
set_property PROGRAM.VERIFY 1 $MY_HW_CFGMEM
#set_property PROGRAM.CHECKSUM 0 $MY_HW_CFGMEM      ##譯註: 這參數有些版本不支援,先註解掉

# Program the part
program_hw_cfgmem -hw_cfgmem $MY_HW_CFGMEM
燒完之後記得按一下板子上的"PROG"按鈕(在左上角)!
首先按照下表的方式連接Artix-7 Arty板子(JD那組Pin)和Olimex的ARM-USB-TINY-H
| 訊號用途 | Arty JD Pin編號 | ARM-USB-TINY-H Pin編號 |
|---|---|---|
| TDO | 1 | 13 |
| nTRST | 2 | 3 |
| TCK | 3 | 9 |
| GND | 5(GND) | 14 |
| VREF | 6(VCC) | 2 |
| TDI | 7 | 5 |
| TMS | 8 | 7 |
| nSRST | 9 | 15 |
| GND | 11(GND) | 16 |
| VREF | 12(VCC) | 1 |
在這邊把介面編號一下,方便對照使用(別短路就是了):
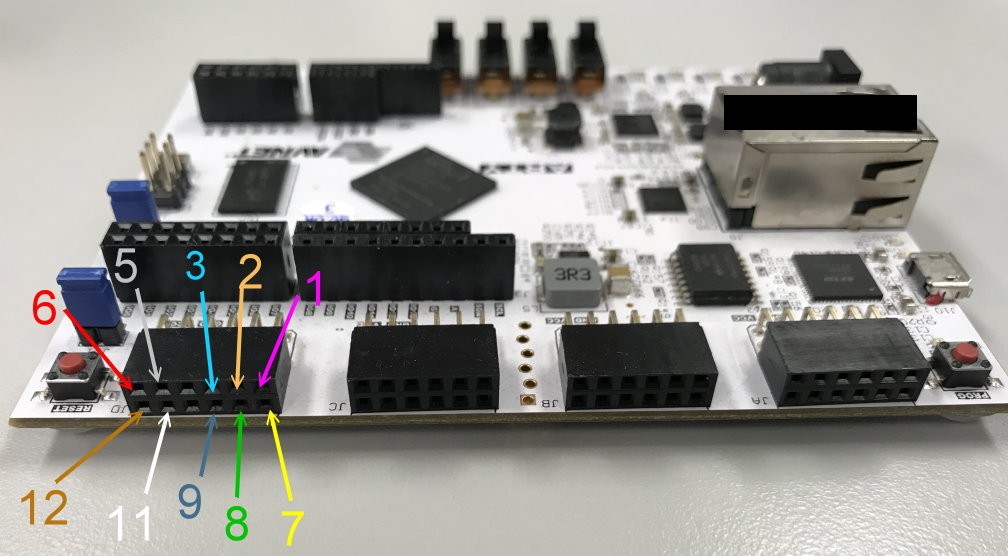
(Arty JD Pin編號)
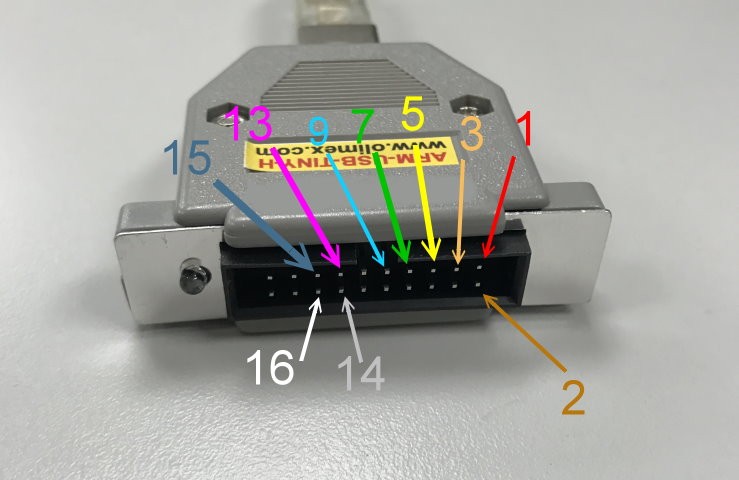
(ARM-USB-TINY-H Pin編號)
==================== 我是分隔線 ====================
連接好之後應該會長這樣:

如果你發現兩邊(Arty板子或是ARM-USB-TINY-H)中,燈號突然不見的話,
那就表示你短路啦!!!!!
在檢查看看吧,別燒壞板子就行!
可以直接使用「Day 02: 簡介OpenOCD背景與編譯」中所提供的Script做編譯!
剩下設定,幾本上同「Day 03: [Lab] 簡單操作OpenOCD」的方式!
不過openocd.cfg需要改用以下內容:
debug_level 3                   #譯註: 將log_level開到Debug
adapter_khz 10000

source [find interface/olimex-arm-usb-tiny-h.cfg]
reset_config srst_only

set _CHIPNAME riscv
jtag newtap $_CHIPNAME cpu -irlen 5 -expected-id 0x20000001

set _TARGETNAME $_CHIPNAME.cpu
target create $_TARGETNAME riscv -chain-position $_TARGETNAME
$_TARGETNAME configure -work-area-phys 0x80000000 -work-area-size 10000 -work-area-backup 1
flash bank spi0 fespi 0x40000000 0 0 0 $_TARGETNAME 0x20004000  #譯註: 定義Flash區塊


init
halt
flash protect 0 64 last off     #譯註: 等等要load程式進去,這邊先解除Flash的lock
剩下有需要的Config可以自己加上去!
最後就是執行啦!./openocd -f openocf.cfg
基本上所需的東西都可以在freedom-e-sdk中找到,記得先編譯好Toolchain,待會會用到!
然後因為我從開始到現在從來沒有成功編譯過Toolchain,所以....
只好拿某大神編好的東西直接用,如果編譯失敗的話..... 你可以留言,我幫你問問看XD
然後輸入以下命令來編譯SDK內附的DEMO_GPIO
cd freedom-e-sdk
export RISCV_PATH=<RISC-V TOOLCHAIN的位置>
make software PROGRAM=demo_gpio BOARD=coreplexip-e51-arty
編譯完成後,東西會出現在software/demo_gpio中!
幾本上同「Day 03: [Lab] 簡單操作OpenOCD」的方式!
$ riscv64-unknown-elf-gdb demo_gpio
Copyright (C) 2016 Free Software Foundation, Inc.
License GPLv3+: GNU GPL version 3 or later <http://gnu.org/licenses/gpl.html>
This is free software: you are free to change and redistribute it.
There is NO WARRANTY, to the extent permitted by law.  Type "show copying"
and "show warranty" for details.
This GDB was configured as "--host=i686-pc-linux-gnu --target=riscv64-elf".
Type "show configuration" for configuration details.
For bug reporting instructions, please see:
<http://www.gnu.org/software/gdb/bugs/>.
Find the GDB manual and other documentation resources online at:
<http://www.gnu.org/software/gdb/documentation/>.
For help, type "help".
Type "apropos word" to search for commands related to "word"...
Reading symbols from demo_gpio...done.
(gdb) target remote :1111
Remote debugging using :1111
warning: Target-supplied registers are not supported by the current architecture
handle_m_ext_interrupt () at demo_gpio.c:37
37        PLIC_complete_interrupt(&g_plic, int_num);
(gdb) lo
Loading section .init, size 0x80 lma 0x40400000
Loading section .text, size 0xc26 lma 0x40400080
Loading section .rodata, size 0x490 lma 0x40400ca8
Loading section .eh_frame, size 0x170 lma 0x40401138
Loading section .data, size 0x60 lma 0x404012a8
Start address 0x40400000, load size 4870
Transfer rate: 2 KB/sec, 974 bytes/write.
(gdb)
基本上就是簡單的輸入
target remote :1111 ==> 連上OpenOCD的GDB port 1111load ==> 將程式載入板子中再來就是簡單的操作:
(gdb) n
19              la sp, _sp
(gdb) n
26              la a0, _data_lma
(gdb) n
27              la a1, _data
(gdb) n
28              la a2, _edata
(gdb) n
29              bgeu a1, a2, 2f
(gdb) n
31              lw t0, (a0)
(gdb) n
32              sw t0, (a1)
(gdb) n
33              addi a0, a0, 4
(gdb) n
34              addi a1, a1, 4
(gdb) n
35              bltu a1, a2, 1b
一路Next下去XD!
或是我們找個地方下Hardware breakpoint:
(gdb) hb *0x40400044
Hardware assisted breakpoint 3 at 0x40400044: file freedom-e-sdk/bsp/env/start.S, line 40.
(gdb) c
Continuing.

Breakpoint 3, _start () at freedom-e-sdk/bsp/env/start.S:40
40              la a1, _end
注意: 這個DEMO是跑在板子中的Flash區域,所以Software breakpoint會完全不能使用!
底下將Day 17、Day 18、Day 20、Day 21的Log和流程簡單的舉例並分析Log
主要涵蓋以下的部分:
畢竟是Log的分析,可能會比較枯燥乏味一點!
首先讓GDB送出"reset halt"這個Command,方法是用monitor <Command>,
如以下範例:
(gdb) monitor reset halt
JTAG tap: riscv.cpu tap/device found: 0x20000001 (mfg: 0x000 (<invalid>), part: 0x0000, ver: 0x2)
Log 大概會長得像這樣!
Debug: 55104 27036 gdb_server.c:2848 gdb_input_inner(): received packet: 'qRcmd,72657365742068616c74'

.....中間略過

Debug: 55138 27038 core.c:725 jtag_add_reset(): SRST line asserted
Debug: 55139 27038 core.c:742 jtag_add_reset(): JTAG reset with TLR instead of TRST
Debug: 55140 27038 core.c:327 jtag_call_event_callbacks(): jtag event: TAP reset
Debug: 55141 27038 core.c:729 jtag_add_reset(): SRST line released
Debug: 55143 27541 core.c:1461 jtag_init_inner(): Init JTAG chain
Debug: 55144 27541 core.c:327 jtag_call_event_callbacks(): jtag event: TAP reset
Debug: 55145 27541 core.c:1121 jtag_examine_chain(): DR scan interrogation for IDCODE/BYPASS
Debug: 55146 27541 core.c:327 jtag_call_event_callbacks(): jtag event: TAP reset
Debug: 55147 27542 jep106.c:33 jep106_manufacturer(): BUG: Caller passed out-of-range JEP106 ID!
Info : 55148 27542 core.c:1020 jtag_examine_chain_display(): JTAG tap: riscv.cpu tap/device found: 0x20000001 (mfg: 0x000 (<invalid>), part: 0x0000,
Debug: 55149 27542 core.c:1252 jtag_validate_ircapture(): IR capture validation scan
Debug: 55150 27542 core.c:1310 jtag_validate_ircapture(): riscv.cpu: IR capture 0x01


.....中間略過


Debug: 55177 27543 riscv-013.c:265 scan(): 41b w a0000001 @10 -> + 00000000 @00
Debug: 55178 27543 riscv-013.c:276 scan(): haltreq hartreset dmactive ->
Debug: 55179 27543 riscv-013.c:265 scan(): 41b - 00000000 @10 -> + 00000001 @10
Debug: 55180 27543 riscv-013.c:276 scan():  ->  dmactive
Debug: 55181 27543 riscv-013.c:265 scan(): 41b r 00000000 @10 -> + 00000000 @00
Debug: 55182 27543 riscv-013.c:265 scan(): 41b - 00000000 @10 -> + 00000001 @10
Debug: 55183 27543 riscv-013.c:276 scan():  ->  dmactive
Debug: 55184 27543 riscv-013.c:265 scan(): 41b w 80000003 @10 -> + 00000000 @00
Debug: 55185 27543 riscv-013.c:276 scan(): haltreq ndmreset dmactive ->
Debug: 55186 27543 riscv-013.c:265 scan(): 41b - 00000000 @10 -> + 00000001 @10
Debug: 55187 27543 riscv-013.c:276 scan():  ->  dmactive


.....中間略過


Debug: 55202 27544 riscv.c:695 riscv_deassert_reset(): RISCV DEASSERT RESET
Debug: 55203 27544 riscv-013.c:1322 deassert_reset(): 0
Debug: 55204 27544 riscv-013.c:265 scan(): 41b w 80000001 @10 -> + 00000000 @00
Debug: 55205 27544 riscv-013.c:276 scan(): haltreq dmactive ->
Debug: 55206 27544 riscv-013.c:265 scan(): 41b - 00000000 @10 -> + 00000003 @10
Debug: 55207 27544 riscv-013.c:276 scan():  ->  ndmreset dmactive
Debug: 55208 27544 riscv-013.c:1336 deassert_reset(): Waiting for hart to be halted.
Debug: 55209 27544 riscv-013.c:265 scan(): 41b r 00000000 @11 -> + 00000000 @00
Debug: 55210 27544 riscv-013.c:265 scan(): 41b - 00000000 @11 -> + 00030382 @11
Debug: 55211 27544 riscv-013.c:276 scan():  ->  allresumeack anyresumeack allhalted anyhalted authenticated version=2
Debug: 55212 27544 riscv-013.c:265 scan(): 41b w 00000001 @10 -> + 00000000 @00
Debug: 55213 27544 riscv-013.c:276 scan():  dmactive ->
Debug: 55214 27544 riscv-013.c:265 scan(): 41b - 00000000 @10 -> + 00000001 @10
Debug: 55215 27544 riscv-013.c:276 scan():  ->  dmactive
首先是OpenOCD GDB_Server收到封包的部分:Debug: 55104 27036 gdb_server.c:2848 gdb_input_inner(): received packet: 'qRcmd,72657365742068616c74'
在收到後,會先處理JTAG的部分,就是Debug: 55138 27038 core.c:725 jtag_add_reset(): SRST line asserted開始的那一大段!
接下來是呼叫Target中處理Assert Reset的函式,還記得在「Day 17: 深入淺出 RISC-V 源碼剖析 (2) - Target Status Control」中介紹到的部分:
static int assert_reset(struct target *target)
{
    RISCV_INFO(r);

    select_dmi(target);

    uint32_t control_base = set_field(0, DMI_DMCONTROL_DMACTIVE, 1);

    if (target->rtos) {
        ....中間省略!

    } else {
        /* Reset just this hart. */
        uint32_t control = set_field(control_base, DMI_DMCONTROL_HARTSEL,
                r->current_hartid);
        control = set_field(control, DMI_DMCONTROL_HALTREQ,
                target->reset_halt ? 1 : 0);
        control = set_field(control, DMI_DMCONTROL_HARTRESET, 1);   ///譯註: 這邊試這先拉起hartreset看看~!
        dmi_write(target, DMI_DMCONTROL, control);

        /* Read back to check if hartreset is supported. */
        uint32_t rb = dmi_read(target, DMI_DMCONTROL);
        if (!get_field(rb, DMI_DMCONTROL_HARTRESET)) {
            /* Use ndmreset instead. That will reset the entire device, but
             * that's probably what OpenOCD wants anyway. */
            control = set_field(control, DMI_DMCONTROL_HARTRESET, 0);

            ///譯註: 改用ndmreset重試!
            control = set_field(control, DMI_DMCONTROL_NDMRESET, 1);
            dmi_write(target, DMI_DMCONTROL, control);
        }
    }

    ///譯註: 將目前Target的狀態設成TARGET_RESET
    target->state = TARGET_RESET;

    return ERROR_OK;
}
出來的Log就是這一段:
///譯註: 這邊試這先拉起hartreset看看~!
///      control = set_field(control, DMI_DMCONTROL_HARTRESET, 1);
///      dmi_write(target, DMI_DMCONTROL, control);
Debug: 55177 27543 riscv-013.c:265 scan(): 41b w a0000001 @10 -> + 00000000 @00
Debug: 55178 27543 riscv-013.c:276 scan(): haltreq hartreset dmactive ->
Debug: 55179 27543 riscv-013.c:265 scan(): 41b - 00000000 @10 -> + 00000001 @10
Debug: 55180 27543 riscv-013.c:276 scan():  ->  dmactive


///譯註: uint32_t rb = dmi_read(target, DMI_DMCONTROL);
Debug: 55181 27543 riscv-013.c:265 scan(): 41b r 00000000 @10 -> + 00000000 @00
Debug: 55182 27543 riscv-013.c:265 scan(): 41b - 00000000 @10 -> + 00000001 @10
Debug: 55183 27543 riscv-013.c:276 scan():  ->  dmactive


///譯註: 改用ndmreset重試!
///      control = set_field(control, DMI_DMCONTROL_NDMRESET, 1);
///      dmi_write(target, DMI_DMCONTROL, control);
Debug: 55184 27543 riscv-013.c:265 scan(): 41b w 80000003 @10 -> + 00000000 @00
Debug: 55185 27543 riscv-013.c:276 scan(): haltreq ndmreset dmactive ->
Debug: 55186 27543 riscv-013.c:265 scan(): 41b - 00000000 @10 -> + 00000001 @10
Debug: 55187 27543 riscv-013.c:276 scan():  ->  dmactive
簡單的重現整個Assert Reset的流程!
最後是Deassert Reset的Log:
Debug: 55202 27544 riscv.c:695 riscv_deassert_reset(): RISCV DEASSERT RESET


///譯註: LOG_DEBUG("%d", r->current_hartid);
Debug: 55203 27544 riscv-013.c:1322 deassert_reset(): 0


///譯註: /* Clear the reset, but make sure haltreq is still set */
///      uint32_t control = 0;
///      control = set_field(control, DMI_DMCONTROL_HALTREQ, target->reset_halt ? 1 : 0);
///      control = set_field(control, DMI_DMCONTROL_HARTSEL, r->current_hartid);
///      control = set_field(control, DMI_DMCONTROL_DMACTIVE, 1);
///      dmi_write(target, DMI_DMCONTROL, control);
Debug: 55204 27544 riscv-013.c:265 scan(): 41b w 80000001 @10 -> + 00000000 @00
Debug: 55205 27544 riscv-013.c:276 scan(): haltreq dmactive ->
Debug: 55206 27544 riscv-013.c:265 scan(): 41b - 00000000 @10 -> + 00000003 @10
Debug: 55207 27544 riscv-013.c:276 scan():  ->  ndmreset dmactive


///譯註: LOG_DEBUG("Waiting for hart to be halted.");
Debug: 55208 27544 riscv-013.c:1336 deassert_reset(): Waiting for hart to be halted.


///譯註: dmstatus = dmi_read(target, DMI_DMSTATUS);
Debug: 55209 27544 riscv-013.c:265 scan(): 41b r 00000000 @11 -> + 00000000 @00
Debug: 55210 27544 riscv-013.c:265 scan(): 41b - 00000000 @11 -> + 00030382 @11
Debug: 55211 27544 riscv-013.c:276 scan():  ->  allresumeack anyresumeack allhalted anyhalted authenticated version=2


///譯註: control = set_field(control, DMI_DMCONTROL_HALTREQ, 0);
///      dmi_write(target, DMI_DMCONTROL, control);
Debug: 55212 27544 riscv-013.c:265 scan(): 41b w 00000001 @10 -> + 00000000 @00
Debug: 55213 27544 riscv-013.c:276 scan():  dmactive ->
Debug: 55214 27544 riscv-013.c:265 scan(): 41b - 00000000 @10 -> + 00000001 @10
Debug: 55215 27544 riscv-013.c:276 scan():  ->  dmactive
跟下面流程比一下:
static int deassert_reset(struct target *target)
{
    RISCV_INFO(r);
    RISCV013_INFO(info);
    select_dmi(target);

    LOG_DEBUG("%d", r->current_hartid);

    /* Clear the reset, but make sure haltreq is still set */
    uint32_t control = 0;
    control = set_field(control, DMI_DMCONTROL_HALTREQ, target->reset_halt ? 1 : 0);    ///譯註: Reset歸回原位,但是如果有用到haltreq的話,不能先放到!
    control = set_field(control, DMI_DMCONTROL_HARTSEL, r->current_hartid);
    control = set_field(control, DMI_DMCONTROL_DMACTIVE, 1);
    dmi_write(target, DMI_DMCONTROL, control);

    uint32_t dmstatus;
    int dmi_busy_delay = info->dmi_busy_delay;
    time_t start = time(NULL);

    if (target->reset_halt) {
        LOG_DEBUG("Waiting for hart to be halted.");
        do {
            dmstatus = dmi_read(target, DMI_DMSTATUS);
            if (time(NULL) - start > riscv_reset_timeout_sec) {
                LOG_ERROR("Hart didn't halt coming out of reset in %ds; "
                        "dmstatus=0x%x; "
                        "Increase the timeout with riscv set_reset_timeout_sec.",
                        riscv_reset_timeout_sec, dmstatus);
                return ERROR_FAIL;
            }
            target->state = TARGET_HALTED;
        } while (get_field(dmstatus, DMI_DMSTATUS_ALLHALTED) == 0);

        control = set_field(control, DMI_DMCONTROL_HALTREQ, 0);
        dmi_write(target, DMI_DMCONTROL, control);

    } else {
        .... Reset Run 處理的部分略過
    }
    info->dmi_busy_delay = dmi_busy_delay;
    return ERROR_OK;
}
這邊先舉一個最常用的指令print $pc,把$PC的值打印出來!
Log 大概會長得像這樣!
Debug: 48050 11494 gdb_server.c:2848 gdb_input_inner(): received packet: 'p20'
Debug: 48051 11494 riscv.c:742 riscv_get_gdb_reg_list(): reg_class=0
Debug: 48052 11494 riscv.c:743 riscv_get_gdb_reg_list(): rtos_hartid=0 current_hartid=0
Debug: 48053 11494 riscv.c:1467 riscv_set_current_hartid(): setting hartid to 0, was 0
Debug: 48054 11494 riscv-013.c:265 scan(): 41b r 00000000 @10 -> + 00000000 @00
Debug: 48055 11494 riscv-013.c:265 scan(): 41b - 00000000 @10 -> + 00000001 @10
Debug: 48056 11494 riscv-013.c:276 scan():  ->  dmactive
Debug: 48057 11495 riscv-013.c:265 scan(): 41b w 00000001 @10 -> + 00000000 @00
Debug: 48058 11495 riscv-013.c:276 scan():  dmactive ->
Debug: 48059 11495 riscv-013.c:265 scan(): 41b - 00000000 @10 -> + 00000001 @10
Debug: 48060 11495 riscv-013.c:276 scan():  ->  dmactive
Debug: 48061 11495 riscv-013.c:1860 riscv013_get_register(): reading register pc on hart 0
Debug: 48062 11495 riscv.c:1467 riscv_set_current_hartid(): setting hartid to 0, was 0
Debug: 48063 11495 riscv-013.c:265 scan(): 41b r 00000000 @10 -> + 00000000 @00
Debug: 48064 11495 riscv-013.c:265 scan(): 41b - 00000000 @10 -> + 00000001 @10
Debug: 48065 11495 riscv-013.c:276 scan():  ->  dmactive
Debug: 48066 11495 riscv-013.c:265 scan(): 41b w 00000001 @10 -> + 00000000 @00
Debug: 48067 11495 riscv-013.c:276 scan():  dmactive ->
Debug: 48068 11495 riscv-013.c:265 scan(): 41b - 00000000 @10 -> + 00000001 @10
Debug: 48069 11495 riscv-013.c:276 scan():  ->  dmactive
Debug: 48070 11495 riscv-013.c:564 execute_abstract_command(): command=0x321008
Debug: 48071 11495 riscv-013.c:265 scan(): 41b w 00321008 @17 -> + 00000000 @00
Debug: 48072 11496 riscv-013.c:265 scan(): 41b - 00000000 @17 -> + 00241000 @17
Debug: 48073 11496 riscv-013.c:265 scan(): 41b r 00000000 @16 -> + 00000000 @00
Debug: 48074 11496 riscv-013.c:265 scan(): 41b - 00000000 @16 -> + 10000002 @16
Debug: 48075 11496 riscv-013.c:276 scan():  ->  progbufsize=16 datacount=2
Debug: 48076 11496 riscv-013.c:265 scan(): 41b r 00000000 @16 -> + 00000000 @00
Debug: 48077 11496 riscv-013.c:265 scan(): 41b - 00000000 @16 -> + 10000002 @16
Debug: 48078 11496 riscv-013.c:276 scan():  ->  progbufsize=16 datacount=2
Debug: 48079 11496 riscv-013.c:265 scan(): 41b r 00000000 @05 -> + 00000000 @00
Debug: 48080 11496 riscv-013.c:265 scan(): 41b - 00000000 @05 -> + 00000000 @05
Debug: 48081 11496 riscv-013.c:265 scan(): 41b r 00000000 @04 -> + 00000000 @00
Debug: 48082 11497 riscv-013.c:265 scan(): 41b - 00000000 @04 -> + 00000000 @04
Debug: 48083 11497 riscv-013.c:1051 register_read_direct(): [0] reg[0x8] = 0x0
從OpenOCD gdb_server收到命令開始:gdb_server.c:2848 gdb_input_inner(): received packet: 'p20'
這個GDB Remote Protocol之後會有專文介紹!
直到進入read_regiseter處理流程Debug: 48061 11495 riscv-013.c:1860 riscv013_get_register(): reading register pc on hart 0
然後呼叫register_read_direct(),並使用"Abstrace Command - Access Register"來處理:Debug: 48070 11495 riscv-013.c:564 execute_abstract_command(): command=0x321008
忘記怎麼Access Register的話,可以參考「Day 18: 深入淺出 RISC-V 源碼剖析 (3) - Register Access」
然後就可以得到目前的$PC = 0x0: Debug: 48083 11497 riscv-013.c:1051 register_read_direct(): [0] reg[0x8] = 0x0
一樣從接收到GDB 封包開始
Debug: 55342 23549 gdb_server.c:2848 gdb_input_inner(): received packet: 'Z1,40400044,2'
Debug: 55343 23549 gdb_server.c:1613 gdb_breakpoint_watchpoint_packet(): -
Debug: 55344 23549 riscv-013.c:1860 riscv013_get_register(): reading register tselect on hart 0
Debug: 55345 23549 riscv.c:1467 riscv_set_current_hartid(): setting hartid to 0, was 0
Debug: 55346 23549 riscv-013.c:265 scan(): 41b r 00000000 @10 -> + 00000000 @00
Debug: 55347 23549 riscv-013.c:265 scan(): 41b - 00000000 @10 -> + 00000001 @10
Debug: 55348 23549 riscv-013.c:276 scan():  ->  dmactive
Debug: 55349 23550 riscv-013.c:265 scan(): 41b w 00000001 @10 -> + 00000000 @00
Debug: 55350 23550 riscv-013.c:276 scan():  dmactive ->
Debug: 55351 23550 riscv-013.c:265 scan(): 41b - 00000000 @10 -> + 00000001 @10
Debug: 55352 23550 riscv-013.c:276 scan():  ->  dmactive
Debug: 55342 23549 gdb_server.c:2848 gdb_input_inner(): received packet: 'Z1,40400044,2'
Debug: 55343 23549 gdb_server.c:1613 gdb_breakpoint_watchpoint_packet(): -
然後我們直接看到maybe_add_trigger_t2()處理的部分:
static int maybe_add_trigger_t2(struct target *target, unsigned hartid,
        struct trigger *trigger, uint64_t tdata1)
{
    ....上面略過

    riscv_set_register_on_hart(target, hartid, GDB_REGNO_TDATA1, tdata1);

    uint64_t tdata1_rb = riscv_get_register_on_hart(target, hartid, GDB_REGNO_TDATA1);
    LOG_DEBUG("tdata1=0x%" PRIx64, tdata1_rb);

    if (tdata1 != tdata1_rb) {
        LOG_DEBUG("Trigger doesn't support what we need; After writing 0x%"
                PRIx64 " to tdata1 it contains 0x%" PRIx64,
                tdata1, tdata1_rb);
        riscv_set_register_on_hart(target, hartid, GDB_REGNO_TDATA1, 0);
        return ERROR_TARGET_RESOURCE_NOT_AVAILABLE;
    }

    riscv_set_register_on_hart(target, hartid, GDB_REGNO_TDATA2, trigger->address);

    return ERROR_OK;
}
首先是"riscv_set_register_on_hart(target, hartid, GDB_REGNO_TDATA1, tdata1);":
Debug: 55558 23566 riscv-013.c:924 register_write_direct(): [0] reg[0x7e2] <- 0x2880000000001044
Debug: 55559 23566 riscv-013.c:564 execute_abstract_command(): command=0x321008
Debug: 55560 23566 riscv-013.c:265 scan(): 41b w 00321008 @17 -> + 00000000 @00
Debug: 55561 23566 riscv-013.c:265 scan(): 41b - 00000000 @17 -> + 00331008 @17
Debug: 55562 23567 riscv-013.c:265 scan(): 41b r 00000000 @16 -> + 00000000 @00
Debug: 55563 23567 riscv-013.c:265 scan(): 41b - 00000000 @16 -> + 10000002 @16
Debug: 55564 23567 riscv-013.c:276 scan():  ->  progbufsize=16 datacount=2
Debug: 55565 23567 riscv-013.c:265 scan(): 41b r 00000000 @16 -> + 00000000 @00
Debug: 55566 23567 riscv-013.c:265 scan(): 41b - 00000000 @16 -> + 10000002 @16
Debug: 55567 23567 riscv-013.c:276 scan():  ->  progbufsize=16 datacount=2
Debug: 55568 23567 riscv-013.c:265 scan(): 41b r 00000000 @05 -> + 00000000 @00
Debug: 55569 23567 riscv-013.c:265 scan(): 41b - 00000000 @05 -> + 00000000 @05
Debug: 55570 23567 riscv-013.c:265 scan(): 41b r 00000000 @04 -> + 00000000 @00
Debug: 55571 23567 riscv-013.c:265 scan(): 41b - 00000000 @04 -> + 00000000 @04
....後面還有一堆
然後是這段:
uint64_t tdata1_rb = riscv_get_register_on_hart(target, hartid, GDB_REGNO_TDATA1);
    LOG_DEBUG("tdata1=0x%" PRIx64, tdata1_rb);
對應的Log:
....上面有一堆
Debug: 55682 23577 riscv-013.c:1051 register_read_direct(): [0] reg[0x7e2] = 0x2880000000001044
Debug: 55683 23577 riscv.c:1557 riscv_get_register_on_hart(): [0] tdata1: 2880000000001044
Debug: 55684 23577 riscv.c:374 maybe_add_trigger_t2(): tdata1=0x2880000000001044
最後將Address寫入的部分riscv_set_register_on_hart(target, hartid, GDB_REGNO_TDATA2, trigger->address);,對應的Log為:
Debug: 55695 23577 riscv-013.c:924 register_write_direct(): [0] reg[0x7e3] <- 0x40400044
Debug: 55696 23577 riscv-013.c:564 execute_abstract_command(): command=0x321008
Debug: 55697 23577 riscv-013.c:265 scan(): 41b w 00321008 @17 -> + 00000000 @00
Debug: 55698 23577 riscv-013.c:265 scan(): 41b - 00000000 @17 -> + 00331008 @17
Debug: 55699 23578 riscv-013.c:265 scan(): 41b r 00000000 @16 -> + 00000000 @00
Debug: 55700 23578 riscv-013.c:265 scan(): 41b - 00000000 @16 -> + 10000002 @16
Debug: 55701 23578 riscv-013.c:276 scan():  ->  progbufsize=16 datacount=2
Debug: 55702 23578 riscv-013.c:265 scan(): 41b r 00000000 @16 -> + 00000000 @00
Debug: 55703 23578 riscv-013.c:265 scan(): 41b - 00000000 @16 -> + 10000002 @16
Debug: 55704 23578 riscv-013.c:276 scan():  ->  progbufsize=16 datacount=2
Debug: 55705 23578 riscv-013.c:265 scan(): 41b r 00000000 @05 -> + 00000000 @00
....後面還有一堆
這部分Log就比較簡單啦,先看Log:
Debug: 45929 16777 riscv.c:965 riscv_openocd_poll(): polling all harts

....中間略過

Debug: 45938 16777 riscv.c:949 riscv_poll_hart(): polling hart 0, target->state=1 (TARGET_HALTED=2)
Debug: 45939 16778 riscv-013.c:265 scan(): 41b r 00000000 @11 -> + 00000000 @00
Debug: 45940 16778 riscv-013.c:265 scan(): 41b - 00000000 @11 -> + 00030c82 @11
Debug: 45941 16778 riscv-013.c:276 scan():  ->  allresumeack anyresumeack allrunning anyrunning authenticated version=2
在「Day 21: 深入淺出 RISC-V 源碼剖析 (6) - Polling & Debug(Halt) Reason」中有提到的實作:
int riscv_openocd_poll(struct target *target)
{
    LOG_DEBUG("polling all harts");
    int triggered_hart = -1;
    if (riscv_rtos_enabled(target)) {

        ....RTOS的部分省略!

    } else {
        ////譯註: 針對單一個Hart呼叫riscv_poll_hart()來處理!
        if (riscv_poll_hart(target, riscv_current_hartid(target)) == 0)
            return ERROR_OK;

        triggered_hart = riscv_current_hartid(target);
        LOG_DEBUG("  hart %d halted", triggered_hart);
    }


    ....後面Halt處理省略


    target->state = TARGET_HALTED;
    target_call_event_callbacks(target, TARGET_EVENT_HALTED);
    return ERROR_OK;
}

static int riscv_poll_hart(struct target *target, int hartid)
{
    RISCV_INFO(r);
    riscv_set_current_hartid(target, hartid);

    LOG_DEBUG("polling hart %d, target->state=%d (TARGET_HALTED=%d)", hartid, target->state, TARGET_HALTED);

    /* If OpenOCD this we're running but this hart is halted then it's time
     * to raise an event. */
    ///譯註: 判斷Hart是否在Halt的階段
    if (target->state != TARGET_HALTED && riscv_is_halted(target)) {
        LOG_DEBUG("  triggered a halt");
        r->on_halt(target);
        return 1;
    }

    return 0;
}

bool riscv_is_halted(struct target *target)
{
    RISCV_INFO(r);
    assert(r->is_halted);
    return r->is_halted(target);
}

static bool riscv013_is_halted(struct target *target)
{
    uint32_t dmstatus = dmi_read(target, DMI_DMSTATUS);
    if (get_field(dmstatus, DMI_DMSTATUS_ANYUNAVAIL))
        LOG_ERROR("hart %d is unavailiable", riscv_current_hartid(target));
    if (get_field(dmstatus, DMI_DMSTATUS_ANYNONEXISTENT))
        LOG_ERROR("hart %d doesn't exist", riscv_current_hartid(target));
    return get_field(dmstatus, DMI_DMSTATUS_ALLHALTED);
}
首先是riscv_openocd_poll()中"LOG_DEBUG("polling all harts");",對應的LogDebug: 45929 16777 riscv.c:965 riscv_openocd_poll(): polling all harts
再過來是riscv_poll_hart()中"LOG_DEBUG("polling hart %d, target->state=%d (TARGET_HALTED=%d)", hartid, target->state, TARGET_HALTED);",對應的LogDebug: 45938 16777 riscv.c:949 riscv_poll_hart(): polling hart 0, target->state=1 (TARGET_HALTED=2)
最後是riscv013_is_halted()處理的部分"uint32_t dmstatus = dmi_read(target, DMI_DMSTATUS);",對應的Log:
Debug: 45939 16778 riscv-013.c:265 scan(): 41b r 00000000 @11 -> + 00000000 @00
Debug: 45940 16778 riscv-013.c:265 scan(): 41b - 00000000 @11 -> + 00030c82 @11
Debug: 45941 16778 riscv-013.c:276 scan():  ->  allresumeack anyresumeack allrunning anyrunning authenticated version=2
講完,我猜應該沒人看得完這篇..... 除非本身就是做Debugger的!?
從開始到現在總共花了2X天把RISC-V和OpenOCD支援的部分整個說明完畢,
並利用這個Lab將程式碼與Log互相"Link"起來XD!
往後的文章中,預計將往外延伸探討FTDI Adapter、Flash、GDB Server的部分,
不過好像剩沒幾天可以寫....

