昨天我們使用Node.js Driver 操作 MongoDB,寫出下面的程式
const MongoClient = require('mongodb').MongoClient;

// 建立連線
const url = 'mongodb://localhost:27017';
const dbName = 'myproject';
const client = new MongoClient(url, {useNewUrlParser: true});
client.connect()
  .then((connectedClient) => {
    console.log('mongodb is connected');
  })
  .catch(error => {
    console.error(error);
  });

// GET /api/mongo
router.get('/api/mongo', function (req, res, next) {
  // 回應
  res.json({
    isConnected: client.isConnected(),
  });
});

// GET /api/echo
router.post('/api/echo', function (req, res, next) {
  const body = req.body;

  // 處理
  const worker = (async function (data) {
    const db = client.db(dbName);
    const collection = db.collection('echo');
    const result = await collection.insertOne(data);
    console.log(result);
    return result;
  })(body);

  // 回應
  worker.then(() => {
    res.json(body);
  })
    .catch(next);
});
會出現以下問題:
.src/router/index.js 路由的程式,為什麼會放資料庫連線邏輯?要解決以上問題需要從專案結構下手,跟程式語言沒什麼關係。
因為後端的目地、功能的見解、認知不同,每個人做出的專案結構一定會不一樣,這是正常的。
打開 hello-mongo,我們先來看看 express 給我們預設的專案結構
/ 路由的根目路express 提供基本的 Web Server 應該要有的目錄,但我們的後端顯然不夠,我們修改成以下
/ 路由的根目路我們多出了,middlewares、services、daos、utilities,
middlewares、services、daos、utilities 的職責概述:
formatDate(date)。我們依照職責概述重構程式
GET /api/mongo重構過程見 ithelp-30dayfullstack-Day16
網頁版專案 codesandbox(只能看檔案,不能執行)
我們約定:
MongoClient 時,建立的物件會取為 mongoClient,依些類推app.jsconst MongoClient = require('mongodb').MongoClient;
const url = 'mongodb://localhost:27017';
const dbName = 'myproject';
const client = new MongoClient(url, { useNewUrlParser: true });
client.connect()
.then((connectedClient) => {
console.log('mongodb is connected');
})
.catch(error => {
console.error(error);
});
資料庫連線放在 app.js ,因為後端一啟動就一定要連上,不然就後面都不用玩了。
./routers/index.js 控制反轉(Inversion of Control)我們用 createRouter(dependencies) 包住整個程式碼,給外界注入相依後才建立 router 物件。
./routers/index.js 相依的是 client,改成在 app.js 中才用 createRouter({client}) 注入
/**
 *
 * @param {MongoClient} client
 */
function createRouter(dependencies) {
  // Get dependencies
  const {client} = dependencies;
  if(!client) {
    throw new Error('client is empty');
  }

  // Create a router
  var router = express.Router();

  /* GET home page. */
  router.get('/', function (req, res, next) {
    ...略
  });

  router.get('/api/sayHi', function (req, res, next) {
    ...略
  });

  router.post('/api/echo', function (req, res, next) {
    ...略
  });

  router.get('/api/mongo', function (req, res, next) {
    ...略
  });

  const mongoose = require('mongoose');
  router.get('/api/mongoose', function (req, res, next) {
    ...略
  });

  return router;
}

module.exports = {
  createRouter
};
然後修改使用./routers/index.js 的 app.js
...略
const indexRouter = require('./routes/index');
...略
app.use('/', indexRouter);
...略
改成
...略
const {createRouter: createRootRouter} = require('./routes/index');
const indexRouter = createRootRouter({client});
...略
app.use('/', indexRouter);
...略
MongoSevice class,放在 ./services/MongoSevice.jsclass MongoService {
/**
*
* @param {MongoClient} mongoClient
*/
constructor({mongoClient}) {
this.mongoClient = mongoClient;
}
/**
*
* @returns Promise<bool>
*/
isConnected() {
return Promise.resolve(this.mongoClient.isConnected())
}
}
module.exports = MongoService;
我們把 GET /api/mongo 的實作放在 MongoService 的 isConnected()。
./routers/index.js 使用 MongoService 物件多增加一個 MongoService的依賴項,mongoService 是 MongoService 物件。
/**
 *
 * @param {object} dependencies
 * @param {MongoService} dependencies.mongoService
 * @param {MongoClient} dependencies.client
 */
function createRouter(dependencies) {
  // Get dependencies
  const { client, mongoService } = dependencies;
  if (!client) {
    throw new Error('client is empty');
  }
  ...略
}
GET /api/mongo 改成使用 MongoService 物件
 router.get('/api/mongo', function (req, res, next) {
    mongoService.isConnected()
      .then(isConnected => {
        res.json({isConnected});
      })
      .catch(next);
  });
最後,在 app.js 建立 MongoService 物件並注入
const MongoService = require('./services/MongoService');

const mongoService = new MongoService({mongoClient: client});
const {createRouter: createRootRouter} = require('./routes/index');
const indexRouter = createRootRouter({client, mongoService});
我們總結一下,我們所做的事
MongoService 物件,router 會使用 MongoService 物件完成實作(ex: isConnected())而不是把實作留在 router,router 因該專心對付 web api的介接app.js,它們的相依性如下圖(注:這不是UML class diagram,只是表達關係)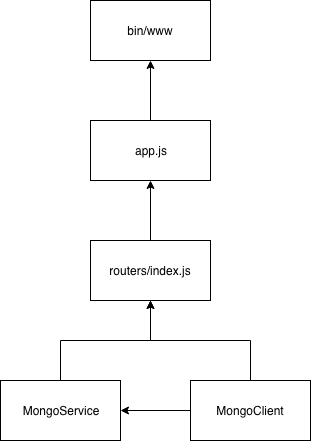
接下來我們可以更進一步重構 POST /api/echo,這樣我們就可以把 ./routers/index.js 對 client 的相依拿掉,讓它只面對 MongoService,之後的相依關係就更單純了。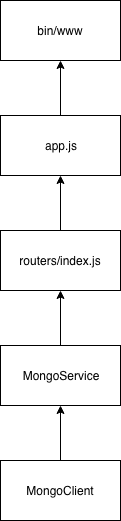
POST /api/echoPOST /api/echo 的資料庫操作移到 MongoService 的 insertEcho()加入 insertEcho()後,移除 POST /api/echo 資料庫操作,且改成使用 MongoService 的 insertEcho()
class MongoService {
    ...略

    /**
     *
     * @param {*} data
     * @returns Promise
     */
    async insertEcho(data) {
        const dbName = 'myproject';
        const db = this.mongoClient.db(dbName);
        const collection = db.collection('echo');
        const result = await collection.insertOne(data);
        console.log(result);
        return result;
    }
}
./routers/index.js 的 POST /api/echo 變成
  router.post('/api/echo', function (req, res, next) {
    const body = req.body;

    mongoService.insertEcho(body)
      .then(() => {
        res.json(body);
      })
      .catch(next);
  });
./routers/index.js 對 client 的相依因為 ./routers/index.js 沒有用到 client,可以移除了,且app.js中也不用注入 clinet了
const {createRouter: createRootRouter} = require('./routes/index');
const indexRouter = createRootRouter({mongoService});
我們完成了,得到更單純的關係
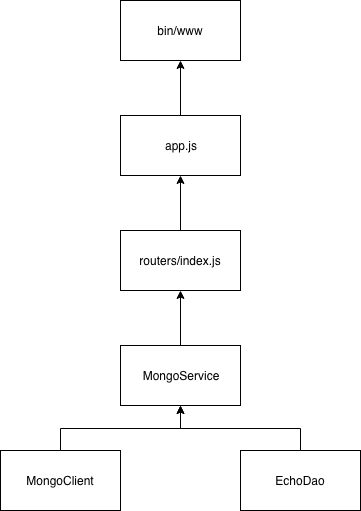
我自可以更進一步重構出更底層的 DAO 出來,例如 EchoDao
EchoDaoclass EchoDao {
/**
*
* @param {MongoClient} mongoClient
*/
constructor({ mongoClient }) {
this.mongoClient = mongoClient;
}
insert(data) {
}
}
module.exports = EchoDao;
MongoService 的資料章操作移到 insertEcho()class EchoDao {
/**
*
* @param {MongoClient} mongoClient
*/
constructor({ mongoClient }) {
this.mongoClient = mongoClient;
}
insert(data) {
const dbName = 'myproject';
const db = this.mongoClient.db(dbName);
const collection = db.collection('echo');
return await collection.insertOne(data);
}
}
module.exports = EchoDao;
MongoService 使用 EchoDao加入相依
class MongoService {
    /**
     *
     * @param {MongoClient} mongoClient
     * @param {EchoDao} echoDao
     */
    constructor({ mongoClient, echoDao }) {
        this.mongoClient = mongoClient;
        this.echoDao = echoDao;
    }
    ...略

    /**
     *
     * @param {*} data
     * @returns Promise
     */
    async insertEcho(data) {
        return this.echoDao.insert(data);
    }
}

module.exports = MongoService;
app.js 中 MongoService 的建立加入 echoDao 的相依
const EchoDao = require('./daos/EchoDao');

const echoDao = new EchoDao({mongoClient: client});
const mongoService = new MongoService({mongoClient: client, echoDao});
經過重構 GET /api/mongo 和 POST /api/echo,我們完成了最後的樣子
這結構有什麼好處
POST /api/echo 時輸入物件時要帶入 token 屬性值,才可寫入資料庫,我們就可以在 MongoService 加入這種邏輯。
async insertEcho(data) {
  const {token} = data; // 省略了值型別的驗証
  if(token !== 'hello-mongo') {
    return Promise.reject(new Error('缺少 token'));
  }
  return this.echoDao.insert(data);
}
但也有缺點
class EchoService {
  constructor({ echoDao }) {
    this.echoDao = echoDao;
  }
  async insertEcho(data) {
    return this.echoDao.insert(data);
  }
}
class EchoService {
  constructor({ echoDao }) {
    this.echoDao = echoDao;
    this.insertEcho = this.echoDao.insert;
  }
}
總結一句話
當介面越多,越有彈性、但越複雜;彈性不夠,就抽一個介面
mongoose 也可以進行這類似的重構,doa 可以直接用 model 替換,但有幾點要注意:
const Cat = mongoose.model('Cat', { name: String }) 是和 mongoose 註冊 model(只需執行一次就可以),跟 mongoose 有沒有 connection 沒關西,只當送出資料庫操作(ex: .save())才會使用到 connectionmodel.toObject()
  const Cat = mongoose.model('Cat', { name: String }); // 註冊 Cat model
  router.post('/api/cat', function (req, res, next) {
    const { name } = req.body;
    const worker = (async function () {
      const kitty = new Cat({ name });

      // 測式一
      return await kitty.save(); // 回傳 model 型態

      // 測式二
      // const result =  await kitty.save();
      // return result.toObject(); // 回傳 ojbect 型態
    })();

    worker
      .then(data => {
        data._dirty = 'hi'; // 動態放髒東西
        console.log(JSON.stringify(data));
        res.json(data);
      })
      .catch(next);
  });
今天我們引入了專案結構,並實際重構 GET /api/mongo 和 POST /api/echo, 讓我們的程式碼更有結構性。


 iThome鐵人賽