延續昨天的ViewGroups介紹,我們得知可用於LinearLayout可用於Child Views的水平與垂直排列:
<LinearLayout
    xmlns:android="http://schemas.android.com/apk/res/android"
    android:orientation="vertical"
    android:layout_width="match_parent"
    android:layout_height="match_parent">

    <TextView
        android:text="Guest List"
        android:layout_width="wrap_content"
        android:layout_height="wrap_content"
        android:textSize="24sp"
        android:textColor="#f0f8ff"
        android:background="#000000"/>
    <TextView
        android:text="KH"
        android:layout_width="wrap_content"
        android:layout_height="wrap_content"
        android:textSize="24sp"
        android:background="#f0e68c"/>
    <TextView
        android:text="Chimin"
        android:layout_width="wrap_content"
        android:layout_height="wrap_content"
        android:textSize="24sp"
        android:background="#40e0d0"/>
    <TextView
        android:text="UT"
        android:layout_width="wrap_content"
        android:layout_height="wrap_content"
        android:textSize="24sp"
        android:background="#e298d8"/>
    <TextView
        android:text="Hank"
        android:layout_width="wrap_content"
        android:layout_height="wrap_content"
        android:textSize="24sp"
        android:background="#6496e5"/>
</LinearLayout>
像這樣的排列,畫面中會有許多空白的部分沒用到,這時可以利用android:layout_weight屬性。
該屬性用於配置每個child view在畫面中的比重,由上至下分別設置比重為0, 1, 2, 3, 4(非絕對數字,而是比值)。
<LinearLayout
    xmlns:android="http://schemas.android.com/apk/res/android"
    android:orientation="vertical"
    android:layout_width="match_parent"
    android:layout_height="match_parent">
    <TextView
        android:text="Guest List"
        android:layout_width="wrap_content"
        android:layout_height="0dp"
        android:textSize="24sp"
        android:textColor="#f0f8ff"
        android:background="#000000"
        android:layout_weight="0" />
    <TextView
        android:text="KH"
        android:layout_width="wrap_content"
        android:layout_height="0dp"
        android:textSize="24sp"
        android:background="#f0e68c"
        android:layout_weight="1" />
    <TextView
        android:text="Chimin"
        android:layout_width="wrap_content"
        android:layout_height="0dp"
        android:textSize="24sp"
        android:background="#40e0d0"
        android:layout_weight="2" />
    <TextView
        android:text="UT"
        android:layout_width="wrap_content"
        android:layout_height="0dp"
        android:textSize="24sp"
        android:background="#e298d8"
        android:layout_weight="3" />
    <TextView
        android:text="Hank"
        android:layout_width="wrap_content"
        android:layout_height="0dp"
        android:textSize="24sp"
        android:background="#6496e5"
        android:layout_weight="4" />
</LinearLayout>
無使用(圖左)及使用android:layout_weight(圖右):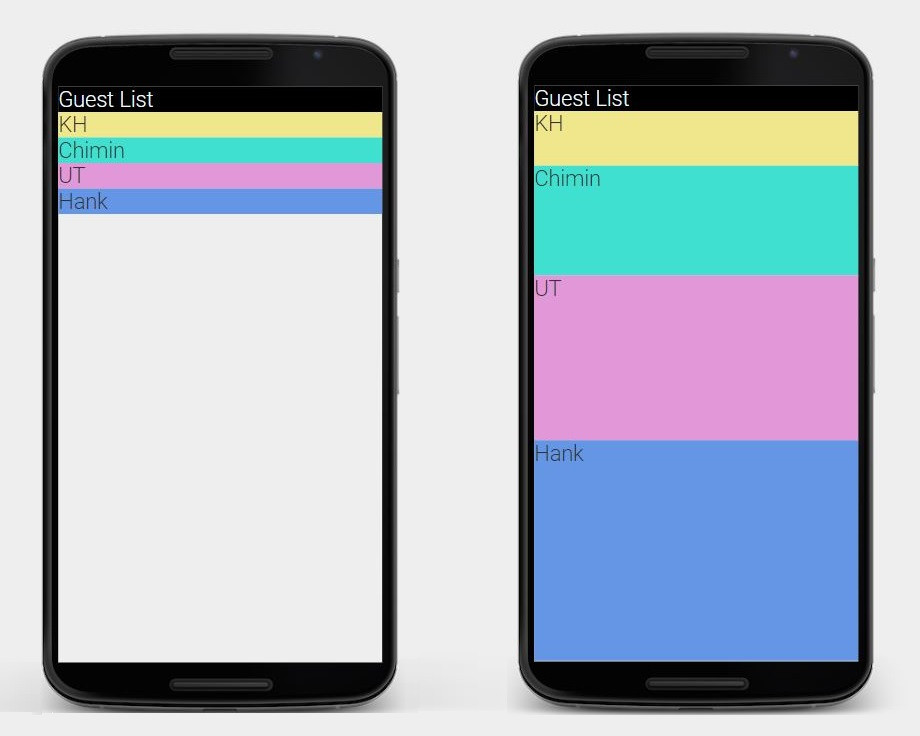
android:layout_weight,必須先將parent view(LinearLayout)的長寬屬性都設為"match_parent",意思是填滿整個畫面。再將每個child view的高度設為"0dp",之後交由android:layout_weight來分配比重。利用相對位置來排列view
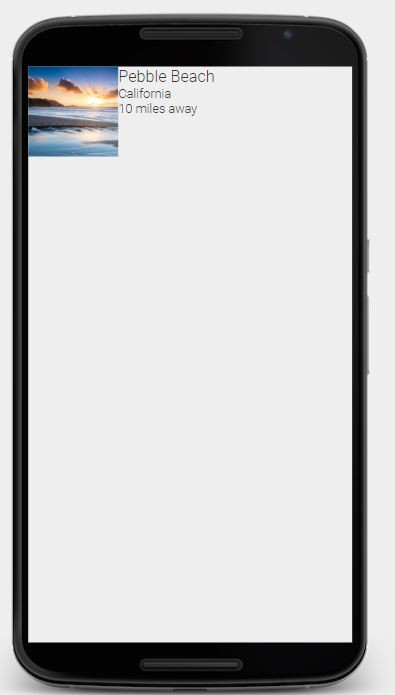
相對於LinearLayout是在垂直或水平排列child view,RelativeLayout則是利用相對位置來排列views,因此不需要android:orientation屬性,但是需要為每個要參考到的view加上id。
android:id屬性用於指定view的識別id,在第一次使用時必須以"@+id/beach_image_view"的形式,之後引用便不再需要+號。android:layout_toRightOf中便指定要在哪一個view的右邊,例如id為"@id/beach_image_view"的ImageView。如下XML:
<RelativeLayout
    xmlns:android="http://schemas.android.com/apk/res/android"
    android:layout_width="match_parent"
    android:layout_height="match_parent">

    <ImageView
        android:id="@+id/beach_image_view"
        android:layout_width="100dp"
        android:layout_height="100dp"
        android:scaleType="centerCrop"
        android:src="@drawable/ocean" />
    <TextView
        android:id="@+id/beach_text1_view"
        android:layout_width="wrap_content"
        android:layout_height="wrap_content"
        android:layout_toRightOf="@id/beach_image_view"
        android:text="Pebble Beach"
        android:textAppearance="?android:textAppearanceMedium"/>
    <TextView
        android:id="@+id/beach_text2_view"
        android:layout_width="wrap_content"
        android:layout_height="wrap_content"
        android:layout_below="@id/beach_text1_view"
        android:layout_toRightOf="@id/beach_image_view"
        android:text="California"
        android:textAppearance="?android:textAppearanceSmall" />
    <TextView
        android:layout_width="wrap_content"
        android:layout_height="wrap_content"
        android:layout_below="@id/beach_text2_view"
        android:layout_toRightOf="@id/beach_image_view"
        android:text="10 miles away"
        android:textAppearance="?android:textAppearanceSmall"/>

</RelativeLayout>
今天學到了如何在Linearlayout配置下利用畫面的空白處,以及認識了另一種GroupView - RelativeLayout,也引入了id的概念,是不是和HTML元素有些類似呢。