
昨天介紹了 React 的基本概念 state/prop,它們是控制畫面渲染的變數。然而 component 的 state/prop 混合使用會使渲染邏輯變的混亂。
考慮登入畫面: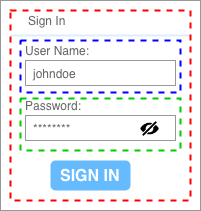
把 username 和 password 分成兩個 component後,關於 hide 值就有二種可能的 component tree 設計。
(component tree 1) 放在 password component 中的 state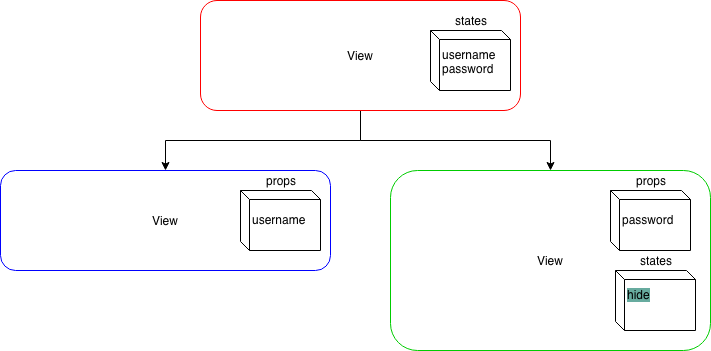
(component tree 2) 放在最上層 component 中的 state,然後在送到 password component 的 prop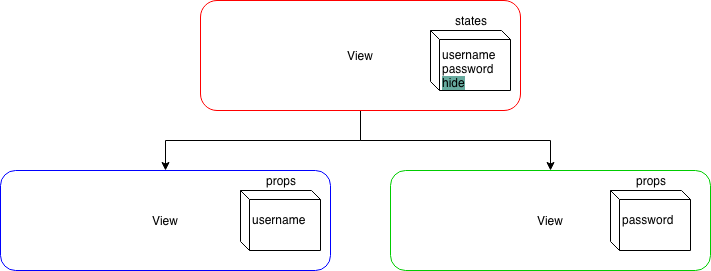
假如當使用者按下 SIGN IN 時,希望密碼是隱藏的也就是 hide 需要更動。因為 SIGN IN 是在最上層的 component, 在上面 component tree 1 就會有設定上的困難(因為 state 是在 password component 內部),component tree 2 反而沒有。
試想當你的 component tree 更大時,你應該怎麼管理那些 state 呢?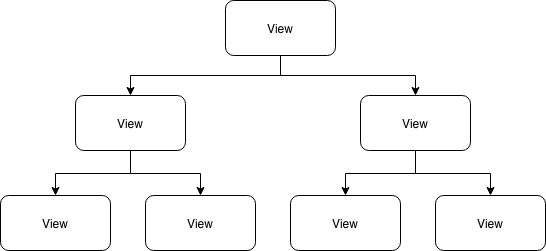
今天會介紹 Flux framework 和 Redux。
我覺得不要一開始就想要馬上把 Redux 和 React 串起來,因為你會誤以為 Redux 很複雜。我在本篇未會給出一個直接運作 Redux 的 Node.js 專案,裡面只有一隻程式,執行過程就是 Redux api 的最簡單的範例。
明天才會把 Redux 和 React 串起,你會看到 store, action 被拆到不同的檔案。
Facebook 提出了 Flux framework(或稱架構),來處理 state 和 prop 的混亂。
Flux 希望資料的流動是單一的 (單向資料流),使用者行為會產生 Action 送入 Dispatcher,Dispatcher 會把 Action 派分到「有註冊要監聽Action的 Store」,然後 Store 依照 Action 的 識別字串 決定如何修改 state,當 Store 修改完 state,會發出 change 訊息。最後, 註冊 change 訊息的 View ,收到來自 Store 的通知,就會執行 setState() 更新畫面(更新內部的component)。
它的流程如下: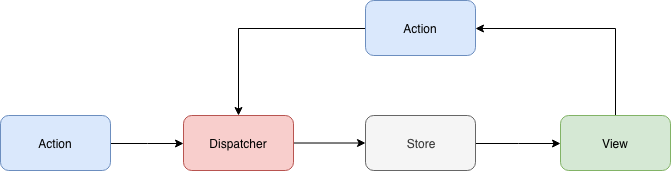
我們注意看到「註冊 Store 的(change)訊息的 View」,它是 state 值流入的第一個 view,被稱成 Controller-View 它負責連結 Store 取出 state 值和引起 setState(),然後送入裡面的 view (即內部 view 的 props)。最後的架構圖如下: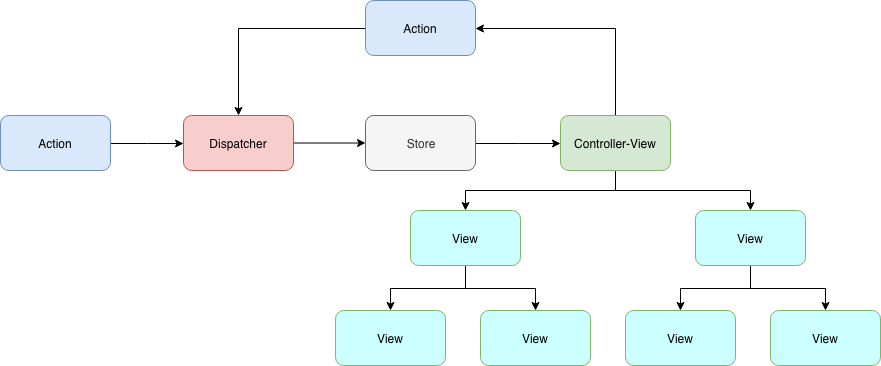
以下三個都是 Flux 的實現套件,他們的 API 用法和特性有很大的差異
Dispatcher 的概念,直接把 Action 綁定(bind) 在 Stroe 中,所以 Flux API 串接較方便。用法看官網5分鐘上手就可以了。原本的 Flux Store 和 View 的關係下圖(截錄淺談 React、Flux 與 Redux)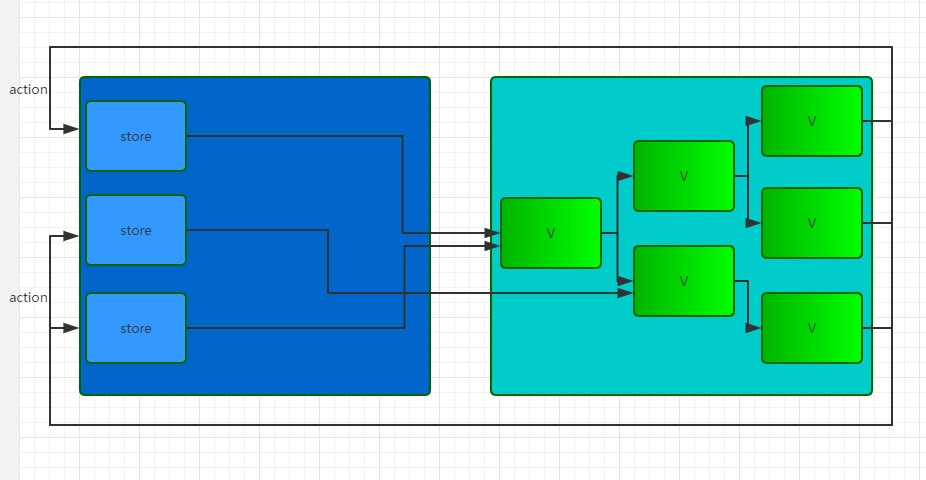
然而 Redux 簡化 Flux 的概念,變成 (截錄修改淺談 React、Flux 與 Redux)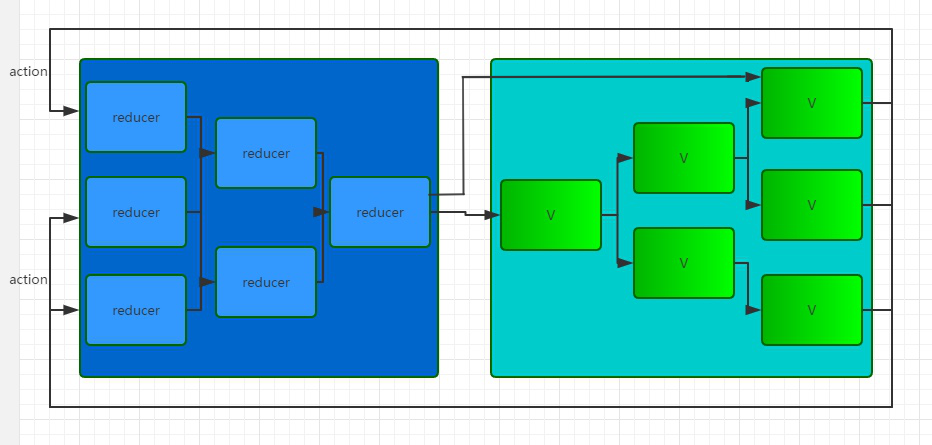
store.dispatch(action) 就可以引發分派 action。const initState = {};
const reducer = (state = initState, action) => {
const {type, ...actionData} = action;
switch (type) {
default:
return state;
}
};
// Reducer configuration
const rootReducer = combineReducers({
    login: LoginReducer,
    account: AccountReducer,
});
注意:這裡不是說只能有一個 controller-view,subcomponent 也能是 controller-view
所以 Reducer 簡化 Flux 完整的概念,更容易使用。
Redux 是資料的流動,是改變 state 的框架,最後的 state 給誰用跟它沒有關係,View 是與它無關。因此,React 跟它的運作是沒有關係的。我們可以開一個 Node.js 來運作體驗 Redux。
hello-redux
npm init後,安裝 redux npm install redux --save
hello-redux.js 檔案message state。const {createStore} = require('redux');
// 定義 action type
const identityChangeMessage = 'CHANGE_MESSAGE';
// 建立一個 Reducer
const initState = {
message: 'init message',
};
const reducer = (state = initState, action) => {
const {type, payload} = action;
switch (type) {
case identityChangeMessage: {
const {message} = payload;
return Object.assign({}, {message});
}
default:
return state;
}
};
// 建立一個 Store
const store = createStore(reducer);
store.getState()可以取出目前的 state
// 印出初始的 state
console.log(store.getState());
// 建立一個 action
const action = {
    type: identityChangeMessage,
    payload: {
        message: 'change',
    },
}
type 屬性。function changeMessage(data) {
return {
type: identityChangeMessage,
payload: {
message: data,
},
}
}
store.dispatch(action);
identityChangeMessage) 修改 stateconsole.log(store.getState());
執行 node hello-redux.js 的結果:
{ message: 'init message' }
{ message: 'change' }
今天介紹了 Flux 的基本概念和實現它的套件 Redux,也寫了簡單的程式體驗 Redux 的運作。明天就把 Redux 和 React 串接起來。
hello-redux.jsconst {createStore} = require('redux');
// 定義 action type
const identityChangeMessage = 'CHANGE_MESSAGE';
// 建立一個 Reducer
const initState = {
message: 'init message',
};
const reducer = (state = initState, action) => {
const {type, payload} = action;
switch (type) {
case identityChangeMessage: {
const {message} = payload;
return Object.assign({}, {message});
}
default:
return state;
}
};
// 建立一個 Store
const store = createStore(reducer);
// 印出初始的 state
console.log(store.getState());
// 建立一個 action
const action = {
type: identityChangeMessage,
payload: {
message: 'change',
},
}
// 分派(dispatch) action
store.dispatch(action);
// 印出收到 action 後,被 reducer 修改的 state
console.log(store.getState());







 iThome鐵人賽
 看影片追技術