
完成了主要的三大頁面後,我們回來做Event中的Media系列,三種不同的媒體儲存,我都會以UITableView的方式顯示,只有部分的功能不一樣而已,然後先前預計是以Blob的形式存入資料庫,但我想了一下,這樣每次都要轉來轉去,其實不一定是好的,還是用檔案存在Local的Document Folder下好了,同時練習檔案的讀取與寫入~
因此,這邊先做幾個前置作業吧!
struct Media {
    var id: Int64
    var title: String
    var detail: String
    var path: String
}
let TB_MEDIA = Table("TB_MEDIA")
let TB_MEDIA_ID = Expression<Int64>("id")
let TB_MEDIA_EVENT_ID = Expression<Int64>("event_id")
let TB_MEDIA_TYPE = Expression<Int>("type")
let TB_MEDIA_TITLE = Expression<String>("title")
let TB_MEDIA_DETAIL = Expression<String?>("detail")
let TB_MEDIA_PATH = Expression<String>("path”)
try database.run(TB_MEDIA.create(ifNotExists: true) { t in
    t.column(TB_MEDIA_ID, primaryKey: true)    //     "id" INTEGER PRIMARY KEY NOT NULL,
    t.column(TB_MEDIA_EVENT_ID, references: TB_EVENT, TB_EVENT_ID) //    "event_id" INTEGER PRIMARY KEY NOT NULL,
    t.column(TB_MEDIA_TYPE)  //     "type" INTEGER
    t.column(TB_MEDIA_TITLE)  //     "title" TEXT
    t.column(TB_MEDIA_DETAIL)  //     "detail" TEXT
    t.column(TB_MEDIA_PATH)  //     "path" TEXT
})
func queryMediaByEventIdAndType(event_id: Int64, type: Int) -> Array<Media> {
    var mediaList:[Media] = [Media]()
    do {
        for result in Array(try database.prepare(TB_MEDIA.filter(TB_MEDIA_EVENT_ID == event_id && TB_MEDIA_TYPE == type))) {
            mediaList.append(Media(id: result[TB_MEDIA_ID], title: result[TB_MEDIA_TITLE], detail: result[TB_MEDIA_DETAIL] ?? "", path: result[TB_MEDIA_PATH]))
        }
    } catch {
    }
    return mediaList
}

func insertMedia(event_id: Int64, type: Int, title: String, detail: String?, path: String) {
    do {
        try database.run(TB_MEDIA.insert(TB_MEDIA_EVENT_ID <- event_id, TB_MEDIA_TYPE <- type, TB_MEDIA_TITLE <- title, TB_MEDIA_DETAIL <- detail, TB_MEDIA_PATH <- path))
    } catch {
    }
}

func updateMediaTitleById(id: Int64, title: String) {
    do {
        let item = TB_MEDIA.filter(TB_MEDIA_ID == id)
        if try database.run(item.update(TB_MEDIA_TITLE <- title)) > 0 {
            print("update media")
        }
    } catch {
    }
}

func updateMediaDetailById(id: Int64, detail: String?) {
    do {
        let item = TB_MEDIA.filter(TB_MEDIA_ID == id)
        if try database.run(item.update(TB_MEDIA_DETAIL <- detail)) > 0 {
            print("update media")
        }
    } catch {
    }
}

func deleteMediaById(id: Int64) {
    let item = TB_MEDIA.filter(TB_MEDIA_ID == id)
    do {
        if try database.run(item.delete()) > 0 {
            print("deleted media")
        }
    } catch {
        print("delete failed: \(error)")
    }
}
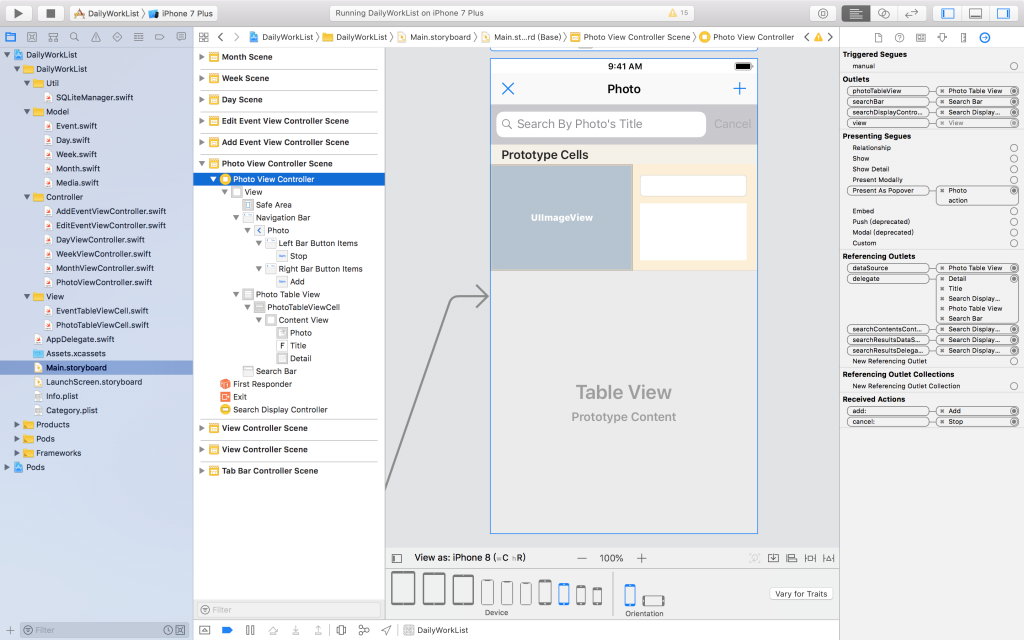
如此一來資料結構面就好囉!接著在Main.storyboard中加入Photo Scene吧
新增PhotoTableViewCell.swift
import UIKit
class PhotoTableViewCell: UITableViewCell {
    @IBOutlet weak var photo: UIImageView!
    @IBOutlet weak var title: UITextField!
    @IBOutlet weak var detail: UITextView!
    var id: Int64!
}
再來只要寫PhotoViewController.swift中的內容,就完成囉!但篇幅可能會太長,我今天先把相簿選取的功能做出來,明天再來完成剩下的喔
當按下「+」按鈕後要開啟手機相簿,因此我們要利用UIImagePickerController,所以要加入兩個Protocol:UINavigationControllerDelegate, UIImagePickerControllerDelegate
let photoPiker = UIImagePickerController()
@IBAction func add(_ sender: UIBarButtonItem) {
    if UIImagePickerController.isSourceTypeAvailable(.photoLibrary) {
        photoPiker.sourceType = .photoLibrary
        photoPiker.delegate = self
        photoPiker.allowsEditing = true
        // 開啟相簿選取頁面
        self.present(photoPiker, animated: true, completion: nil)
    }
}
接著加入當選取相片後,要接收的Func
func imagePickerController(_ picker: UIImagePickerController, didFinishPickingMediaWithInfo info: [String : Any]) {
    do {
        // 建立Document/Path的資料夾,若已存在則不影響
        let documentsDirectory = NSURL(fileURLWithPath: NSSearchPathForDirectoriesInDomains(.documentDirectory, .userDomainMask, true)[0])
        let dataPath = documentsDirectory.appendingPathComponent(path)!
        try FileManager.default.createDirectory(atPath: dataPath.path, withIntermediateDirectories: true)

        // 設定圖片名稱,為現在時間yyyyMMddHHmmssSSSS格式,避免重複
        let fileName = "\(formatter.string(from: Date())).jpg"
        let documentsURL = FileManager.default.urls(for: .documentDirectory, in: .userDomainMask).first!
        let fileURL = documentsURL.appendingPathComponent(path + fileName)
        print(fileURL)

        // 取得編輯後的圖片(原圖用UIImagePickerControllerOriginalImage)
        let image: UIImage = info[UIImagePickerControllerEditedImage] as! UIImage
        let imageData: Data = UIImageJPEGRepresentation(image, 1)!
        // 寫入檔案
        try imageData.write(to: fileURL, options: .atomic)
        // 存入資料庫
        sqlManager.insertMedia(event_id: event_id, type: type, title: fileName, detail: nil, path: path + fileName)
    } catch {
        print("\(error)")
    }

    // update the button label text
    self.reloadTableView()
    // 關閉相簿選取頁面
    photoPiker.dismiss(animated: true, completion: nil)
}
func tableView(_ tableView: UITableView, cellForRowAt indexPath: IndexPath) -> UITableViewCell {
    let cell = tableView.dequeueReusableCell(withIdentifier: cellIdentifier, for: indexPath) as! PhotoTableViewCell
    // 設定id
    cell.id = self.searchList[indexPath.row].id
    // 設定Title文字
    cell.title.text = self.searchList[indexPath.row].title
    // 把id指定給此TextField,供異動時的id參考
    cell.title.tag = Int(self.searchList[indexPath.row].id)
    // 設定詳細說明文字
    cell.detail.text = self.searchList[indexPath.row].detail
    // 把id指定給此TextView,供異動時的id參考
    cell.detail.tag = Int(self.searchList[indexPath.row].id)

    // 取得預設App的Document路徑
    let documentsURL = FileManager.default.urls(for: .documentDirectory, in: .userDomainMask).first!
    // 指定此圖片檔案的路徑
    let filePath = documentsURL.appendingPathComponent(self.searchList[indexPath.row].path).path
    // 讀取檔案
    if FileManager.default.fileExists(atPath: filePath) {
        // 如果檔案存在,則以UIImage圖片顯示
        cell.photo.image = UIImage(contentsOfFile: filePath)
    }
    return cell
}
func tableView(_ tableView: UITableView, editActionsForRowAt: IndexPath) -> [UITableViewRowAction]? {
    let delete = UITableViewRowAction(style: .normal, title: "Delete") { action, indexPath in
        do {
            // 取得預設App的Document路徑
            let documentsURL = FileManager.default.urls(for: .documentDirectory, in: .userDomainMask).first!
            // 指定此圖片檔案的路徑
            let filePath = documentsURL.appendingPathComponent(self.searchList[indexPath.row].path).path
            // 移除檔案
            try FileManager.default.removeItem(atPath: filePath)
            // 刪除資料庫資料
            self.sqlManager.deleteMediaById(id: self.searchList[indexPath.row].id)
            // 重新整理UITableView
            self.reloadTableView()
        } catch {
            print("\(error)")
        }
    }
    delete.backgroundColor = UIColor.red
    return [delete]
}
今天就先這樣喔,剩下明天再繼續
