
我們先前用的 SDK 為其他人封裝好方便我們用的,但我們必須要自己了解其原理,於是這篇文章將講解 SDK 內部的原理,利用單純的 HTTPS 請求來操作 Cosmos DB 。
發送 HTTPS Request 通常包含幾個部分:Endpoint、Request Header、Request Body。
首先我們要知道我們要發送請求的位置,類似於網頁的 URL。存取不同的資源必須填上不同的值,Cosmos DB 中最常見包含如下幾種 URL: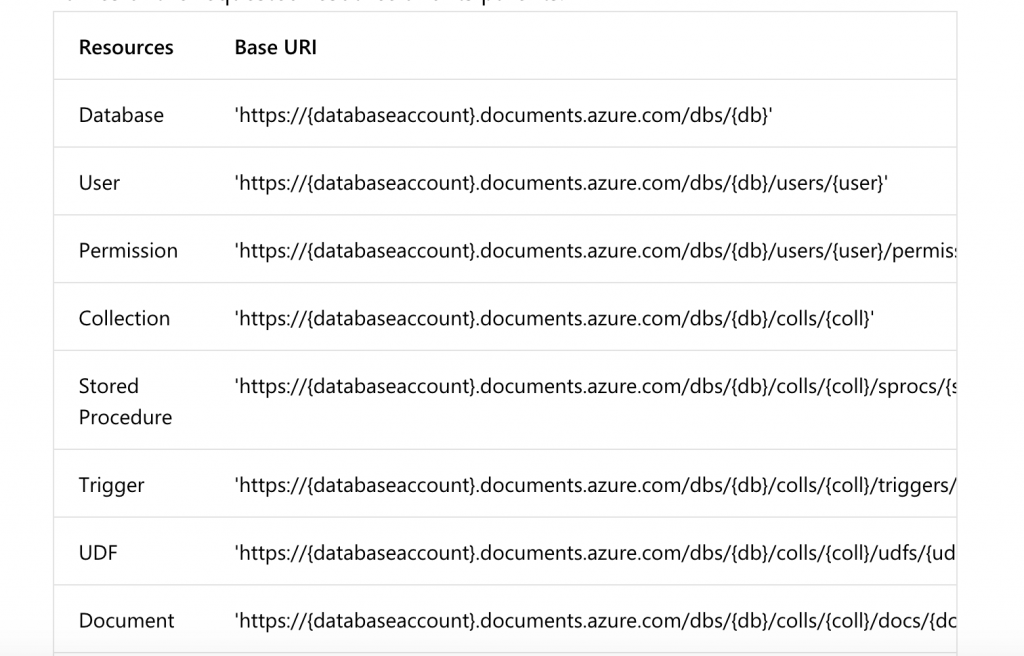
Header再來為了讓 Cosmos DB 辨識存取資源的人之身份與相關資訊,我們必須加上 Header 欄位,首先我們看到 Request Header 的文件:https://docs.microsoft.com/en-us/rest/api/cosmos-db/common-cosmosdb-rest-request-headers
文件內寫出了必要的請求 Header 包含:
{
  Authorization: "產生相關 authorization token",
  Content-Type:  "請求格式",
  x-ms-date:     "UTC 格式的當前時間",
  x-ms-version:  "API 版本號碼",
}
接著我們要來從第一個 Header 欄位開始填寫。
Authorization 欄位首先我們要產生 Header 內的 Authorization 欄位,必須為如下格式:
type={tokenType}&ver={tokenVersion}&sig={hashSignature}
tokenType 為
master或是resource
tokenVersion 通常為1.0
hashSignature 產生步驟:
masterKey 轉為 base64 格式HMAC-SHA256做雜湊,其中 HMAC 的 key 為剛才第一步驟產生的 base64 值HAMC-SHA256 的 body 內容為 verb, resourceType, resourceId, date, 串接的值,且每個欄位後要空行看完後可能一頭霧水,不過沒關係,下面我們用程式來實做看看。
function genAuthHeader(
  verb,
  resourceType,
  resourceId,
  date,
  master_Key
) {
  const key = new Buffer(master_Key, "base64");

  const text =
    (verb || "").toLowerCase() +
    "\n" +
    (resourceType || "").toLowerCase() +
    "\n" +
    (resourceId || "") +
    "\n" +
    date.toLowerCase() +
    "\n" +
    "" +
    "\n";
  const body = new Buffer(text, "utf8");
  const signature = crypto
    .createHmac("sha256", key)
    .update(body)
    .digest("base64");

  const tokenType = "master";
  const TokenVersion = "1.0";

  return encodeURIComponent(
    "type=" + tokenType + "&ver=" + TokenVersion + "&sig=" + signature
  );
}
如此我們就產生了第一個 Authorization 欄位,不過還有剩下三個欄位,我們可以用以下方式產生他們:
{
  Content-Type:  'application/json',
  x-ms-date:     new Date(Date.now()).toUTCString(),
  x-ms-version:  '2018-06-18',  // 照著填此值即可
}
如此我們就完成 Request Header 了,因為這個範例是 GET 請求,不會有 Request Body,所以我們有了 Endpoint 和 Request Header,就可以來發送請求,我們馬上用以下範例試試看。
以下範例將會讀取一筆我們已經存放入資料庫的資料內容。
const https = require("https");
const crypto = require("crypto");

const db_id = "TestDB";
const coll_id = "Fruits";
const resourceType = "docs";
const resourceLink = `dbs/${db_id}/colls/${coll_id}/docs/fd327d79-fb20-f5ab-fc81-6e28482670b3`;

const masterKey = "填上 Master Key";
const UTC_Date = new Date(Date.now()).toUTCString();
const method = "GET";

const options = {
  host: "yicheng.documents.azure.com",
  port: 443,
  path: `/` + resourceLink,
  method,
  headers: {
    authorization: genAuthHeader(
      method,
      resourceType,
      resourceLink,
      UTC_Date,
      masterKey
    ),
    "x-ms-version": '2018-06-18',
    "x-ms-date": UTC_Date,
    'Accept': 'application/json',
    'Content-Type': 'application/json',
  }
};

function sendRequest() {
  const req = https.request(options, res => {
    console.log(res.statusCode);
    res.on("data", function(data) {
      console.log(data.toString());
    });
  });

  req.on("error", e => {
    console.error(e);
  });

  req.end();
}

sendRequest();

function genAuthHeader(
  verb,
  resourceType,
  resourceId,
  date,
  master_Key
) {
  const key = new Buffer(master_Key, "base64");

  const text =
    (verb || "").toLowerCase() +
    "\n" +
    (resourceType || "").toLowerCase() +
    "\n" +
    (resourceId || "") +
    "\n" +
    date.toLowerCase() +
    "\n" +
    "" +
    "\n";
    const body = new Buffer(text, "utf8");
  const signature = crypto
    .createHmac("sha256", key)
    .update(body)
    .digest("base64");

  const tokenType = "master";
  const TokenVersion = "1.0";
  return encodeURIComponent(
    "type=" + tokenType + "&ver=" + TokenVersion + "&sig=" + signature
  );
}
回傳如下:
各位是否都成功接收到了回傳的資料了呢?接著我們來看看如果是使用 SDK 該如何做。
const cosmos = require('@azure/cosmos');
const CosmosClient = cosmos.CosmosClient;

const endpoint = "https://yicheng.documents.azure.com:443/";
const masterKey = "填上金鑰";
const client = new CosmosClient({ endpoint, auth: { masterKey } });
const databaseDefinition = { id: 'TestDB' };
const collectionDefinition = { id: 'Fruits' };

async function createFruit() {
  const { body } = await client.database(databaseDefinition.id)
  .container(collectionDefinition.id)
  .item('fd327d79-fb20-f5ab-fc81-6e28482670b3').read();
};

createFruit().catch(err => {
  console.error(err);
});
後記:
使用
Cosmos DB的RESTful API其中有很雷的地方是:resourceLink前面不可以有/,筆者先前將resourceLink寫為/dbs...,發送後總是回傳401 Unauthorized,這時非常納悶,後來一直與 SDK 版本的 payload 比對了兩個小時,後來才發現原來resourceLink是前面多了一個/,導致產生的雜湊一直不符合預期,必須要把/換成寫在 host 的前面才可以path: '/' + resourceLink。
參考資料:https://docs.microsoft.com/en-us/rest/api/cosmos-db/restful-interactions-with-cosmosdb-resources


 iThome鐵人賽