大家好,今天跟大家一起學習,如何建立超簡單的線上預約系統。
Step 1. 建立資料表
CREATE TABLE [dbo].[dbmh]
(
    [Id] INT NOT NULL PRIMARY KEY IDENTITY,
    [tname] NVARCHAR(50) NULL,
    [tdept] NVARCHAR(20) NULL,
    [tphome] NVARCHAR(15) NULL,
    [temail] NVARCHAR(100) NULL,
    [rtable4] INT NULL,
    [rdate] DATETIME NULL,
    [rslot] NVARCHAR(15) NULL
)
Step 2. 在Model建立class
加入 using System.ComponentModel.DataAnnotations
 public class AppointmentModel
    {


            [Key]
            [Display(Name = "序號")]
            public string id { get; set; }

            [Display(Name = "教師姓名")]
            public string tname { get; set; }


            [Required]
            [Display(Name = "系所單位")]
            public string tdept { get; set; }

            [Required]
            [Display(Name = "連絡電話")]
            public string tphome { get; set; }

            [Required]
            [Display(Name = "電子郵件")]
            public string temail { get; set; }

            [Required]
            [Display(Name = "預約人數")]
            public string rtable4 { get; set; }


            [Required]
            [Display(Name = "預約日期")]
            public string rdate { get; set; }


            [Required]
            [Display(Name = "預約時段")]
            public string rslot { get; set; }

    }
Step 3. 貼入連線字串到 Webconfig
  <connectionStrings>
    <add name="connect" connectionString="Data Source=(LocalDB)\MSSQLLocalDB;AttachDbFilename=C:\Users\black\source\repos\ithome2\ithome2\App_Data\Database1.mdf;Integrated Security=True" />
    <add name="Database1Entities" connectionString="metadata=res://*/Models.GuestBookModel.csdl|res://*/Models.GuestBookModel.ssdl|res://*/Models.GuestBookModel.msl;provider=System.Data.SqlClient;provider connection string="data source=(LocalDB)\MSSQLLocalDB;attachdbfilename=|DataDirectory|\Database1.mdf;integrated security=True;MultipleActiveResultSets=True;App=EntityFramework"" providerName="System.Data.EntityClient" />
  </connectionStrings>
Step 4. 建立Controller
記得加入
using System.Configuration;
using System.Data.SqlClient;
string strConnString = ConfigurationManager.ConnectionStrings["connect"].ConnectionString;
// GET: Appointment
public ActionResult Index()
{
return View();
}
public ActionResult AddDate() {
return View();
}
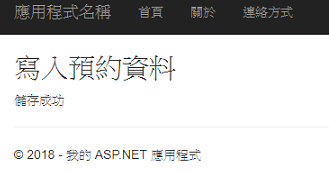
public ActionResult wtea(string tname, string tdept, string tphome, string temail, string rtable4, string rdate, string rslot) {
Save_senddata(tname, tdept, tphome, temail, rtable4, rdate, rslot);
ViewBag.Msg = "儲存成功";
return View();
}
public int Save_senddata(string tname, string tdept, string tphome, string temail, string rtable4, string rdate, string rslot)
{
string strConnString = ConfigurationManager.ConnectionStrings["connect"].ConnectionString;
using (SqlConnection conn = new SqlConnection(strConnString))
{
conn.Open();
SqlCommand scom = new SqlCommand("", conn);
scom.CommandText = @"
insert into [dbo].[dbmh]
(
tname,
tdept,
tphome,
temail,
rtable4,
rdate,
rslot
)
values
(
@tname,
@tdept,
@tphome,
@temail,
@rtable4,
@rdate,
@rslot
)
";
scom.Parameters.AddWithValue("@tname", tname);
scom.Parameters.AddWithValue("@tdept", tdept);
scom.Parameters.AddWithValue("@tphome", tphome);
scom.Parameters.AddWithValue("@temail", temail);
scom.Parameters.AddWithValue("@rtable4", rtable4);
scom.Parameters.AddWithValue("@rdate", rdate);
scom.Parameters.AddWithValue("@rslot", rslot);
int i = scom.ExecuteNonQuery();
scom.Dispose();
scom.Clone();
return i;
}
}
Step 5. 建立View
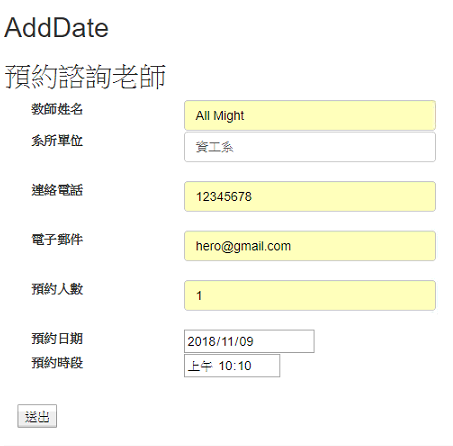
AddData(新增資料)
@{
    ViewBag.Title = "AddDate";
}

    <h2>AddDate</h2>

    @model ithome2.Models.AppointmentModel
    @{
    ViewBag.Title = "新增資料";
    }

    <h2>預約諮詢老師</h2>

    @using (Html.BeginForm("wtea", "Appointment", FormMethod.Post))
    {

    <div class="col-md-12">
        @Html.LabelFor(model => model.tname, htmlAttributes: new { @class = "control-label col-md-2" })
    </div>
    <div class="col-md-12">
        @Html.TextBox("tname", null, new { @class = "form-control" })
    </div>

    <div class="col-md-12">
        @Html.LabelFor(model => model.tdept, htmlAttributes: new { @class = "control-label col-md-2" })
    </div>
    <div class="col-md-12">
        @Html.TextBox("tdept", null, new { @class = "form-control" })
    </div>
    <br />


    <div class="col-md-12">
        @Html.LabelFor(model => model.tphome, htmlAttributes: new { @class = "control-label col-md-2" })
    </div>
    <div class="col-md-12">
        @Html.TextBox("tphome", null, new { @class = "form-control" })
    </div>
    <br />

    <div class="col-md-12">
        @Html.LabelFor(model => model.temail, htmlAttributes: new { @class = "control-label col-md-2" })
    </div>
    <div class="col-md-12">
        @Html.TextBox("temail", null, new { @class = "form-control" })
    </div>
    <br />

    <div class="col-md-12">
        @Html.LabelFor(model => model.rtable4, htmlAttributes: new { @class = "control-label col-md-2" })
    </div>
    <div class="col-md-12">
        @Html.TextBox("rtable4", null, new { @class = "form-control" })
    </div>
    <br />


    <div class="col-md-12">
        @Html.LabelFor(model => model.rdate, htmlAttributes: new { @class = "control-label col-md-2" })
    </div>
    <div class="col-md-12">
        <input type="date" name="rdate">
    </div>


    <div class="col-md-12">
        @Html.LabelFor(model => model.rslot, htmlAttributes: new { @class = "control-label col-md-2" })
    </div>
    <div class="col-md-12">
        <input type="time" name="rslot">
    </div>

    <br />


    <p></p>
    <div class="col-md-12">
        <input type="submit" value="送出" />
    </div>
    }
wtea (寫入資料)
    @{
        ViewBag.Title = "wtea";
    }

    <h2>寫入預約資料</h2>

    @ViewBag.Msg
成功畫面: