
這次要來完成上方篩選的細節
上次只有實作簡單版的collectionView
但要仔細觀察他每個字其實都有自適應寬度自適應在很多地方都用得到
今天就來研究 Swfit 自適應寬度
要控制cell大小除了之前有提過的
layout.itemSize = CGSize(width: 100, height: 30)
要做更詳細的控制每個index row
可以使用collectionViewLayout做控制
回傳CGSize改變每一個cell
func collectionView(_ collectionView: UICollectionView, layout collectionViewLayout: UICollectionViewLayout, sizeForItemAt indexPath: IndexPath) -> CGSize{
	var cellSize = CGSize()
	return cellSize
}
這裡很重要*3
這不像是OC直接將func打好就可以控制
記得宣告頂部的UICollectionViewDelegateFlowLayout
才可以雙劍合併 你的cell才會改變
如果下沒作動記得看一下有沒有宣告
class HomeViewController: UICollectionViewDelegateFlowLayout
我這邊將上面分類的文字都先用一個陣列儲存好
畢竟沒api直接寫死就可以了
var filterTitleArr: Array<String> = []

filterTitleArr = ["分類", "價格範圍", "外送費上限", "飲食限制"]
這邊開始就可以注意到
他的篩選有五個文字
並且有長有短
所以我們需要幫他們各自測量大小
這邊有一個func可以讓你帶入 font以及maxSize
自動回傳最大的高度以及長度
// MARK: - Custom Methods
func textSize(text : String , font : UIFont , maxSize : CGSize) -> CGSize{
    return text.boundingRect(with: maxSize, options: [.usesLineFragmentOrigin], attributes: [NSAttributedString.Key.font : font], context: nil).size
}
接下來回去剛剛的collectionViewLayout
將func加入到裡面
並且把該填入的質都帶進去
func collectionView(_ collectionView: UICollectionView, layout collectionViewLayout: UICollectionViewLayout, sizeForItemAt indexPath: IndexPath) -> CGSize {
    var cellSize = CGSize()
    let textFont = UIFont.systemFont(ofSize: 17)
    let textString = filterTitleArr[indexPath.item]
    let textMaxSize = CGSize(width: 240, height: CGFloat(MAXFLOAT))
    let textLabelSize = self.textSize(text:textString , font: textFont, maxSize: textMaxSize)

    //+40 是右方icon寬度 + 其他設定
    //如果你是單純文字的話不用加
    cellSize.width = textLabelSize.width + 40

	//高度固定
    cellSize.height = 30
    return cellSize
}
cellForItemAtindexPath 裡面記得把剛剛的文字也放進去
func collectionView(_ collectionView: UICollectionView, cellForItemAt indexPath: IndexPath) -> UICollectionViewCell {
	let cell:HomeCell = collectionView.dequeueReusableCell(withReuseIdentifier: "myCell", for: indexPath)
    as! HomeCell
    //文字
	cell.textLabel.text = filterTitleArr[indexPath.item]
    //圖片
    cell.iconImg?.image = UIImage.init(named: "down")

}
簡單Demo
看起來好像可以了
但是前方好像還有一個設定icon
跟大家特別不一致沒label 圖片大小也不同
原APP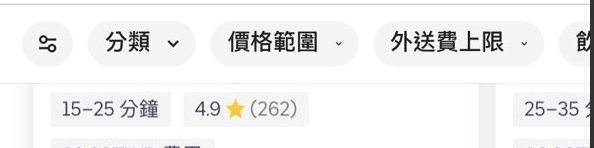
我在想說要不要乾脆count直接+1
在index item == 0的地方直接addSubView
感覺好像可以 來實做看看
第一個按鈕是正圓形
所以將其設定為正方形即可
剩餘不變
func collectionView(_ collectionView: UICollectionView, layout collectionViewLayout: UICollectionViewLayout, sizeForItemAt indexPath: IndexPath) -> CGSize {
    var cellSize = CGSize()
    if indexPath.item == 0 {
        cellSize.width = 30
    }else{
        let textFont = UIFont.systemFont(ofSize: 17)
        let textString = filterTitleArr[indexPath.item - 1]
        let textMaxSize = CGSize(width: 240, height: CGFloat(MAXFLOAT))
        let textLabelSize = self.textSize(text:textString , font: textFont, maxSize: textMaxSize)
        cellSize.width = textLabelSize.width + 40
    }
    cellSize.height = 30
    return cellSize
}
count 比剛剛還多1
為了放置前方icon
func collectionView(_ collectionView: UICollectionView, numberOfItemsInSection section: Int) -> Int {
	return 5
}
這裡的想法是直接接之前的文字Label 跟 icom 都隱藏
並且加入單純的設定icon
func collectionView(_ collectionView: UICollectionView, cellForItemAt indexPath: IndexPath) -> UICollectionViewCell {
    let cell:HomeCell = collectionView.dequeueReusableCell(withReuseIdentifier: "myCell", for: indexPath)
        as! HomeCell

    cell.backgroundColor = UIColor.init(red: 0.2, green: 0.2, blue: 0.2, alpha: 0.1)
    cell.clipsToBounds = true
    cell.layer.cornerRadius = cell.frame.height/2

    if indexPath.item == 0 {
        cell.textLabel.isHidden = true
        cell.iconImg.isHidden = true

        let titleImg = UIImageView()
        titleImg.frame = CGRect.init(x: cell.frame.width*0.3, y: cell.frame.height*0.3, width: cell.frame.width*0.4, height: cell.frame.height*0.4)
        titleImg.image = UIImage.init(named: "settings")
        cell.addSubview(titleImg)

    }else{
        cell.textLabel.isHidden = false
        cell.iconImg.isHidden = false

        cell.textLabel.text = filterTitleArr[indexPath.item - 1]
        cell.iconImg?.image = UIImage.init(named: "down")
    }

    return cell
}
Demo
哇 是不是完成了
看似美好 我就在想
這樣會不會他每次都add一個image出來
越想越不對
立刻把 titleImg.alpha = 0.1
這樣如果重複新增的話會越來越深
結果果然越變越深
這樣會造成我的記憶體爆掉
不太行

決定把原來的客製化HomeCell做修改
使用Stack View把他們三個選成一個群組
原先
新增stackView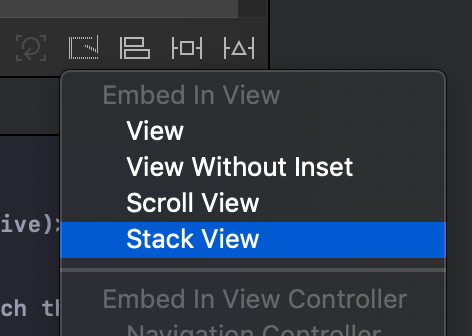
將三個元件新增進來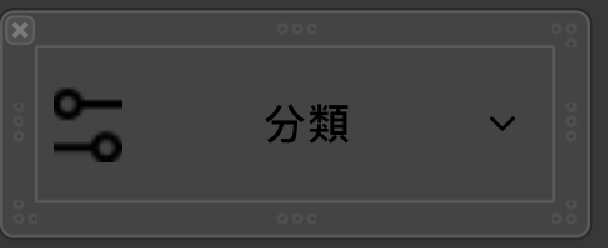
並且把 title icon 固定 1:1比例尺新增進去
再來使用Hidden 來控制是否要出現Stack View的好處就是會像Android的gone一樣Hidden時位置也會消失
不會留空白在原地
func collectionView(_ collectionView: UICollectionView, cellForItemAt indexPath: IndexPath) -> UICollectionViewCell {
    let cell:HomeCell = collectionView.dequeueReusableCell(withReuseIdentifier: "myCell", for: indexPath)
        as! HomeCell

    cell.backgroundColor = UIColor.init(red: 0.2, green: 0.2, blue: 0.2, alpha: 0.1)
    cell.clipsToBounds = true
    cell.layer.cornerRadius = cell.frame.height/2

    if indexPath.item == 0 {
        cell.textLabel.isHidden = true
        cell.iconImg.isHidden = true
        cell.titleImg.isHidden = false
    }else{
        cell.textLabel.isHidden = false
        cell.iconImg.isHidden = false
        cell.titleImg.isHidden = true
        cell.textLabel.text = filterTitleArr[indexPath.item - 1]
    }

    return cell
}
Demo
大功告成
