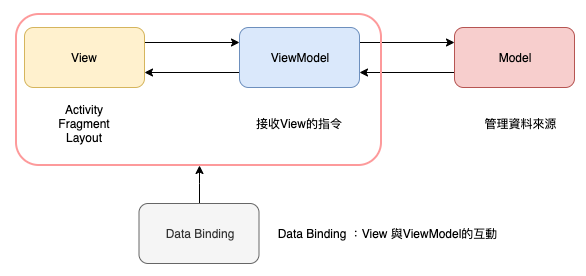
接著要介紹的是MVVM,MVVM是Model、View、ViewModel的簡稱。
Model :
負責管理資料來源。這裡的Model,不單指Data model,包含取得、更新等操作,例如Web API、SharedPreference等資料來源。
View:
指的是Activity、Fragment、res/layout裡xml,這些都屬於View。View只處理顯示UI及與使用者互動。
ViewModel:
在View與Model中間,接收View的請求並從Model取得資料。View只處理商業邏輯與資料相關的事,這些資料會使用DataBinding的技術自動綁定至UI。ViewModel不會持有任何的UI實體,這跟Presenter就不一樣了。

MVVM 線上課程!
我開設了一門教MVP、MVVM 架構的線上課程,搭配Android Architecture Components。
Android 架構設計 | 用 Architecture Components 打造易維護、可測試的App
在實踐MVVM的時,我們會搭配DataBinding來一起介紹,DataBinding 是一種實現ViewModel與View 協作的方式。所以MVVM是一種架構,而DataBinding則是UI與資料綁定的一種方式。
以往我們在做資料繫結時,會在Activity 使用findViewById取得UI元件,再將資料繫結在畫面上。DtatBinding則是使用聲明式的方式讓UI綁定到資料來源,而不是寫程式去取得UI元件再給值。
你可以透過@{}的語法,讓Layout上的元件指定到一個資料來源。
<TextView
    android:text="@{viewmodel.userName}" />
使用DataBinding,首先在build.gradle 裡增加
android {
    ...
    dataBinding {
        enabled = true
    }
}
apply plugin: "kotlin-kapt"
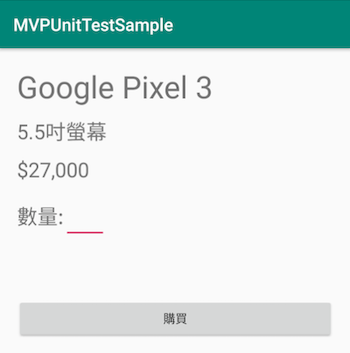
與MVP一樣,我們用這個顯示商品明細的畫面來做範例。上面的資料是跟Repository取得商品資料(商品名稱、螢幕大小、售價)。
步驟:
步驟1:建立Model
先建一個Model,這個Model是我們要用來做資料繫結的,也就是UI要用的Data Model。
class ProductViewModel() {
    var productName: ObservableField<String> = ObservableField("")
    var productDesc: ObservableField<String> = ObservableField("")
    var productPrice: ObservableField<Int> = ObservableField(0)
    var productItems: ObservableField<String> = ObservableField("")
}
步驟2:在Layout 裡使用Model
在activity_main.xml 裡
在最外層加入一個layout標籤為根節點。layout裡面再放一個data,這裡的<data>裡就是要來放用來Binding的DataModel
<?xml version="1.0" encoding="utf-8"?>
<layout xmlns:android="http://schemas.android.com/apk/res/android" xmlns:tools="http://schemas.android.com/tools"
        xmlns:app="http://schemas.android.com/apk/res-auto">
    <data>

    </data>
    <android.support.constraint.ConstraintLayout
            android:layout_width="match_parent"
            android:layout_height="match_parent"
            tools:context=".MainActivity">

    </android.support.constraint.ConstraintLayout>
</layout>
在data裡加入variable,讓我們可以在xml裡使用ProductViewModel
<data>
    <variable
        name="productViewModel"
        type="evan.chen.tutorial.mvvmdatabindingsample.ProductViewModel"/>
</data>
使用@{productViewModel.屬性} 來取得Model的值
<TextView
        android:layout_width="wrap_content"
        android:layout_height="wrap_content"
        android:textSize="36sp"
        android:text="@{productViewModel.productName}"/>
<TextView
        android:layout_width="wrap_content"
        android:layout_height="wrap_content"
        android:layout_marginTop="12dp"
        android:textSize="24sp"
        android:text="@{productViewModel.productDesc}"/>
最後,在Activity加上binding,並給予初始值
程式碼的ActivityProductBinding 是data binding從activity_product.xml 自動產生的類別。 ActivityProductBinding
class ProductActivity : AppCompatActivity() {

    private val productId = "pixel3"

    override fun onCreate(savedInstanceState: Bundle?) {
        super.onCreate(savedInstanceState)
        setContentView(R.layout.activity_product)

        val dataBinding = DataBindingUtil.setContentView<ActivityProductBinding>(this, R.layout.activity_product)

        val productAPI = ProductAPI()
        val productRepository = ProductRepository(productAPI)

        val productViewModel = ProductViewModel(productRepository)

        dataBinding.productViewModel = productViewModel

        //加這一段就可以讓model有變就更新回UI
        dataBinding.lifecycleOwner = this

        productViewModel.getProduct(productId)
    }
}
執行App,我們就可以看到資料被繫結在畫面了,已經不需要額外使用setText。也就是你在Activity不需要取得Textview、EditText的元件了。
到目前為止我們完成了紅色箭頭這個部分,從ViewModel把資料繫結到View
接著要來完成另外一個箭頭,也就要當View有異動時,也要同步到Model。
接著我們希望,當購買數量變更時,下面同時會顯示你購買了幾份
只需要在TextView的text寫上"@{productViewModel.productItems}"
代表著EditText的text有變化時,productViewModel.productItems會更著變,TextView的TextView也會更著異動。
<TextView
        android:layout_width="wrap_content"
        android:layout_height="wrap_content"
        android:layout_marginTop="12dp"
        android:textSize="24sp"
        android:layout_gravity=“start"
        android:text="@{productViewModel.productItems}"/>
最後按下購買的事件綁定,在onClick寫下@{() -> productViewModel.buy()},代表呼叫ProductViewModel的buy方法。
<Button android:layout_width="match_parent"
        android:layout_height="wrap_content"
        android:layout_marginTop="24dp"
        android:padding="10dp"
        android:layout_gravity="center"
        android:onClick="@{() -> productViewModel.buy()}"
        android:text="購買"
fun buy() {
    println("buy")
}
範例下載:
https://github.com/evanchen76/mvvmdatabindingsample
參考:
https://developer.android.com/topic/libraries/data-binding
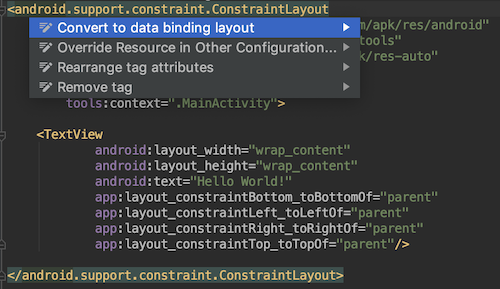
小技巧:
將Layout 轉為DataBinding的Lalyout。option + enter,Convert to data binding layout
下一篇將繼續介紹MVVM的 ViewModel與LiveData。
出版書:
Android TDD 測試驅動開發:從 UnitTest、TDD 到 DevOps 實踐
線上課程:
Android 架構設計 | 用 Architecture Components 打造易維護、可測試的App
3堂組合:Android 架構設計 + 動畫入門到進階 + UI 進階實戰


 iThome鐵人賽