上篇的部分:AWS的基礎設置、創建k8s的控制介面(Yesterday)
下篇的部分:kubectl的安裝與設置、登入EC2的工作節點(Today)
昨天我們看了上篇,今天我們延續上篇的內容,開始介紹下篇的部分,沒看過上篇的朋友,務必先看過。
這個部分是要將你用的電腦下載kubectl這個套件,並綁定AWS的服務,我們接續著昨天的設定繼續操作。
實務上基本你也不會把minikube的環境和AWS的集群環境混在一起,當初的設計就是先在minikube群集測試,如果沒有問題再上AWS測試,不過在整個流程中還是有些部分可以優化,你可以透過Drone CI/CD的流程去簡化你在Docker內開發、打包、部署等等的工作。
理想的情況下,是把minikube設置在本地電腦,而AWS群集是在區網內的另外一台電腦可見、可操作,提供一個小型的集成開發環境。
對於不太熟悉虛擬機和一般作業系統差異的朋友,可以參考:第二天的內容
因為筆者之前在mac OS的機器上已經裝了minikube,為了保證環境的隔離性,就另外裝了VirtualBox,並在裡面新增了Ubuntu的環境,因此接下來的操作,都是在該環境內進行的,請特別留意。
我們不會透過這個圖形介面操作,因為在mac環境的指令要貼過去很麻煩,所以我們會換個做法:
底下示範操作:
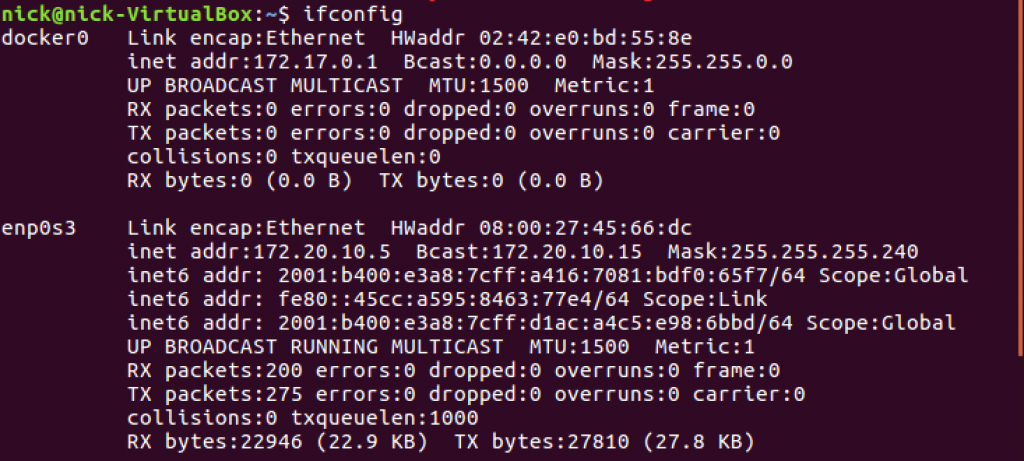
可以注意到ip是172.20.10.5,而網路介面是enp0s3
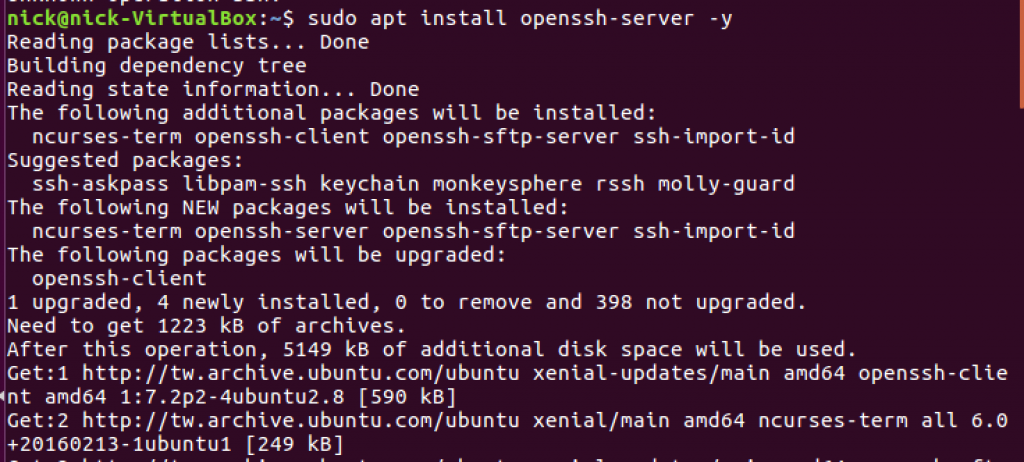

OK,確認無誤,我們先把Ubuntu關掉

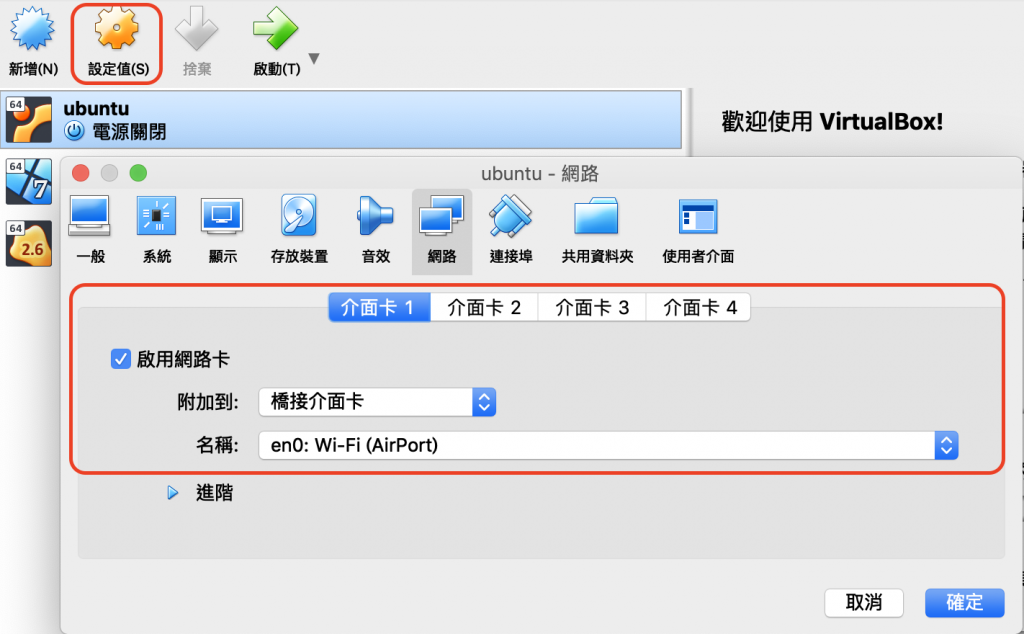
網卡一:
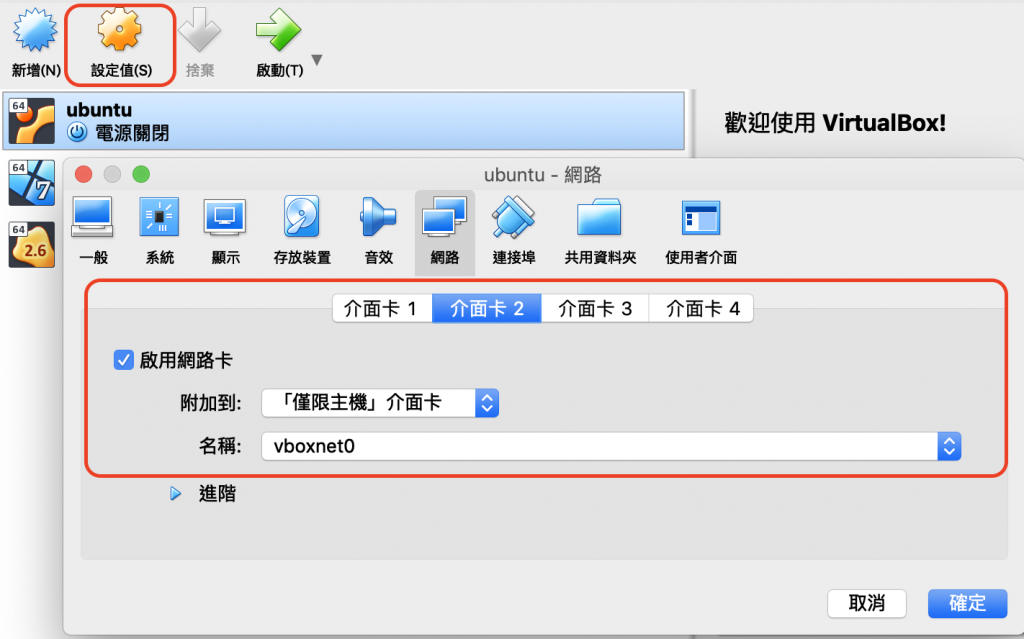
網卡二:
接著啟動VirtualBox,直接把那個畫面縮小
我們從命令列登入
$ssh nick@192.168.99.100
nick@192.168.99.100's password:
Welcome to Ubuntu 16.04.5 LTS (GNU/Linux 4.15.0-42-generic x86_64)

 * Documentation:  https://help.ubuntu.com
 * Management:     https://landscape.canonical.com
 * Support:        https://ubuntu.com/advantage

407 packages can be updated.
283 updates are security updates.

New release '18.04.2 LTS' available.
Run 'do-release-upgrade' to upgrade to it.

Last login: Sun Oct  6 15:32:38 2019 from 192.168.99.1
nick@nick-VirtualBox:~$
OK,可以用了,相信有人注意到這個IP是跟minikube的ip是一樣的,這個IP是可以改的,設定靜態IP,可以參考這裡
以下皆是在虛擬機的ubuntu操作喔!
接著就要延續上個章節的內容了,我們這邊要:
$curl -o kubectl https://amazon-eks.s3-us-west-2.amazonaws.com/1.13.8/2019-08-14/bin/linux/amd64/kubectl
  % Total    % Received % Xferd  Average Speed   Time    Time     Time  Current
                                 Dload  Upload   Total   Spent    Left  Speed
 16 37.3M   16 6383k    0     0   475k      0  0:01:20  0:00:13  0:01:07  550k
這會花點時間,取決於網路速度,我們等它一下,好了進到下一步
$chmod +x ./kubectl
$ll kubectl
-rwxrwxr-x 1 nick nick 39202272  十   6 15:59 kubectl*
$mkdir -p $HOME/bin && cp ./kubectl $HOME/bin/kubectl && export PATH=$HOME/bin:$PATH
$echo 'export PATH=$HOME/bin:$PATH' >> ~/.bashrc
$kubectl version --short --client
Client Version: v1.13.11-eks-5876d6
$curl -o aws-iam-authenticator https://amazon-eks.s3-us-west-2.amazonaws.com/1.13.8/2019-08-14/bin/linux/amd64/aws-iam-authenticator
  % Total    % Received % Xferd  Average Speed   Time    Time     Time  Current
                                 Dload  Upload   Total   Spent    Left  Speed
 49 17.7M   49 8958k    0     0   487k      0  0:00:37  0:00:18  0:00:19 1415k
$chmod +x ./aws-iam-authenticator
$mkdir -p $HOME/bin && cp ./aws-iam-authenticator $HOME/bin/aws-iam-authenticator && export PATH=$HOME/bin:$PATH
#$echo 'export PATH=$HOME/bin:$PATH' >> ~/.bashrc
$aws-iam-authenticator help
A tool to authenticate to Kubernetes using AWS IAM credentials

Usage:
  aws-iam-authenticator [command]

Available Commands:
  help        Help about any command
  init        Pre-generate certificate, private key, and kubeconfig files for the server.
  server      Run a webhook validation server suitable that validates tokens using AWS IAM
  token       Authenticate using AWS IAM and get token for Kubernetes
  verify      Verify a token for debugging purpose
  version     Version will output the current build information

Flags:
  -i, --cluster-id ID       Specify the cluster ID, a unique-per-cluster identifier for your aws-iam-authenticator installation.
  -c, --config filename     Load configuration from filename
  -h, --help                help for aws-iam-authenticator
  -l, --log-format string   Specify log format to use when logging to stderr [text or json] (default "text")

Use "aws-iam-authenticator [command] --help" for more information about a command.
這邊我們透過剛安裝的authenticator去驗證,###的部分在之前下載的accessKeys.csv裡面
$vim ~/.aws/credentials
[default]
aws_access_key_id=###
aws_secret_access_key=###
region=ap-southeast-1
output=json
接著使用這個檔案透過API取得Token
$aws-iam-authenticator token -i EKS-cluster |python -m json.tool
{
    "apiVersion": "client.authentication.k8s.io/v1alpha1",
    "kind": "ExecCredential",
    "spec": {},
    "status": {
        "expirationTimestamp": "2019-10-06T09:34:49Z",
        "token": "k8s-aws-v1.aHR0cHM6Ly9zdHMuYW1hem9uYXdzLmNvbS8_QWN0aW9uPUdldENhbGxlcklkZW50aXR5JlZlcnNpb249MjAxMS0wNi0xNSZYLUFtei1BbGdvcml0aG09QVdTNC1ITUFDLVNIQTI1NiZYLUFtei1DcmVkZW50aWFsPUFLSUE2UTZHMjNXWjJCM1BESDdNJTJGMjAxOTEwMDYlMkZ1cy1lYXN0LTElMkZzdHMlMkZhd3M0X3JlcXVlc3QmWC1BbXotRGF0ZT0yMDE5MTAwNlQwOTIwNDlaJlgtQW16LUV4cGlyZXM9MCZYLUFtei1TaWduZWRIZWFkZXJzPWhvc3QlM0J4LWs4cy1hd3MtaWQmWC1BbXotU2lnbmF0dXJlPWE0NWI3ZWIxMzZmYzQwNzE5YzAzZjY5OTllNmE2NjRmNjNkYmEzYzBjNTA3MDRhOGM5NjgwOTAwODY1YjYyM2Y"
    }
}
至少要1.16.156以上的版本,下面要設置會比較容易~
$pip3 install awscli --upgrade --user
$aws --version
aws-cli/1.16.253 Python/3.5.2 Linux/4.15.0-42-generic botocore/1.12.243
驗證eks-cluster的設置
$aws eks describe-cluster --name eks-cluster
將<>範圍的字串用EKS上的cluster對應資訊抽換掉
$vim ~/.kube/config-eks
apiVersion: v1
clusters:
- cluster:
    server: <API server endpoint>
    certificate-authority-data: <Certificate authority>
  name: kubernetes
contexts:
- context:
    cluster: kubernetes
    user: aws
  name: aws
current-context: aws
kind: Config
preferences: {}
users:
- name: aws
  user:
    exec:
      apiVersion: client.authentication.k8s.io/v1alpha1
      command: aws-iam-authenticator
      args:
        - "token"
        - "-i"
        - "eks-cluster"
        # - "-r"
        # - "<role-arn>"
      # env:
        # - name: AWS_PROFILE
        #   value: "<aws-profile>"
好了之後,檢查下
$kubectl get svc
NAME             TYPE        CLUSTER-IP   EXTERNAL-IP   PORT(S)   AGE
svc/kubernetes   ClusterIP   10.100.0.1   <none>        443/TCP   1m
OK,設置到這邊就結束囉!我們看一個Topic~
前一段我們已經把集群架設起來了,接著我們要做的事,就是要把Work Node加到集群中。
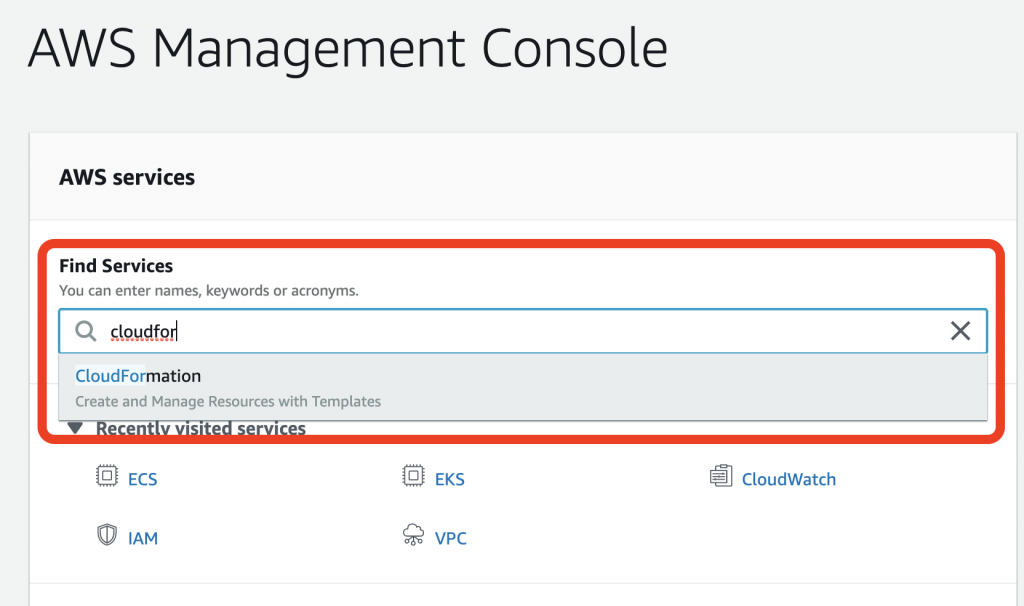
先回到AWS Management Console,進到CloudFormation
接著新增一個Stack,這個Stack是Node Group
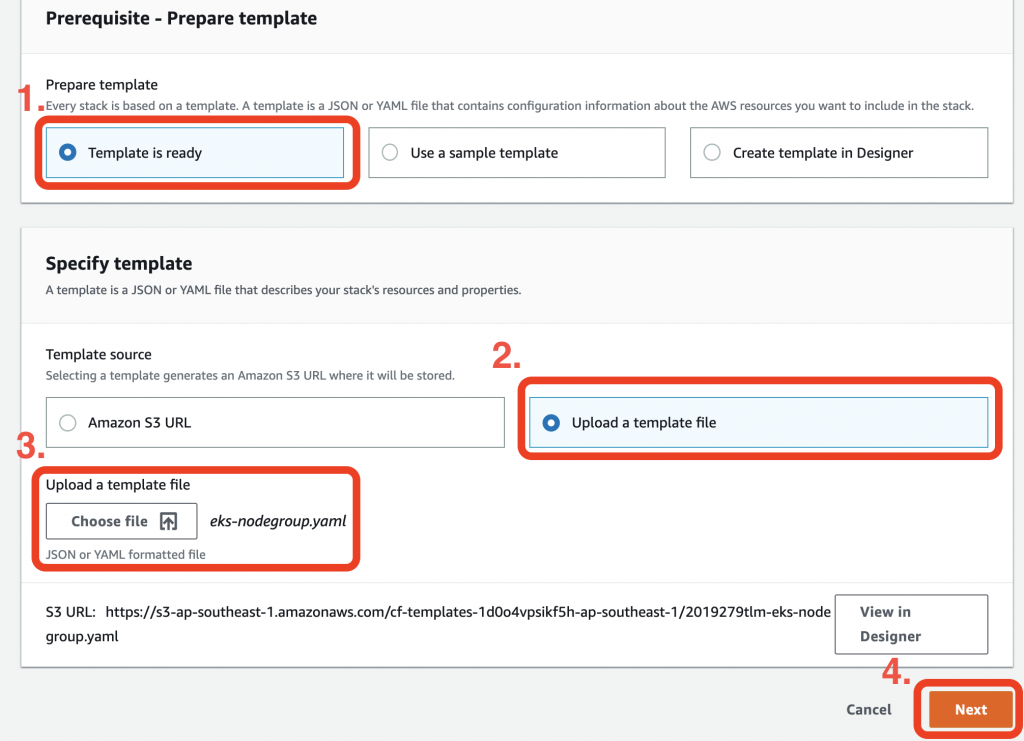
其中的eks-nodegroup.yaml可以從這裡下載
再來是一些其他參數的設定
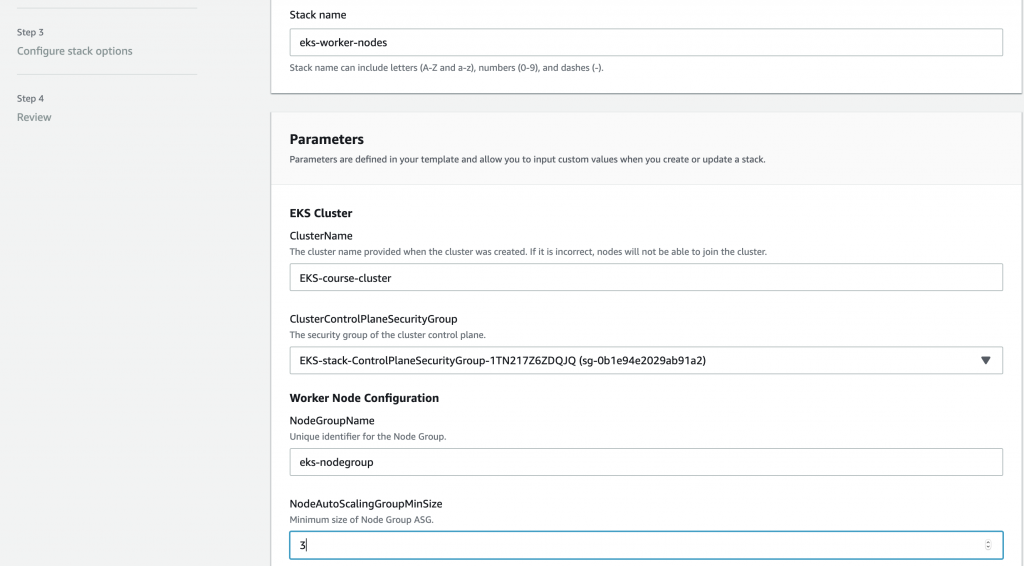
注意到AMI的部分,這個需要最佳化設定,參考這裡
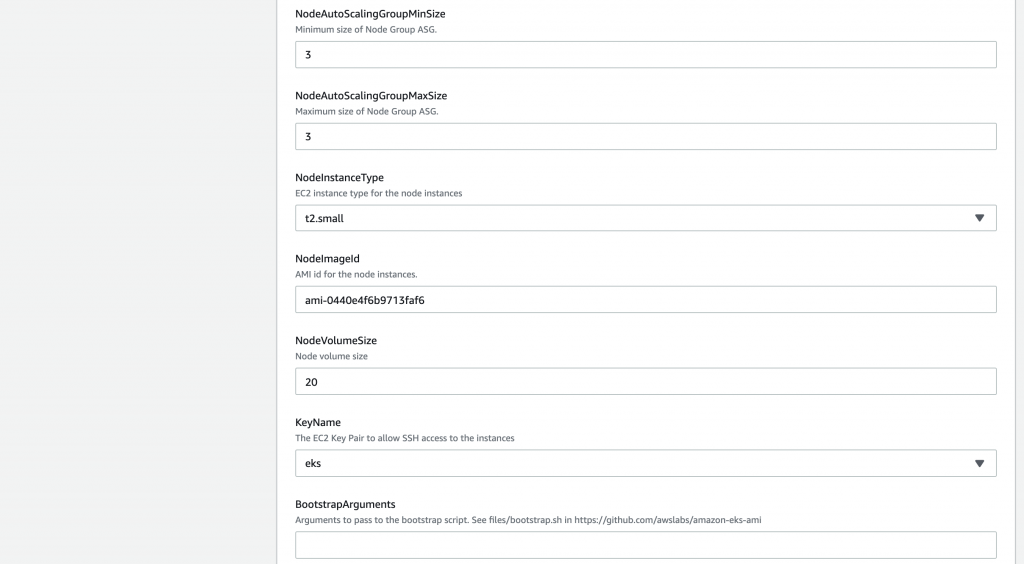
三個Subnet都要放上去
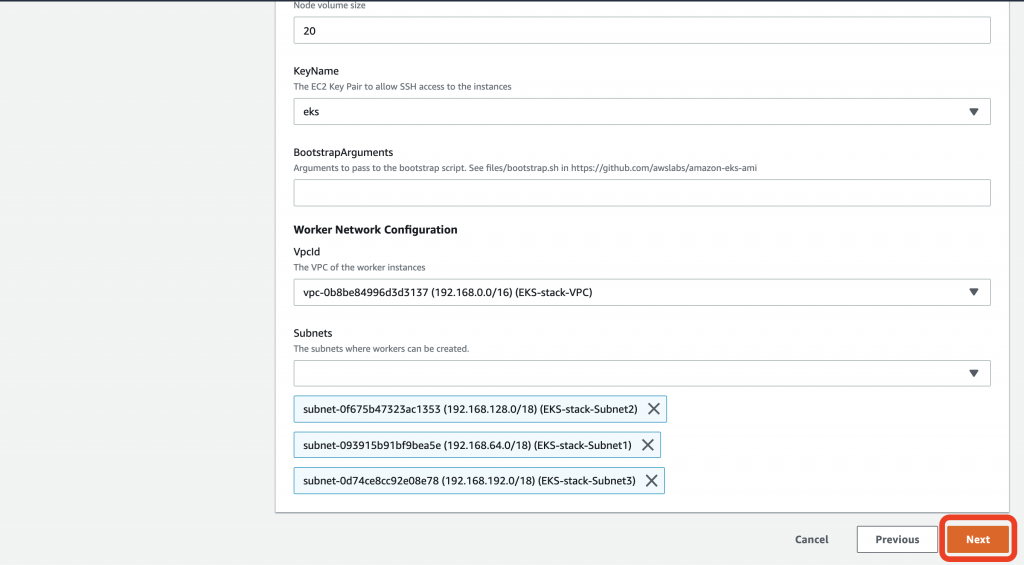
大致這樣,好了下一步,按Next
後面只是總覽,不用改,直接Create Stack就好

要稍等一下,好了之後我們去看一下EC2,那邊會有三台機器開起來

我們到Security Group那邊的NodeGroup去加個SSH的設置
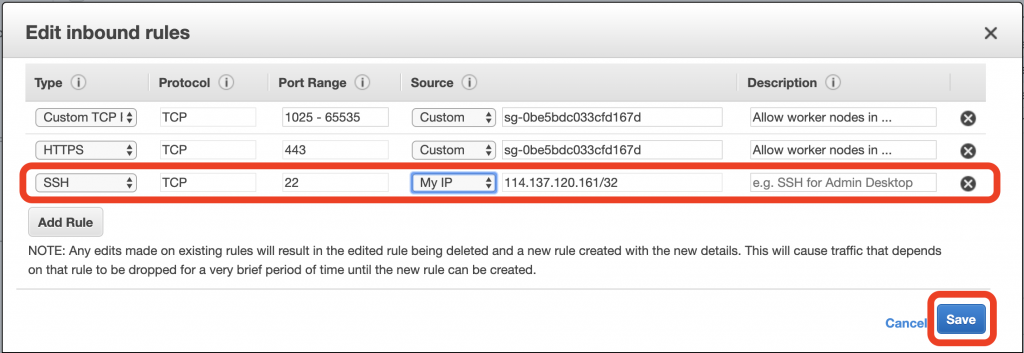
檢查Instance的IP
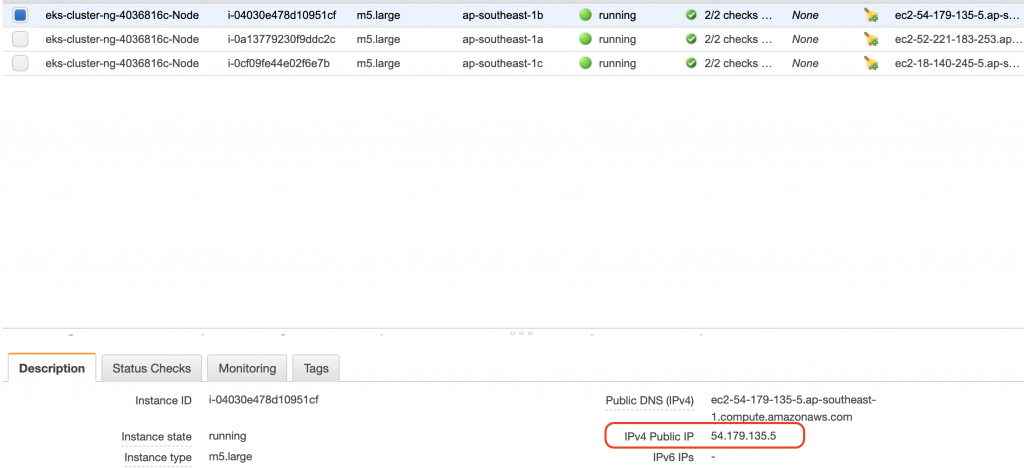
這樣的話,就能利用前面的eks.pem連進去囉
$ssh -i ~/.ssh/eks.pem ec2-user@54.179.135.5
我們檢查下節點狀態
$kubectl get no
No resources found
看樣子還沒結束,要在k8s集群裡面改ConfigMap才能確保節點順利加入
$vim aws-auth.yaml
apiVersion: v1
kind: ConfigMap
metadata:
  name: aws-auth
  namespace: kube-system
data:
  mapRoles: |
    - rolearn: <role-arn-from-previous-step>
      username: system:node:{{EC2PrivateDNSName}}
      groups:
        - system:bootstrappers
        - system:nodes
其中role-arn-from-previous-step要換成下方反白內容
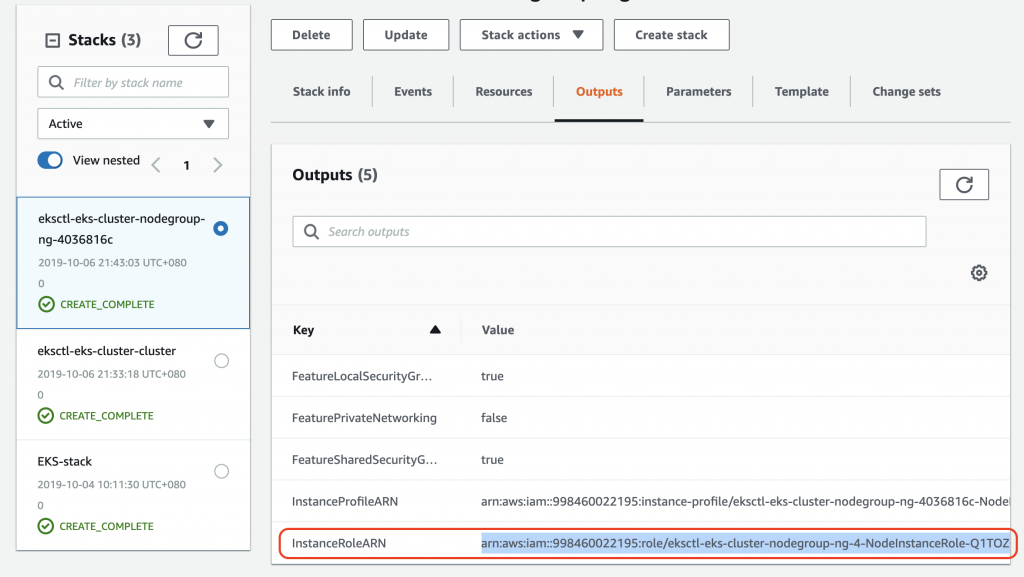
好了apply一下,官方有說這個檔案的其他內容最好不要亂動
$kubectl apply -f aws-auth.yaml
configmap "aws-auth" configured
最後我們可以看到集群的節點狀態
$kubectl get no
NAME                                                STATUS   ROLES    AGE   VERSION
ip-192-168-4-101.ap-southeast-1.compute.internal    Ready    <none>   10m   v1.13.8-eks-cd3eb0
ip-192-168-54-227.ap-southeast-1.compute.internal   Ready    <none>   10m   v1.13.8-eks-cd3eb0
ip-192-168-77-210.ap-southeast-1.compute.internal   Ready    <none>   10m   v1.13.8-eks-cd3eb0
OK,雲端AWS的集群設置完畢了!
如果你覺得這樣設置實在累到爆,筆者傳授必殺技給你
我們其實可以直接利用eksctl設置,讓我們感受一下
$curl --silent --location "https://github.com/weaveworks/eksctl/releases/download/latest_release/eksctl_$(uname -s)_amd64.tar.gz" | tar xz -C /tmp
$sudo mv /tmp/eksctl /usr/local/bin
$eksctl version
[ℹ]  version.Info{BuiltAt:"", GitCommit:"", GitTag:"0.6.0"}
創建一個新群集,名稱是eks-cluster,3個節點,使用新加坡的網域
$eksctl create cluster --name=eks-cluster --nodes=3 --region=ap-southeast-1
這會花一點時間,大概要20分左右
前面不提的原因是,如果一開始就這樣設置了,那麼發生問題的時候,因為AWS元件熟練度不足,會要花更多時間排錯^_^
今天我們看到了雲端AWS集群的架設方式,下卷結束了,整體來說介紹應該算蠻完整的,我們也學習到了eksctl初步的使用,它可以讓我們快速的架設群集,跟Kops速度上感覺差不多,當然目前感覺Kops的控制項還是比較多的,明天開始會在雲端的群集操作了,我們可以開始看到雲端EKS和區網minikube的不同,加油!明天見了!
本文同步刊載於https://github.com/x1y2z3456/ironman
感謝您撥冗閱讀此文章,不喜勿噴,有任何問題建議歡迎下方留言:)
說個笑話,希望我能寫滿30天啊(笑
