iT邦幫忙

第 11 屆 iThome 鐵人賽

DAY 24
1

安裝

  1. 安裝套件
pipenv install scrapy
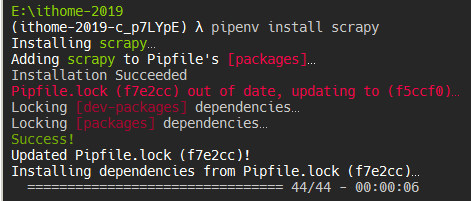
https://ithelp.ithome.com.tw/upload/images/20191008/20107875g9yNnYcKP0.png

曾經在安裝的時候遇到 Twisted 一直安裝失敗,無法透過 pip 安裝。如果有遇到的讀者,可以在這邊下載對應版本的 .tar.gz 檔案來手動安裝。

  1. 驗證安裝
scrapy shell

https://ithelp.ithome.com.tw/upload/images/20191008/20107875S9wla4Une3.png)

如果遇到錯誤 ModuleNotFoundError: No module named 'win32api',需要另外安裝套件:pipenv install pywin32

初始化爬蟲專案

Scrapy 有提供 CLI 來進行管理,建立爬蟲專案時,需要使用 startproject 這個指令。

https://ithelp.ithome.com.tw/upload/images/20191008/20107875FZATYhpxLZ.png

建立 Scrapy 專案後,會多出一個 <project-name> 目錄。
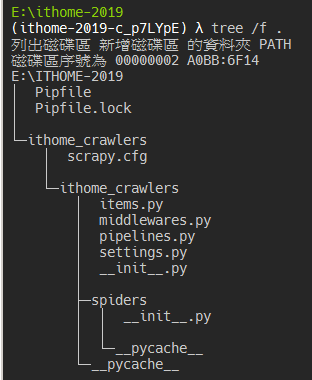
https://ithelp.ithome.com.tw/upload/images/20191008/20107875mq0ELDjDpC.png

建立爬蟲

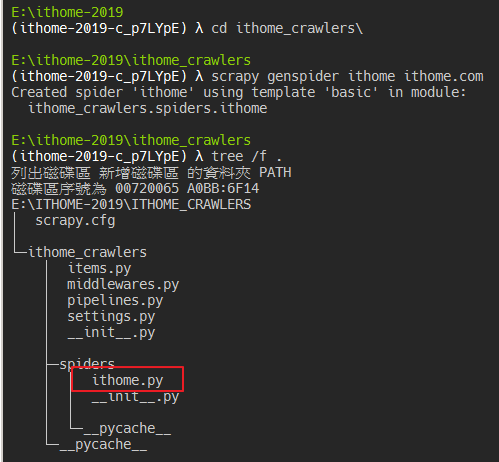
進入專案目錄後,可以用 genspider 指令來建立一個新的爬蟲。

https://ithelp.ithome.com.tw/upload/images/20191008/20107875s8Jyy3nNEp.png

執行後可以看到 spiders 目錄下多了一個 ithome.py 檔案,包含一個 scrapy.Spider 的類別,之後爬蟲的邏輯就會寫在這邊。


明天會介紹爬蟲類別中的屬性和方法,專案目錄中還有其他檔案,未來幾天也會陸續介紹到喔~

參考資料


上一篇
【Day 22】Scrapy 簡介
下一篇
【Day 24】第一個 Scrapy 爬蟲
系列文
爬蟲在手、資料我有 - 30 天 Scrapy 爬蟲實戰33
圖片
  直播研討會
圖片
{{ item.channelVendor }} {{ item.webinarstarted }} |
{{ formatDate(item.duration) }}
直播中

尚未有邦友留言

立即登入留言