昨天我們已經將進階篇的延伸做了一個結束,那麼今天我們要開始來看看管理篇的內容,比較一下在AWS上的操作與minikube有何差異。
管理篇的部分與進階篇相同,分為上下兩篇,我們將會把之前運用在minikube的設定套用到AWS的群集上。
管理篇(上):服務、監控(今天)
管理篇(下):資源控制、虛擬集群、使用者管理、RBAC(明天)
複習傳送門:
本節說明如何在EKS上使用k8s的Service,整體使用到了Service、Deployment、ReplicaSet、Pod、ELB等元件。
這是一個簡易的管理方式應用,我們直接看個例子:開啟一個有Load Balancer的Service
$kubectl run nginx --image=nginx --port 80
deployment.apps "nginx" created
$kubectl get all
NAME                         READY   STATUS    RESTARTS   AGE
pod/nginx-57867cc648-rkdt6   1/1     Running   0          7s

NAME                 TYPE        CLUSTER-IP   EXTERNAL-IP   PORT(S)   AGE
service/kubernetes   ClusterIP   10.100.0.1   <none>        443/TCP   4h53m

NAME                    READY   UP-TO-DATE   AVAILABLE   AGE
deployment.apps/nginx   1/1     1            1           8s

NAME                               DESIRED   CURRENT   READY   AGE
replicaset.apps/nginx-57867cc648   1         1         1       8s
$kubectl port-forward deployment/nginx 8080:80
Forwarding from 127.0.0.1:8080 -> 80
Forwarding from [::1]:8080 -> 80
$kubectl scale deploy/nginx --replicas=4
deployment.extensions/nginx scaled
$kubectl get po
NAME                     READY   STATUS              RESTARTS   AGE
nginx-57867cc648-rkdt6   1/1     Running             0          74s
nginx-57867cc648-tlvfn   0/1     ContainerCreating   0          3s
nginx-57867cc648-vbcbr   0/1     ContainerCreating   0          3s
nginx-57867cc648-zklj2   0/1     ContainerCreating   0          3s
$kubectl expose deploy/nginx --port 80 --target-port 80 --type LoadBalancer
service/nginx exposed
可以發現到:
a81124d1de99711e9a6660a7201ce556-1276776701.ap-southeast-1.elb.amazonaws.com
30256這邊$kubectl get svc
NAME TYPE CLUSTER-IP EXTERNAL-IP PORT(S) AGE
kubernetes ClusterIP 10.100.0.1 <none> 443/TCP 4h54m
nginx LoadBalancer 10.100.242.84 a81124d1de99711e9a6660a7201ce556-1276776701.ap-southeast-1.elb.amazonaws.com 80:30256/TCP 10s
$kubectl set image deploy/nginx nginx=openresty/openresty:alpine

$kubectl scale deploy/nginx --replicas=1
deployment.extensions/nginx scaled
$kubectl get po
NAME                     READY   STATUS        RESTARTS   AGE
nginx-57867cc648-rkdt6   1/1     Running       0          6m51s
nginx-57867cc648-vbcbr   0/1     Terminating   0          5m40s
$kubectl set image deploy/nginx nginx=openresty/openresty:alpine
deployment.apps "nginx" image updated

有變成新的頁面囉!
Deployment的設定:
abiosoft/caddy:php
2015
    $kubectl edit deploy/nginx
    deployment.extensions/nginx edited
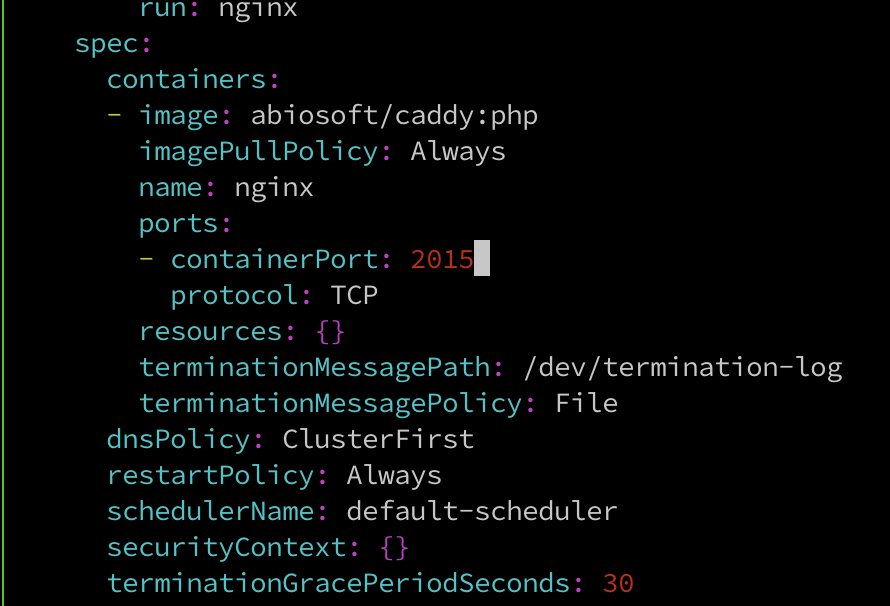
Service的設定:
2015
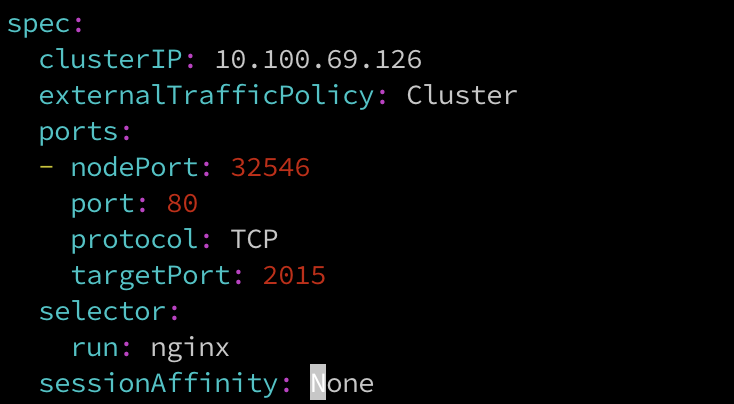
稍等一段時間,約莫1分鐘
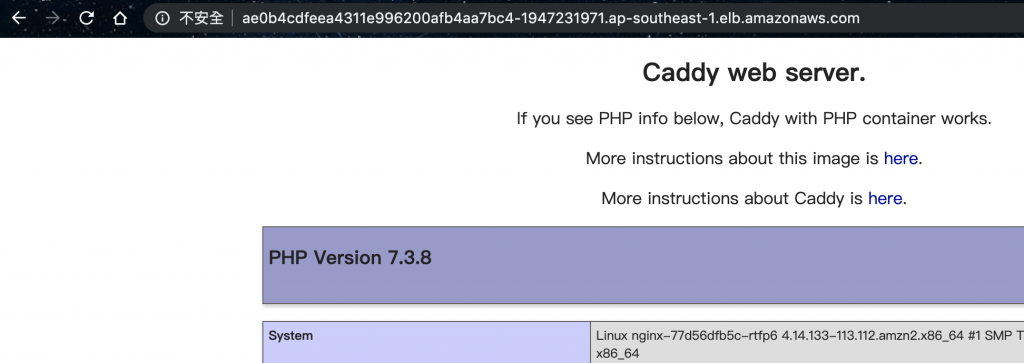
有了!原來我們除了可以透過修改image外,也可以更改port的轉發規則,重新導向到別的服務上。
好了恢復原狀
$kubectl delete svc/nginx deploy/nginx
service "nginx" deleted
deployment.extensions "nginx" deleted
這個小節我們在AWS的群集安裝WeaveScope並測試
檢查群集的節點及元件狀態
$kubectl get componentstatus
NAME                 STATUS    MESSAGE              ERROR
scheduler            Healthy   ok
controller-manager   Healthy   ok
etcd-0               Healthy   {"health": "true"}
$kubectl get no
NAME                                               STATUS   ROLES    AGE   VERSION
ip-192-168-1-251.ap-southeast-1.compute.internal   Ready    <none>   59s   v1.13.8-eks-cd3eb0
ip-192-168-61-14.ap-southeast-1.compute.internal   Ready    <none>   60s   v1.13.8-eks-cd3eb0
檢查Namespace
$kubectl get namespaces
NAME          STATUS   AGE
default       Active   8m57s
kube-public   Active   8m56s
kube-system   Active   8m56s
新增一個Deployment,測試用
$vim pod-deploy.yaml
apiVersion: apps/v1
kind: Deployment
metadata:
  name: helloworld-deployment
  labels:
    app: helloworld
spec:
  replicas: 3
  selector:
    matchLabels:
      app: helloworld
  template:
    metadata:
      labels:
        app: helloworld
    spec:
      containers:
      - name: k8s-demo
        image: 105552010/k8s-demo:v1
        ports:
        - containerPort: 3000
接著apply它,等下看Dashboard檢查它就行
$kubectl apply -f pod-deploy.yaml
deployment.extensions/helloworld-deployment created
接著我們要開啟k8s的Dashboard,這邊的設置跟minikube有些不同,請特別注意
在AWS上k8s的Dashboard預設是關閉的,我們必須要做些設置才能用
啟動Dashboard
$kubectl apply -f https://raw.githubusercontent.com/kubernetes/dashboard/v1.10.1/src/deploy/recommended/kubernetes-dashboard.yaml
secret/kubernetes-dashboard-certs created
serviceaccount/kubernetes-dashboard created
role.rbac.authorization.k8s.io/kubernetes-dashboard-minimal created
rolebinding.rbac.authorization.k8s.io/kubernetes-dashboard-minimal created
deployment.apps/kubernetes-dashboard created
service/kubernetes-dashboard created
部署 heapster
$kubectl apply -f https://raw.githubusercontent.com/kubernetes/heapster/master/deploy/kube-config/influxdb/heapster.yaml
serviceaccount "heapster" created
deployment "heapster" created
service "heapster" created
為 heapster 部署 influxdb 後端至群集
$kubectl apply -f https://raw.githubusercontent.com/kubernetes/heapster/master/deploy/kube-config/influxdb/influxdb.yaml
deployment "monitoring-influxdb" created
service "monitoring-influxdb" created
為 Dashboard 建立 heapster 群集角色連結
$kubectl apply -f https://raw.githubusercontent.com/kubernetes/heapster/master/deploy/kube-config/rbac/heapster-rbac.yaml
clusterrolebinding "heapster" created
EKS在RBAC的設置預設是啟動的,所以不用像minikube要重新啟動並調整參數
建立EKS的Service Account
$vim eks-admin-service-account.yaml
apiVersion: v1
kind: ServiceAccount
metadata:
  name: eks-admin
  namespace: kube-system
---
apiVersion: rbac.authorization.k8s.io/v1beta1
kind: ClusterRoleBinding
metadata:
  name: eks-admin
roleRef:
  apiGroup: rbac.authorization.k8s.io
  kind: ClusterRole
  name: cluster-admin
subjects:
- kind: ServiceAccount
  name: eks-admin
  namespace: kube-system
套用設定至群集
$kubectl apply -f eks-admin-service-account.yaml
serviceaccount "eks-admin" created
clusterrolebinding.rbac.authorization.k8s.io "eks-admin" created
檢查Token
$kubectl -n kube-system describe secret $(kubectl -n kube-system get secret | grep eks-admin | awk '{print $1}')
Name:         eks-admin-token-lsfvp
Namespace:    kube-system
Labels:       <none>
Annotations:  kubernetes.io/service-account.name: eks-admin
              kubernetes.io/service-account.uid: 19813eac-eb2b-11e9-b8aa-0a3d58b6f4f2

Type:  kubernetes.io/service-account-token

Data
====
ca.crt:     1025 bytes
namespace:  11 bytes
token:      eyJhbGciOiJSUzI1NiIsImtpZCI6IiJ9.eyJpc3MiOiJrdWJlcm5ldGVzL3NlcnZpY2VhY2NvdW50Iiwia3ViZXJuZXRlcy5pby9zZXJ2aWNlYWNjb3VudC9uYW1lc3BhY2UiOiJrdWJlLXN5c3RlbSIsImt1YmVybmV0ZXMuaW8vc2VydmljZWFjY291bnQvc2VjcmV0Lm5hbWUiOiJla3MtYWRtaW4tdG9rZW4tbHNmdnAiLCJrdWJlcm5ldGVzLmlvL3NlcnZpY2VhY2NvdW50L3NlcnZpY2UtYWNjb3VudC5uYW1lIjoiZWtzLWFkbWluIiwia3ViZXJuZXRlcy5pby9zZXJ2aWNlYWNjb3VudC9zZXJ2aWNlLWFjY291bnQudWlkIjoiMTk4MTNlYWMtZWIyYi0xMWU5LWI4YWEtMGEzZDU4YjZmNGYyIiwic3ViIjoic3lzdGVtOnNlcnZpY2VhY2NvdW50Omt1YmUtc3lzdGVtOmVrcy1hZG1pbiJ9.En72ztniMhwDA6ZEJ0wQWsDTCp3mKFyqPCG1QnYErWLAdvEnTiLdpG9QtqfVnxSbZD-ajYaj7KeZD7nDR3yP1YWTDeTFoD7hhJS0OXlcp9Nc5QvvshmSdO4qrERP1jWXvkDyA8ijYuAZuB3__L-rd2f0bMszYq0DtSV8dtNp_VUd90twmBztolIWH_kZxoVBLODo6-VU934KsQ6YzpdXTPt1ZySBOJTKd2WEg863_0gyIOpAOjpYxiSz1KvutexrsdT7HVjHZkue7UrIm721Sf0UhwKaMuvY5XyFJ7qqTmKAq-GyZasATnR838GkidRyKoPvETVNq3pVQcWvlPYfvg
啟動kube-proxy,讓本地端能讀取Dashboard的內容
$kubectl proxy
Starting to serve on 127.0.0.1:8001
接著在VirtualBox中打開瀏覽器,輸入Token的內容
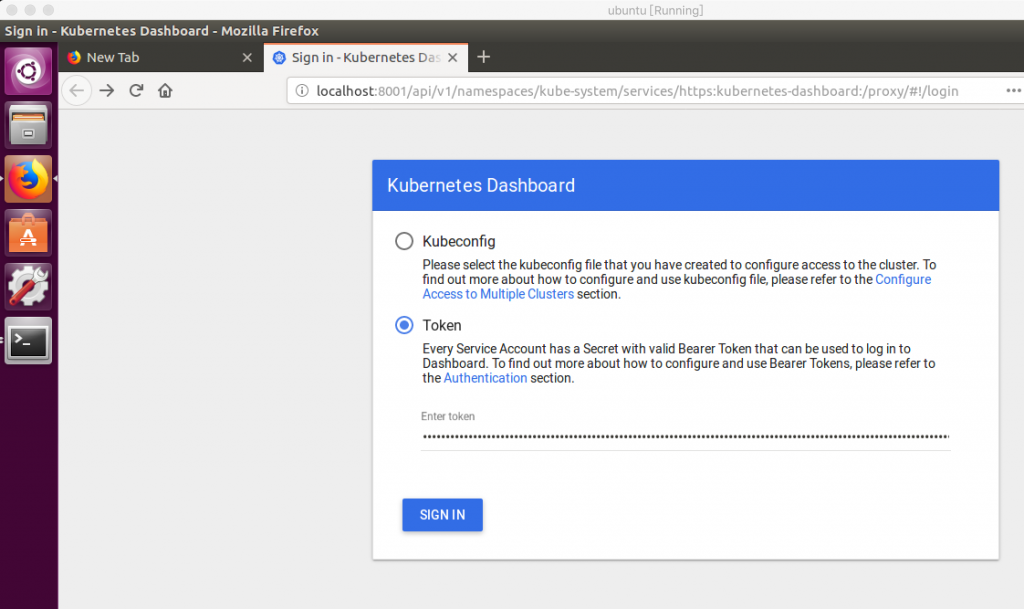
登入後可看到Dashboard!
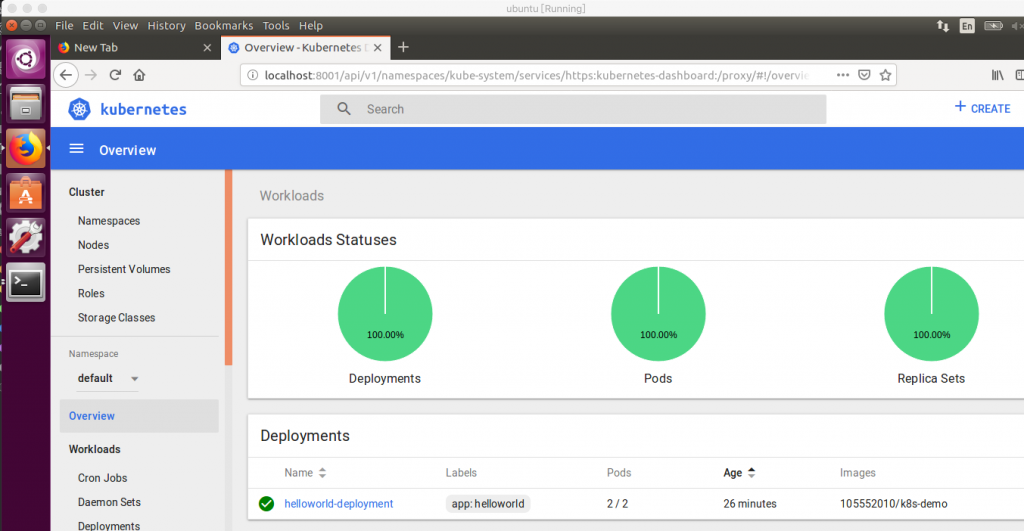
OK,測試成功,我們進到下一步。
透過YAML安裝(這版的k8s比較舊所以可以直接套用,如果版本太新沒法用的話請參考這裡
$kubectl apply -f 'https://cloud.weave.works/k8s/scope.yaml' -n weave
namespace/weave created
serviceaccount/weave-scope created
clusterrole.rbac.authorization.k8s.io/weave-scope created
clusterrolebinding.rbac.authorization.k8s.io/weave-scope created
deployment.apps/weave-scope-app created
service/weave-scope-app created
deployment.apps/weave-scope-cluster-agent created
daemonset.extensions/weave-scope-agent created
檢查Weave Scope的Service設定
$kubectl get svc -n weave
NAME              TYPE        CLUSTER-IP       EXTERNAL-IP   PORT(S)   AGE
weave-scope-app   ClusterIP   10.100.114.110   <none>        80/TCP    3m46s
設置Port Forwarding到4040
$kubectl port-forward -n weave "$(kubectl get -n weave pod --selector=weave-scope-component=app -o jsonpath='{.items..metadata.name}')" 4040
接著在VirtualBox裡面打開瀏覽器
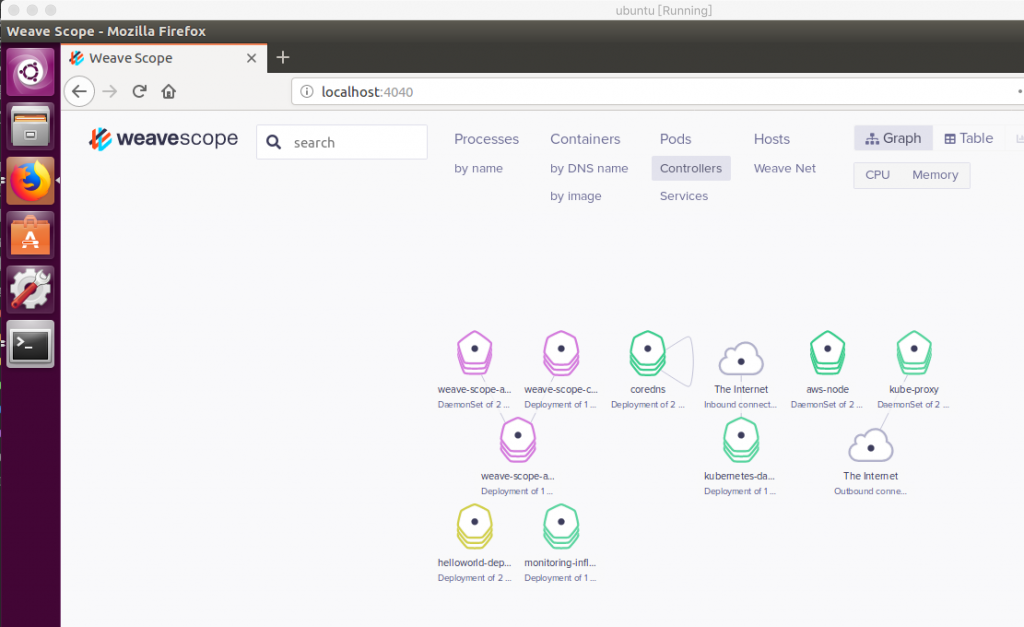
有了!可以用囉~
今天我們看到了一些基本的管理操作方式,可以發現到在AWS上Service搭配Load Balancer的使用,我們只要透過妥善的設置方式,就能夠從AWS開放出的DNS去使用我們提供的服務,這個小測試可以看出兩個主要功能,一個是Scale up之後的Load Balancer的降低loading,進而達到負載平衡的效果。一個是可以設置不同的Service的服務名稱,分別去使用不同的對應服務,也可以依需求設置不同的端口。這個Service的部分可以搭配前面提過的Ingress達到管理Service的效果。再來我們在AWS上架設了WeaveScope,這是前面有提過的監控軟件,我們可以透過這個套件,並搭配Dashboard使用,達到透過圖像化的方式,進而簡化維運上的負擔。明天接續介紹管理篇的部分,我們明天見~
本文同步刊載於https://github.com/x1y2z3456/ironman
感謝您撥冗閱讀此文章,不喜勿噴,有任何問題建議歡迎下方留言:)
說個笑話,希望我能寫滿30天啊(笑
