OCR,光學字元辨識(Optical Character Recognition) 意思是可以把照片中的文字轉化成文字檔,或許你覺得這好像沒什麼,照片裡的文字和文字檔裡的文字差不多啊? 但其實對電腦來說差的可大了,文字檔可以複製貼上,做進一步的處理,以字串為格式,但圖片不行吧,總是得一個字一個字輸入電腦,因為對電腦來說,他就是一張照片,他怎麼會知道裡面有多少我們人類用的文字呢? 而 OCR 技術就是讓電腦學人類看懂照片上的文字並輸入文字檔的技術。
pipenv --python 3.7
pipenv shell
pipenv install Pillow opencv-python pytesseract
到下面的網址下載並安裝 tesseract OCR
https://github.com/UB-Mannheim/tesseract/wiki
安裝好後找到 pytesseract.exe 的位置,並複製其絕對路徑,通常會在 C:\Program Files\Tesseract-OCR\tesseract.exe。
先用一個純英文的檔案來測試他能不能成功辨識,程式碼中有一段 pytesseract.pytesseract.tesseract_cmd 很重要,在 Windows 中我們要把剛剛記下來的 pytesseract.exe 絕對路徑填進去,否則會找不到執行檔,接著主程式的部分就是讀取照片,並且用pytesseract.image_to_string("IMAGE",lang="指定語言")來進行 OCR 辨識,就只需要這一個函式就沒問題了。
import pytesseract
from PIL import Image

def main():
    pytesseract.pytesseract.tesseract_cmd = r"C:\Program Files\Tesseract-OCR\tesseract.exe"
    img = Image.open(r"image\1.JPG")
    #img.show()
    print(pytesseract.image_to_string(img, lang="eng"))


if __name__ == "__main__":
    main()
測試檔案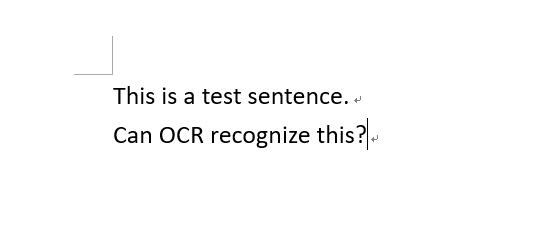
辨識結果
其實和辨識英文一樣,只是我們要下載繁體中文的訓練資料,到這邊 https://github.com/tesseract-ocr/tessdata_best/blob/master/chi_tra.traineddata 下載並將檔案放到 C:\Program Files\Tesseract-OCR\tessdata 中,修改 lang 參數變成 chi_tra 就可以啦~
import pytesseract
from PIL import Image

def main():
    pytesseract.pytesseract.tesseract_cmd = r"C:\Program Files\Tesseract-OCR\tesseract.exe"
    img = Image.open(r"image\2.JPG")
    #img.show()
    print(pytesseract.image_to_string(img, lang="chi_tra"))


if __name__ == "__main__":
    main()
測試檔案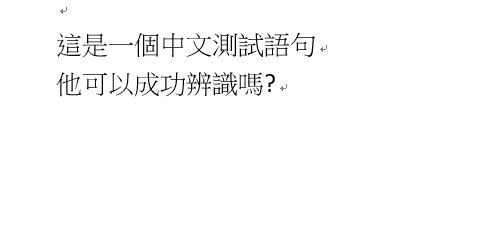
辨識結果
有時候我們會有翻譯晶晶體中英混合文件的需求,這也很簡單,只要設定 lang="chi_tra+eng" 就可以啦,直接相加呢~不過前提是你的電腦內要有相對應的訓練資料才行。
import pytesseract
from PIL import Image

def main():
    pytesseract.pytesseract.tesseract_cmd = r"C:\Program Files\Tesseract-OCR\tesseract.exe"
    img = Image.open(r"image\3.JPG")
    #img.show()
    print(pytesseract.image_to_string(img, lang="chi_tra+eng"))


if __name__ == "__main__":
    main()
測試檔案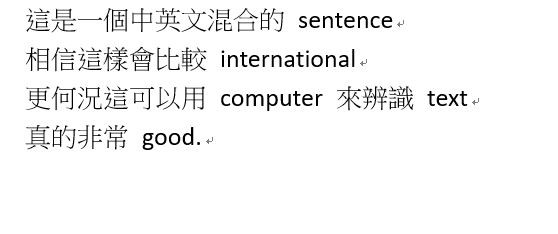
辨識結果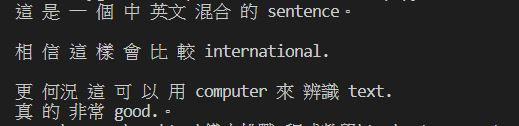
到目前來說整體辨識效果都不錯,OCR其實還有很多應用,其中一個常用的是驗證碼破解,驗證碼其實就是混亂的圖片檔,然而如果透過 OCR 就有機會將它自動轉為文字,方便網路爬蟲與機器人操作。
這是一個驗證碼破解的範例,供大家參考,但是因為驗證碼通常會有很多噪點,我上網引用了大大寫好的降噪副程式,先將驗證碼降噪後再進行 OCR 辨識,會大大的提高成功率。
# -*- coding: utf-8 -*-

import pytesseract
import PIL.Image
import PIL.ImageDraw
from PIL import *
from PIL import ImageEnhance
from PIL import Image
import cv2

# Important variables
user_tesseract_cmd = r"C:\Users\USER\AppData\Local\Tesseract-OCR\tesseract.exe"
show_image = False


#------- DO NOT EDIT BELOW -------

#Code from https://stackoverflow.max-everyday.com/2019/06/python-opencv-denoising/
def getPixel(image,x,y,G,N):
    L = image.getpixel((x,y))
    if L > G:
        L = True
    else:
        L = False

    nearDots = 0
    if L == (image.getpixel((x - 1,y - 1)) > G):
        nearDots += 1
    if L == (image.getpixel((x - 1,y)) > G):
        nearDots += 1
    if L == (image.getpixel((x - 1,y + 1)) > G):
        nearDots += 1
    if L == (image.getpixel((x,y - 1)) > G):
        nearDots += 1
    if L == (image.getpixel((x,y + 1)) > G):
        nearDots += 1
    if L == (image.getpixel((x + 1,y - 1)) > G):
        nearDots += 1
    if L == (image.getpixel((x + 1,y)) > G):
        nearDots += 1
    if L == (image.getpixel((x + 1,y + 1)) > G):
        nearDots += 1

    if nearDots < N:
        return image.getpixel((x,y-1))
    else:
        return None

# 降噪 Function
def clearNoise(image,G,N,Z):
    draw = ImageDraw.Draw(image)

    for i in range(0,Z):
        for x in range(1,image.size[0] - 1):
            for y in range(1,image.size[1] - 1):
                color = getPixel(image,x,y,G,N)
                if color != None:
                    draw.point((x,y),color)

    return image

class CaptchaBroker():

    def decode(self,image_path):
        # open image
        image = Image.open(image_path)

        enhancer = ImageEnhance.Contrast(image)
        image = enhancer.enhance(3.0)
        enhancer = ImageEnhance.Brightness(image)
        image = enhancer.enhance(10.0)

        im2 = image.convert('1')
        im2 = clearNoise(im2,50,4,6)

        w, h = image.size

        if(show_image):
            im2.show()

        #Very important, tesseract-ocr path here
        pytesseract.pytesseract.tesseract_cmd = user_tesseract_cmd
        code = pytesseract.image_to_string(im2)
        #print(code)
        return code
某學校的簡易驗證碼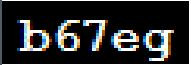
經過上面程式碼破解之後,嘿嘿嘿 驗證碼甚麼的小意思啦,不過有些驗證碼會比較複雜,會需要降噪、銳化、二元化等等的影像處理,那就會需要比較多的影像背景知識了。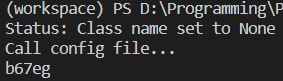
參考資料
https://pypi.org/project/pytesseract/
https://my.oschina.net/u/2396236/blog/1621590
https://stackoverflow.max-everyday.com/2019/06/python-opencv-denoising/
https://medium.com/@b98606021/%E5%AF%A6%E7%94%A8%E5%BF%83%E5%BE%97-tesseract-ocr-eef4fcd425f0
https://www.itread01.com/content/1542341943.html

