因為上個月直接專注在 [iT邦鐵人賽]
直接好幾個禮拜都沒有刷 [鼠年全馬] 進度xD
這週回歸來做我們美美的旅館預約平台
來複習一下目前的進度
看起來首頁的部分該有的都有了~
這篇就來把首頁完善吧!!
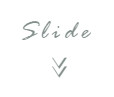
Slide 文字目前只是裝飾,但我們可以把它做的更好,讓它真的有功能
這裡使用Vuetify本身提供的 滾動指令 來做出簡單的畫面滾動動畫
使用 button 元件包住 [Slide] 和 [>>],並加上點擊事件:
<button @click="slideClick" style="outline: none;">
  <div class="slidetext">
    Slide
  </div>
  <div class="slideicon"><span>></span><span>></span></div>
</button>
點擊事件內容:
使用 $vuetify.goTo() 方法 參考這邊
methods: {
  slideClick() {
    //前往id叫做rooms的區塊
    this.$vuetify.goTo("#rooms", this.scrollOptions);
  },
},
$vuetify.goTo(arg_1,arg_2)
滾動屬性設定放在data:
data: () => ({
  scrollOptions: {
    duration: 600,
    easing: "linear",
  },
})
來看看效果圖吧~
[首頁] 最後要來寫導向 [預約頁面]
導向的時機在點選房間卡 RoomCard 的時候觸發!!
首先, 我們在卡片組件 v-card 加上點擊事件:
//RoomCard.vue
<v-card class="roomcard" @click="goto">
  //v-card內容
</v-card>
事件中使用 $router.push() 方法導向到 [預約頁面]
vue-router導頁 參考這邊
方法中設定帶參數,把 RoomCard 詳細資料帶上
methods: {
  goto() {
    this.$router.push({ name: "Reservation", params: { room: this.room } });
  },
},
接著到 Reservation 接收資料:
//Reservation.vue
export default {
  name: "Reservation",
  created() {
    this.room = this.$route.params.room;
  },
  data: () => ({
    room: {},
  }),
};
取得參數資料之後,習慣放進後再使用
###################分隔線###################
上面是原本的寫法,這裡要介紹一招
開啟路由設定頁(router/index.js),在裡面加上一段function:
//router/index.js
const mixProps = function () {
  return route => {
    return Object.assign({}, route.params, route.query)
  }
}
mixProps: 將傳入的 params 及 query 合併在路由設定(routes)的部份加上:
const routes = [
  {
    ...,
    name: 'Reservation',
    props: mixProps(), //加入這行
  },
]
props: mixProps(): 將合併後的物件使用 props 接收回到 Reservation 改成使用 props 接收參數就好囉!!
//Reservation.vue
export default {
  name: "Reservation",
  props: ["room"],
};
這樣寫就不用再分 params 或是 query,全都用 props 就好了~
是不是超酷的xD
頁面跳轉完成囉!!
[預約頁面] 開始開發~先把它切好切滿吧~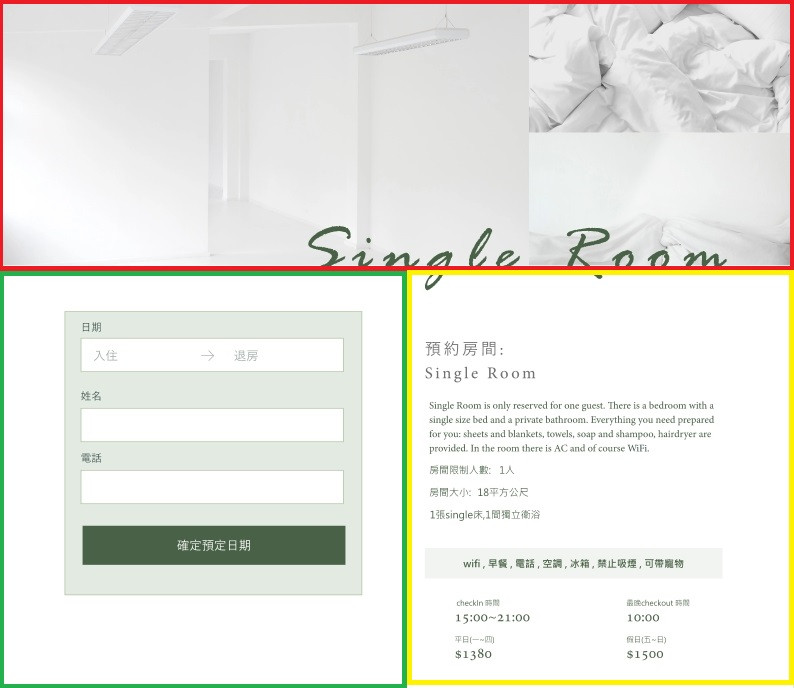
切好之後就建立對應的component之後放上畫面吧~
//Reservation.vue
<template>
  <div>
    <ReservationTop />
    <ReservationCard />
    <ReservationInfo />
    <Footer />
  </div>
</template>
<script>
import Footer from "../components/Footer";
import ReservationTop from "../components/ReservationTop";
import ReservationCard from "../components/ReservationCard";
import ReservationInfo from "../components/ReservationInfo";
export default {
  name: "Reservation",
  components: { ReservationTop, ReservationCard, ReservationInfo, Footer },
};
</script>
因為左右兩邊各占一半,可以利用 grid 來幫忙切
<div class="row">
  <div class="col-6"><ReservationCard /></div>
  <div class="col-6"><ReservationInfo /></div>
</div>
row 預設有外距 -12px,可以加上 pa-0 ma-0 讓內外距為0
<div class="row pa-0 ma-0">
  <div class="col-6"><ReservationCard /></div>
  <div class="col-6"><ReservationInfo /></div>
</div>
Reservation.vue 的部分先到這邊結束~
再來從上往下開始做,從 ReservationTop.vue 開始
[標題] 是由3張圖片 + 1個標題組合
圖片的部分,利用 grid 來切分為2:1,使用 Vuetify-Images圖片組件,先用官方提供的圖片來生成畫面:
//ReservationTop.vue
<div class="row pa-0">
  <div class="col-8">
    <v-img src="https://picsum.photos/500/300?image=10"></v-img>
  </div>
  <div class="col-4">
    <v-img src="https://picsum.photos/500/300?image=15"></v-img>
    <v-img src="https://picsum.photos/500/300?image=20"></v-img>
  </div>
</div>
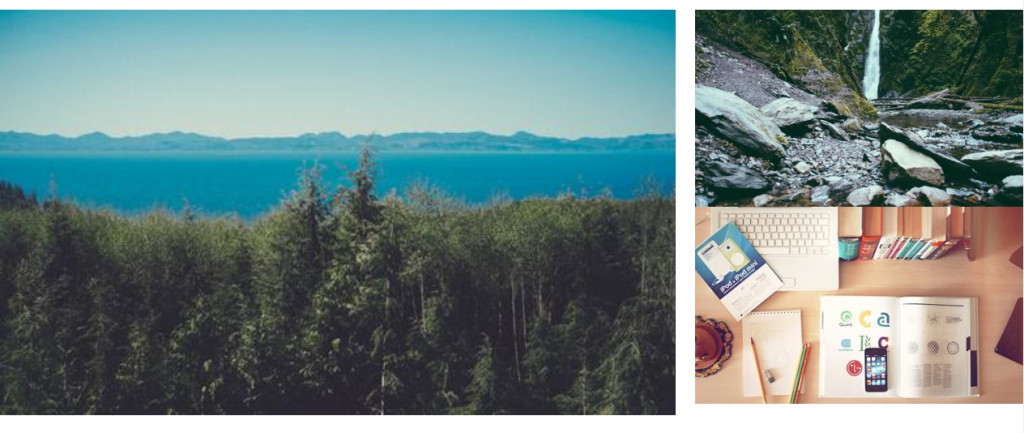
圖片中間被留白了,因為 col 本身有內距,可以加上 pa-0 讓內距為0:
<div class="col-8 pa-0">
  <v-img src="https://picsum.photos/500/300?image=10"></v-img>
</div>
<div class="col-4 pa-0">
  <v-img src="https://picsum.photos/500/300?image=15"></v-img>
  <v-img src="https://picsum.photos/500/300?image=20"></v-img>
</div>
這裡的範例剛好都是橫向圖片, 如果放上直向圖片就會超出高度,於是這裡加上高度限制:
<div class="col-8 pa-0">
  <v-img src="https://picsum.photos/500/300?image=10" max-height="428"></v-img>
</div>
<div class="col-4 pa-0">
  <v-img src="https://picsum.photos/500/300?image=15" max-height="214"></v-img>
  <v-img src="https://picsum.photos/500/300?image=20" max-height="214"></v-img>
</div>
標題的部分,先使用絕對定位與圖片重疊, 然後使用 d-flex 讓整體定位在右下方:
<div class="restitle d-flex align-self-end justify-end">
  <div>This is Title</div>
</div>
.restitle {
  width: 100%;
  position: absolute;
}
接著要計算一下內容的位移(要自己算):
.restitle div {
  margin-bottom: -56px;
  margin-right: 80px;
}
最後套上設計師的CSS:
.restitle {
  width: 100%;
  position: absolute;
  font: Italic 110px/138px Rage;
  letter-spacing: 17.6px;
  color: #496146;
}
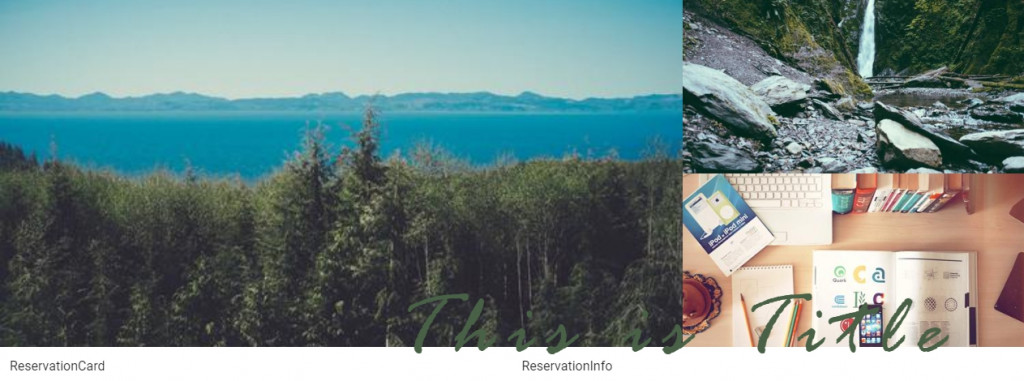
美爆了
接著將真實資料從 Reservation.vue 傳入:
//Reservation.vue
<ReservationTop :name="room.name" :imageUrl="room.imageUrl" />
回到 ReservationTop.vue 接收:
//ReservationTop.vue
export default {
  name: "ReservationTop",
  props: ["name", "imageUrl"],
};
套上真實資料:
<template>
  <div class="row pa-0 ma-0">
    <div class="col-8 pa-0">
      <v-img :src="imageUrl[0]" max-height="428"></v-img>
    </div>
    <div class="col-4 pa-0">
      <v-img :src="imageUrl[1]" max-height="214"></v-img>
      <v-img :src="imageUrl[2]" max-height="214"></v-img>
    </div>
    <div class="restitle d-flex align-self-end justify-end">
      <div>{{ name }}</div>
    </div>
  </div>
</template>
[標題] 的部分完成囉~
來看看畫面吧~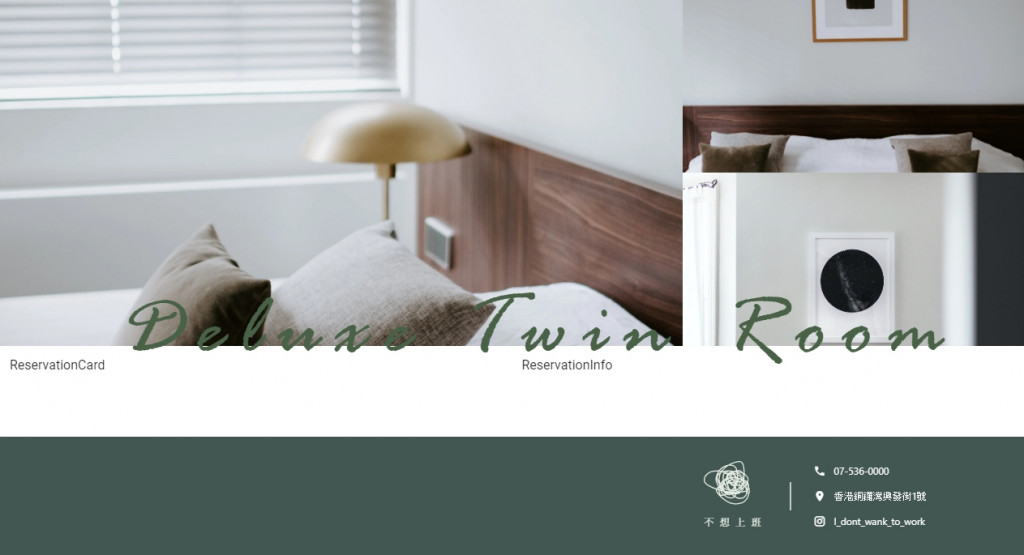
這週開始繼續維持每週一篇的頻率往金角獎邁進
(必要時會多補幾篇進度xD)
附上這次進度的雲端壓縮檔, 執行前記得先npm install
有需要改進或是任何意見建議歡迎下面留言~
 餅乾
餅乾

 iThome鐵人賽