上一篇我們說完了 component 基本的創建和使用方法,接下來介紹一下生命週期吧。
當一個 component 被建立時,我們可以使用 constructor 宣告並初始化 component 的基本狀態。
我們使用昨天創建好的 class component 來試試看吧。
在 state 裡面新增 count,然後使用console.log()來測試。
class ElderBrother extends Component {
  constructor(props) {
    super(props);
    this.state = {
      count: 0,
      memory: "infinity",
    };
    console.log('memory : '+this.state.memory+', count : '+this.state.count);
  }
  handleChange = () => {...};
  render() {...}
}
我們重新啟動 react ,按下 F12 開啟開發者工具會發現,state 已經在 mounting( 建立 ) 時被設定好了。

可是怎麼會出現兩次!
別緊張,這是之前在 index.js 設定的<React.StrictMode />的功用,他會通過調用 2 次 constructor 來把開發者難以發現的錯誤提前發現出來,如果覺得困擾的話,把它拿掉也是可以的。
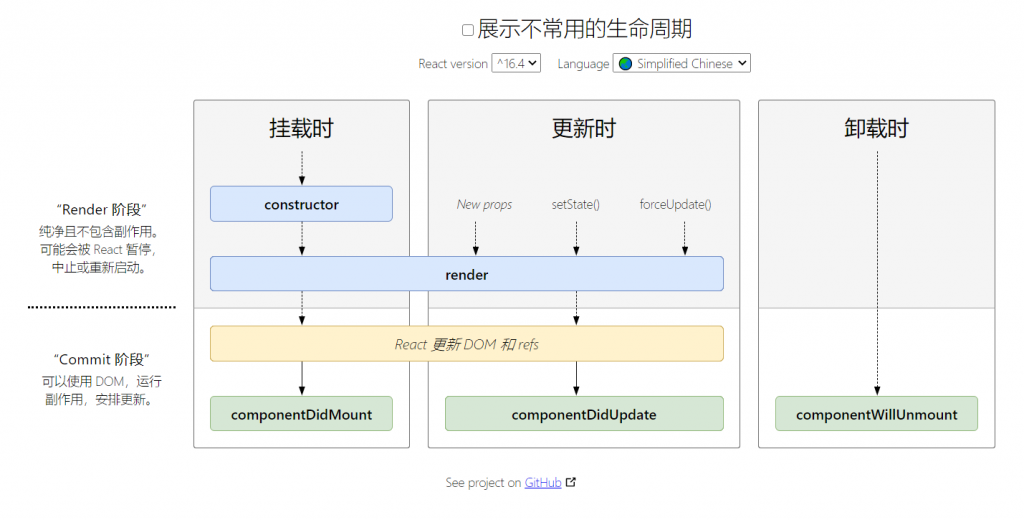
當然生命週期還可以在別的地方建構,我們照 component 在 DOM上面被實作的時期,分為三個階段 mounting、updating、ummounting 做解釋。
可以用這張表做對照,這是由 React 共同開發者建置的表,可以去這裡自己查看。

整個生命週期第一個被實作的地方就是我們剛剛帶到的 constructor,基本上用來宣告和初始化 state。
在 constructor 之後被執行的是 render,這也是整個生命週期裡唯一一個必須要被實作的區塊(不然就不會有畫面了XD),詳細的內容可以看看 Day-5 DOM,聽起來很有殺傷力。。
component 被 render 到 DOM 之後執行的區塊,可以透過更新 state 來重新 render 畫面,建構完畫面之後第一個想要執行的邏輯都可以放在這裡喔,總之,來試試看吧。
在 app.js 新增 componentDidMount() 並創建 addCount 讓 count+1。
  addCount = () => {
    this.setState({count:this.state.count+1})
  };

  componentDidMount() {
    this.addCount();
  }
在 addCount 加上 console.log() 測試一下
  addCount = () => {
    this.setState({count:this.state.count+1},()=>{console.log("DidMount :" + this.state.count)})
  };
可以發現原本在 constructor 設定的 count=0,在經過 componentDidMount 之後被成功更新了。

至於為什麼要把 console.log 加在這裡呢?
這是因為 setState 是非同步的,如果不在 addCount 使用 arrow function 當作 callback function,就沒辦法正確的抓到 count 現在的值。
這是因為就像在 DAY-7 class vs function-component 基本架構(上) 裡提到的 arrow function 他是自動綁定 this 到現在這個呼叫他的 function,所以如果不是使用 arrow function 的話,他只會抓到在 constructor 內尚未更新的 count。
註:非同步=>不管前一個動作處理完了沒,只要呼叫到就會執行。先有個大方向的概念就好,關於 非同步 和 callback function 我們會在未來做詳細的解釋,這邊就不先帶到了,會太離題。
這區塊的觸發條件是當 state 被改變之後,所以在這可以準確地抓到改變後的值,適合在這邊做資料的監聽,和當 state 改變之後的處理方案。
那我們就將 console.log 從 addCount 裡移到這裡吧。
 componentDidUpdate(){
    console.log("DidUpdate :" + this.state.count)
  }
也是順利的抓到了

當 component 要從 DOM 中卸載之前,會執行這個區塊。
通常用來處理有關於這個 component 有關的 state 和希望隨著這個 component 卸載回傳的一些資訊。
由於我對這個部分理解沒有很深,沒辦法舉一個可以清楚解釋這個流程的例子,希望對這部分有了解的大大可以幫我解答一下,感恩。
以上就是有關於生命流程的部分了解,看完這個部分就大概可以理解其實 class component 的可讀性真的不高,如果有可以簡易管理 state 和生命週期的方法就好了。
這時,一道聲音從耳邊傳來,說著:「那個男人或許會遲到,但絕對不會缺席」。

什 ... 什麼!
自從在去年 2/6 React 釋出 v16.8 新版本之後,推出了 HOOK 這個官方 API,這個從尚未正式上線就開始就好評不斷的新功能到底能夠幫我們解決甚麼問題呢?
我是 Chris ,下一篇我們將介紹 Hook 這個可以說是堪稱救世主般的強大套件。
