今天要分享如何製作顏色APP內的彈出視窗alert,起初還不太了解swift和Xcode,加上APP中要使用的alert不是ios內建的樣式,所以花了不少時間看網路上教學製作,希望其他有相同需求的朋友們看了我的製作過程能夠更快速做出客製化的alert,文章如有任何問題或是我的觀念有理解錯誤的部分煩請大家不吝告知~
製作方式主要是參考以下這個教學影片,這個youtube頻道有很多很實用的教學,推薦給大家♥
https://www.youtube.com/watch?v=670h22_ZsvY

struct Constants {
        static let backgroundAlphaTo: CGFloat = 0.6
}
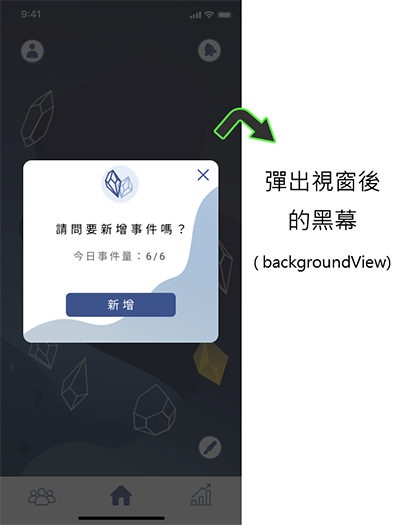
//定義黑色背景,型別為UIView
let backgroundView: UIView = {
       let backgroundView = UIView()
	//設定背景顏色為黑色
       backgroundView.backgroundColor = .black
	//先設定透明度為0,等彈出視窗出現時再調整使其顯示
       backgroundView.alpha = 0
       return backgroundView
}()

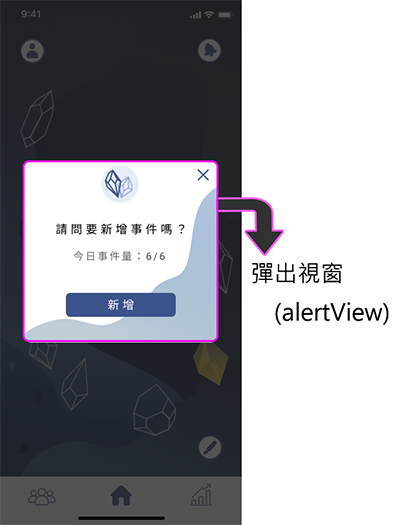
//定義彈出視窗alertView
@objc let alertView: UIView = {
        let alert = UIView()
        alert.layer.masksToBounds = true
        alert.backgroundColor = .white
        alert.layer.cornerRadius = 13
        return alert
}()
//宣告一個名為mytargetView的UIView,取得ViewController.view
var mytargetView: UIView?
這裡的程式碼篇幅有點長,但其實只是在設定物件的顏色、位置等外觀而已
//引數為String型別的title、和message
func showAlert_Q(with title: String,
                   message: String,
                   on ViewController: UIViewController){
        guard let targetView = ViewController.view else{
            return
        }
        //取得目前ViewController.view
        mytargetView = targetView
		//黑色背景大小等於螢幕大小
        backgroundView.frame = targetView.bounds
		//要使用addSubview才會在螢幕中顯示
        targetView.addSubview(backgroundView)
        targetView.addSubview(alertView)
		//定義alertView長寬和位置(y軸先設定-300使其在螢幕之上)
        alertView.frame = CGRect(x: 40, y: -300,
                                 width: 302,
                                 height: 282)
		//設定alertView背景
        alertView.backgroundColor = UIColor(patternImage: UIImage(named: "alert_bg")!)
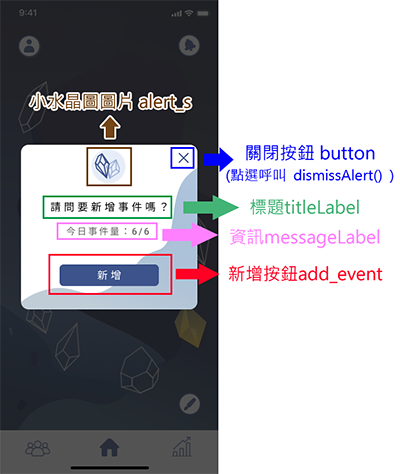
        //標題
        let titleLabel = UILabel(frame: CGRect(x: 0, y: 0, width: alertView.frame.size.width, height: 21))
        titleLabel.center.y = 106
		//標題文字為傳入的引數”title”之內容
        titleLabel.text = title
        titleLabel.font = titleLabel.font.withSize(18)
		//標題文字間距
        titleLabel.addCharacterSpacing(kernValue: 5.2)
		//標題文字置中對齊
        titleLabel.textAlignment = .center
		//將標題titleLabel加入alertView中
        alertView.addSubview(titleLabel)
        //資訊
        let messageLabel = UILabel(frame: CGRect(x: 0, y: 0, width: alertView.frame.size.width, height: 19))
            messageLabel.numberOfLines = 0
            messageLabel.text = "今日事件量"+message+"/6"
            messageLabel.center.y = 149
		//設定 messageLabel的文字顏色
        messageLabel.textColor = UIColor(red: 102/255, green: 102/255, blue: 108/255, alpha: 1)
            messageLabel.font = messageLabel.font.withSize(16)
            messageLabel.textAlignment = .center
        messageLabel.addCharacterSpacing(kernValue: 5.2)
//將資訊messageLabel加入alertView中
            alertView.addSubview(messageLabel)
        //關閉按鈕
        let button = UIButton(frame: CGRect(x:alertView.frame.size.width-(alertView.frame.size.width/2)-30, y: 0, width:alertView.frame.size.width, height: 50))
		//設定按鈕圖示
        button.setImage(UIImage(named: "x"), for: .normal)
		//按下button呼叫dismissAlert函式關閉該彈出視窗
        button.addTarget(self, action: #selector(dismissAlert), for: .touchUpInside)
		//設定button的tag為100
        button.tag = 100
        alertView.addSubview(button)
        //新增按鈕
        let add_event = UIButton(frame: CGRect(x: 0,
                                            y: 0,
                                            width: 170,
                                            height: 37))
        add_event.setTitle("新增", for: .normal)
        add_event.center = CGPoint(x: alertView.frame.size.width * 0.5,
        y: alertView.frame.size.height-55)
        add_event.layer.cornerRadius = 7
        add_event.addTextSpacing(spacing: 5.2)
        add_event.setTitleColor(.white, for: .normal)
        add_event.backgroundColor = UIColor(red: 56/255, green: 83/255, blue: 143/255, alpha: 1)
		//按下add_event呼叫showAlert_T函式切換至下一頁
        add_event.addTarget(self, action: #selector(showAlert_T),
                         for: .touchUpInside)
        alertView.addSubview(add_event)
        //小水晶圖圖片
        let alert_s = UIImageView(frame: CGRect(x: 0, y: 8, width: 60, height: 60))
        alert_s.image = UIImage(named: "alert_s")
        alert_s.center.x = alertView.frame.size.width*0.5
        alertView.addSubview(alert_s)
		//設定彈出視窗載入動畫
        UIView.animate(withDuration: 0.25,
                       animations: {
					//載入黑色背景,時間:0.25秒
                     self.backgroundView.alpha = Constants.backgroundAlphaTo
        },completion: { done in
			//上一個動畫完成後
            if done{
                UIView.animate(withDuration: 0.25,animations: {
					//載入alertView,時間:0.25秒
					//方式:將alertView位置設回視窗中央,製造滑入效果
                    self.alertView.center = targetView.center
                })
            }
        })
  }

清除UIView要呼叫removeFromSuperview()函式
但若要完整清除subview需要再進去alertView清除剛剛加入的subview才能清乾淨!
EX:
for child : UIView in self.alertView.subviews as [UIView]{
child.removeFromSuperview()
}
參考出處:https://blog.csdn.net/zhuiyi316/article/details/8308858
參考出處:https://www.itread01.com/articles/1484274841.html
    //關閉視窗
    @objc func dismissAlert() {
        guard let targetView = mytargetView else {
            return
        }
        UIView.animate(withDuration: 0.25,
                       animations: {
						//改alertView Y軸位置讓alertView滑出螢幕
                        self.alertView.frame = CGRect(x: 40, y:targetView.frame.size.height, width: targetView.frame.size.width-80, height: 300)
        },completion: { done in
            if done{
                UIView.animate(withDuration: 0.25,animations: {
					//先設定黑色背景透明度為0
                    self.backgroundView.alpha = 0
                }, completion: { done in
                    if done{
						//再清除UIView
						//移除新增至alertView裡的所有物件
                        for child : UIView in self.alertView.subviews as [UIView]{
                            child.removeFromSuperview()
                        }
						//移除alertview
                        self.alertView.removeFromSuperview()
                        //移除黑色背景backgroundView
                        self.backgroundView.removeFromSuperview()
                    }
                })
            }
        })
    }
有大致了解如何製作專屬自己的alertView了嗎?其實原理很簡單,將自己需要的物件加進去alertView就可以了!可以新增多個不同的alertView function然後用按鈕addTarget的方式彼此切換,切換方式可以先將新function裡的物件透明度設為0然後用動畫方式做出舊物件淡出(透明度變0之後移除)新物件淡入(透明度變1)的效果就能輕鬆切換到下一頁了~這部分留給大家研究,有問題都歡迎留言與我討論喔!
