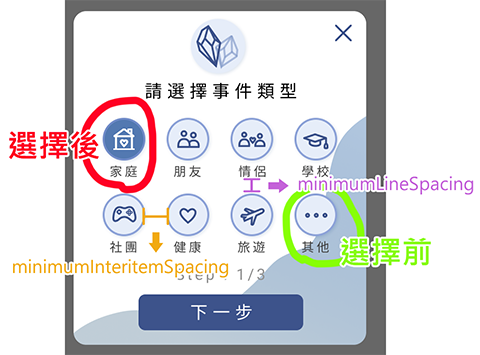
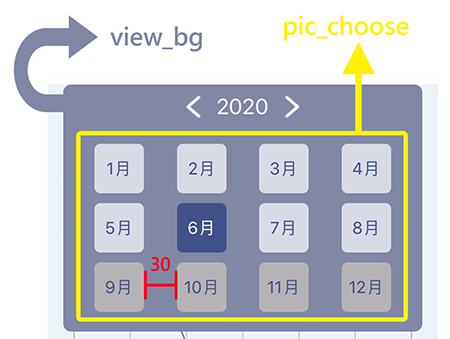
中秋節快樂~昨天分享了如何用純code產生collection View,也有短暫的帶到APP所應用到的地方,今天要來介紹顏色 countenance內除了選貼圖之外還有使用到collection View的地方。

//原始圖片
var items = [UIImage(named: "home_u"),UIImage(named: "friend_u"),UIImage(named: "couple_u"),UIImage(named: "school_u"),UIImage(named: "club_u"),UIImage(named: "health_u"),UIImage(named: "trip_u"),UIImage(named: "other_u")]
//選擇後的圖片
var items_h = [UIImage(named: "home_p"),UIImage(named: "friend_p"),UIImage(named: "couple_p"),UIImage(named: "school_p"),UIImage(named: "club_p"),UIImage(named: "health_p"),UIImage(named: "trip_p"),UIImage(named: "other_p")]

func numberOfSections(in collectionView: UICollectionView) -> Int {
       return 1
}
func collectionView(_ collectionView: UICollectionView, numberOfItemsInSection section: Int) -> Int {
        return items.count
}

func collectionView(_ collectionView: UICollectionView, cellForItemAt indexPath: IndexPath) -> UICollectionViewCell {
        let cell = collectionView.dequeueReusableCell(withReuseIdentifier: "piccell", for: indexPath) as! PicCellCollectionViewCell
        //可以先對cell設定tag,往後需存取更為方便
cell.tag = 87
        cell.frame.size.height = 78
        cell.frame.size.width = 55
		//選擇前圖片
        cell.imageView.image = items[indexPath.item]
        cell.imageView.frame = cell.bounds
		//選擇後圖片
        cell.imageView.highlightedImage = items_h[indexPath.item]
        return cell
}
//點擊觸發事件
func collectionView(_ collectionView: UICollectionView, didSelectItemAt indexPath: IndexPath) {
        type = indexPath.item + 1
}

//指定cell的排列方式為UICollectionViewFlowLayout
let layout = UICollectionViewFlowLayout()
//列與列之間的距離
layout.minimumLineSpacing = 33
//item之間的距離
layout.minimumInteritemSpacing = 20
//定義名為pic_choose的UICollectionView
let pic_choose = UICollectionView(frame: CGRect(x: 0, y: 0, width: 273, height: 200) , collectionViewLayout: layout)
//為了能出現highlight情況,詳情可以參考https://www.jianshu.com/p/55153087631c
pic_choose.delaysContentTouches = false
pic_choose.center.y = 215
pic_choose.center.x = alertView.frame.size.width*0.5
pic_choose.delegate = self
pic_choose.dataSource = self
//關閉滾動功能
pic_choose.isScrollEnabled = false
pic_choose.register(PicCellCollectionViewCell.self, forCellWithReuseIdentifier: "piccell")
//設定背景為透明(UIColor.clear)
pic_choose.backgroundColor = UIColor.clear
self.alertView.addSubview(pic_choose)

首先也是要有class CollectionViewCell(這裡使用AnalysisCollectionViewCell)
class AnalysisCollectionViewCell: UICollectionViewCell {
    var nameLabel:  UILabel = UILabel(frame: CGRect.zero)

    override init(frame : CGRect) {
        super.init(frame : frame)
        nameLabel.frame.size = CGSize(width: self.frame.width, height: self.frame.height)
        nameLabel.textAlignment = NSTextAlignment.center
        nameLabel.textColor = UIColor(hexString: "#3D538B")
        self.addSubview(nameLabel)
    }
//選到的回饋
    override var isSelected: Bool {
        didSet {
                if self.isSelected {
                    nameLabel.textColor = UIColor.white
                    self.backgroundColor = UIColor(hexString: "#3D538B")

                } else {
                    nameLabel.textColor = UIColor(hexString: "#3D538B")
                    self.backgroundColor = UIColor(red: 1, green: 1, blue: 1, alpha: 0.69)
                }
        }
    }
    required init?(coder: NSCoder) {
        fatalError("init(coder:) has not been implemented")
    }
}
回到ViewController (這裡使用AnalysisViewController.swift)記得要繼承UICollectionViewDelegate,UICollectionViewDataSource喔!!
var pic_choose: UICollectionView!
//深藍色背景
let view_bg = UIView()
        view_bg.frame = CGRect(x: 0, y: 65, width: 363, height: 250)
        view_bg.center.x = self.view.bounds.size.width*0.5
        view_bg.backgroundColor = UIColor(hexString: "#7D88A5")
        view_bg.layer.cornerRadius = 8
        view_bg.tag = 47
        //月份選擇
        let layout = UICollectionViewFlowLayout()
        layout.minimumInteritemSpacing = 30
        pic_choose = UICollectionView(frame: CGRect(x: 0, y: 60, width: 300, height: 200) , collectionViewLayout: layout)
        pic_choose.center.x = view_bg.frame.size.width*0.5
        pic_choose.delegate = self
        pic_choose.dataSource = self
        pic_choose.layer.masksToBounds = true
        pic_choose.backgroundColor = UIColor.clear
        pic_choose.register(AnalysisCollectionViewCell.self, forCellWithReuseIdentifier: "select_month")
        view_bg.addSubview(pic_choose)
		self.addSubview(view)

func numberOfSections(in collectionView: UICollectionView) -> Int {
       return 1
}
func collectionView(_ collectionView: UICollectionView, numberOfItemsInSection section: Int) -> Int {
        return 12
}

func collectionView(_ collectionView: UICollectionView, cellForItemAt indexPath: IndexPath) -> UICollectionViewCell {
        let cell = collectionView.dequeueReusableCell(withReuseIdentifier: "select_month", for: indexPath) as! AnalysisCollectionViewCell
        cell.nameLabel.text = String(indexPath.item+1)+"月"
        cell.nameLabel.center.x = cell.frame.size.width*0.5
        cell.nameLabel.center.y = cell.frame.size.height*0.5
        cell.backgroundColor = UIColor(red: 1, green: 1, blue: 1, alpha: 0.69)
        cell.layer.cornerRadius = 6

        if selectYear == nowYear{
//因為是選月份,所以有一些未來月份不能讓使用者選擇,故設定isUserInteractionEnabled=false(因主題為介面製作所以不贅述判斷月份的方式)
            if indexPath.item+1 > nowMonth{
                cell.backgroundColor = UIColor(red: 0.7, green: 0.7, blue: 0.7, alpha: 1)
                //cell.tag = 33
                cell.isUserInteractionEnabled = false
            }
            else{
                cell.backgroundColor = UIColor(red: 1, green: 1, blue: 1, alpha: 0.69)
                cell.isUserInteractionEnabled = true
            }
        }else{
            cell.backgroundColor = UIColor(red: 1, green: 1, blue: 1, alpha: 0.69)
            cell.isUserInteractionEnabled = true
        }

        return cell
}
//點擊事件
func collectionView(_ collectionView: UICollectionView, didSelectItemAt indexPath: IndexPath) {
        selectMonth = indexPath.item + 1
}
今天和大家分享了兩個實際運用collection View的案例,有了collection View後讓介面製作的速度更快更方便了,很多需要讓使用者選擇的介面都能運用到,如果有其他可以運用的地方也歡迎留言和我分享,那麼我們明天再見囉~
